I’ve had a handful of people asking me for a good set of intstruction on how to install the Sega Saturn mod chips
I’m not responsible for any damage you may do to your Saturn by performing this modification. There isn’t much to worry about, but I just don’t want anybody mad at me 🙂
Thanks to Jess Ragan for his help in creating this guide!
What You Need
A model 2 (32-pin – usually round-buttoned) Saturn
Phillips head screwdriver with a long thin neck that can reach the Saturn’s case screws.
A copy of a Saturn game for testing purposes.
A nail file or something similar (may only need this if chip does not fit snugly)
Step 1 – Preparation
Keep your chip safe by leaving it in the anti-static bag that I ship them in.
Unplug your Saturn
Turn your Saturn upside down on a table
Remove the Saturn’s case screws
Put the screws in a safe place
Turn the Saturn right side up.
Step 2 – Install Chip and Hook-up Lens Cable
Look at the twisted white ribbon cable running from the center of the system to the shiny metal box on the right hand side.
Part of the ribbon will be taped to this metal box.
First peel the tape off the metal box, then gently unplug the right end of the ribbon cable.
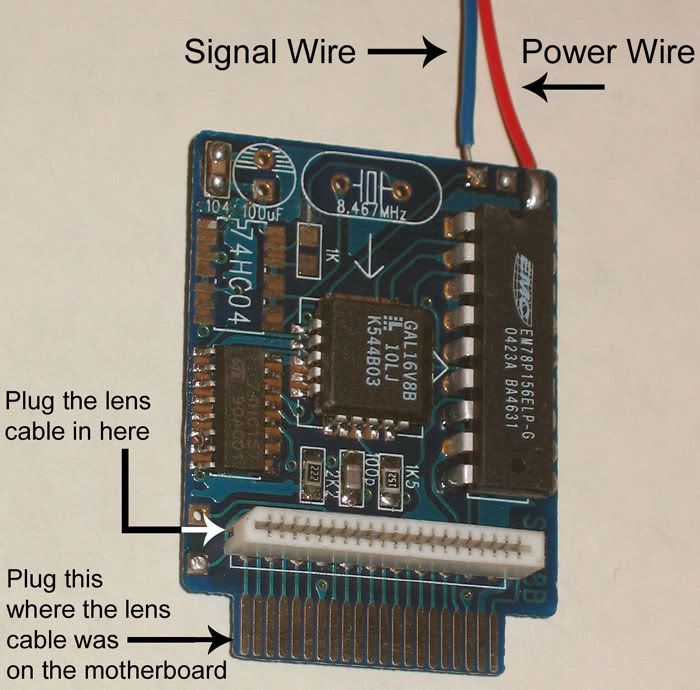
Take this end of the cable and plug it into the connector on the modchip as pointed out below.
Plug the chip itself into the plug where the lens cable was.
If the chip does not plug in easily, you may need to file down the side edges of the plug in order to give it a better fit. However, you shouldn’t put too much pressure on the chip because it can crack easily. And a very gentle side-to-side wiggle can help insert it into the socket.
Step 3 – Getting Link Cables Layed Out
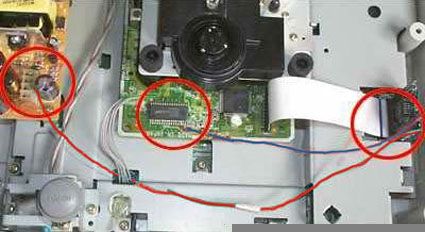
Below you can see the linking (soldering) points of the two cables from the IC chip towards the motherboad.
You can also see how the lens cable is to hooked up to the chip.
A close-up shot of both solder points follows in the next steps.
You may need to add some extra wire to extend the link cables’ reach across the machine.
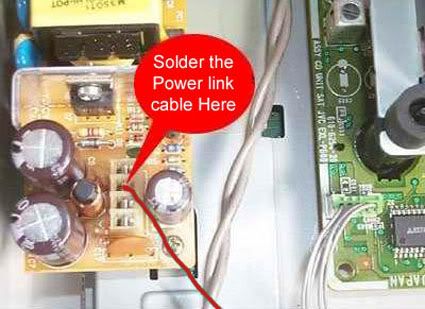
Step 4 – Connect the Power Link Cable
The small wire soldered into the left side of the mod chip is called a jumper cable
Attach this jumper cable to the Saturn to power the chip
On the left side of the Saturn, there are four metal pins in a vertical row
Take the end of the jumper cable and plug it into the second pin from the top (on the back of the unit) even if you see 5 pins instead of 4. (It’s the one marked 5VA — if one does not work, try the other).
Below is a close-up of where to solder the power cable (red)
Please note the power wire MUST solder to the power socket directly!
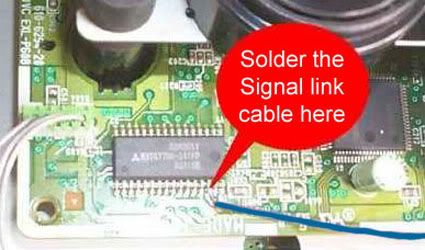
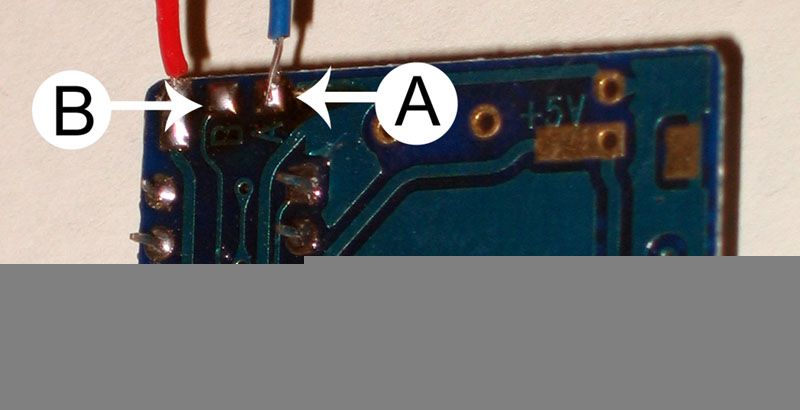
Step 5 – Connect the Signal Link Cable
There are two ways to do this step:
The original way was to solder the signal (blue) wire to pin 14 of the 32-pin chip.
To make this easier, put 2 pieces of thin cardboard surrounding and isolated the 14th pin
Then you soldered to the 14th pin very easily, ignoring the other pins
Below is close-up of where to solder the Signal cable (blue)
OR
You can get rid of the signal cable altogether and link the signal point to point B with a bit of solder instead of linking to pin 14 of the 32-pin chip.
Stick to good brand name CD-Rs and do not use CD-RWs
Burn at the slowest speed that your burner and media will allow
Check the region of the image before burning and make sure it matches the target console (use Saturn Region Patcher.)
If a burned game fails to boot but the Saturn displays the “Game disc is unsuitable for this console†message, then the burn and mod chip are working correctly but the region of the image is set to something different than the console’s region. If the console only displays audio tracks, the then the problem could be a bad image, bad burn, and/or mod chip installation issues.
When you click on links to various merchants on this site and make a purchase, this can result in this site earning a commission.
Affiliate programs and affiliations include, but are not limited to, the eBay Partner Network or Amazon Associates.
i bought a mod chip a few months ago, and unfortunately couldn’t test it right away due to buying a Saturn that was shot. So i finally got one yesterday, and tested it out, and i can’t seem to get backups running. I’ve followed the tutorial to the letter and still am having trouble. Could the chip itself be bad? Can i ship it to you to test it?? Let me know. thanks,
Awesome, pure awesome! Racketboy is very quick and responsive, and his mod chip works wonderfully! I can now stash my originals away for safekeeping! Thanks racketboy, I will try to buy more from you, though I don’t do ebay at the moment.
Thankyou for the chip just brilliant works perfect. Installation was very easy besides trying to fit the chip into the cd lens slot on mobo just ued the blade of the scissors to trim down the sides for a perfect fit.
I dont know which Saturn version I have. On the outside, it has round BLACK buttons; does that make a difference? I noticed the circuit board below the lens is a bit different, the 32 pin chip appears to be below the plastic part of the lens. Also, how big is the mod chip? From the pictures and from looking at my saturn it appears too big. If anyone could help me that would be great.
i just ordered this and i forgot one thing, do the backup games you burn have to be burnt at a certain speed like 4x or something? because i have a dreamcast and i couldent get burnt games to run unless i burnt the games at 4x speed. i have img burn and it was burning some games at 10.1x speed, is that too fast or does it not matter? if someone could help that would b great
hey dawgs thanks racket for the mod.. i just have one question dudes, i burned a game using alcohol (sf3 US) and when i boot it up it plays only the music of the game in a cd player…
Hi got my chip today thanks but I can’t get it to work have hoked it up as shown in the guid and followed very carfully
I have a model 2 saturn and am not new to the mod sece hace moded plenty of system in past but for some reason this will not work! With the chip in the saturn will not even spin up a disk no matter whats in there the lens will not fire anything but take it out an put the ribbon back on its own and it will work fine any ideas??
Thanks for the chip, works perfectly, just definitely could’ve used a smaller soldering tip than the only one I had at home. Now I can finally put the saturn back onto my shelf and play more than Space Hulk….
Excellent Mod chip!
Thank you so much for being one of the remainder USA Saturn mod chip venders. I appreciate the great response to my faulty chip problem, and the second chip worked flawlessly. It was a pleasure doing business with you and I hope you can satisfy Saturn fans for years to come.
Just a notation: When putting solder from point A to B it helps a lot if it is done on both sides. For one reason or another I did it on one side and had no response from the system, but when I applied it to the other side it worked fine. Does it matter which side you solder points A and B together or was it probably just a bad connection on the first try?
Mod chip and Memory card came the other day. Memory card didn’t seem to work but then i recalled that the old memory card I had died assuming it was the card. I’m not convinced it is the Saturn. Also I have the 64 pin Saturn which means a lot of pain in the ass. If i cant extend the memory what is the point of getting to play a lot of games. I’m on the hunt for a model 2 Saturn now. Excellent service from Racket boy, some confusion with the payment but he was responsive and pleasent
I have installed this on my Saturn w/ relative ease compared to Xbox, Wii, PSX and others and able to play those “games”. I have a question does a modchip exists that allows to play JAP games on a US saturn w/o the 4-1 in cart.
Hi mach_six! Nope — there aren’t any chips to take care of regions, but you can patch the ISOs of your games before burning so you don’t need a 4-in-1.
Installed within 15 minutes flat, so far works perfect for all the backups I have for my Model 2 Saturn. A way better solution to the swapping disc. I recommend this chip to anyone , and its really easy to install.
The shipping took about ten days, pretty good.
P.S. you are going to have to slightly file down the terminal of the modchip to get it to fit, but other then that, its all game playing.
Racketboy,
i bought a mod chip a few months ago, and unfortunately couldn’t test it right away due to buying a Saturn that was shot. So i finally got one yesterday, and tested it out, and i can’t seem to get backups running. I’ve followed the tutorial to the letter and still am having trouble. Could the chip itself be bad? Can i ship it to you to test it?? Let me know. thanks,
dan
Just wondering if I can still purchase a modchip for my Saturn. I actually own both Models so making sure this site and chip is still available.
Hope it is so that I can order a modchip for my Model 2. Will stop back frequently to see if I got a response.
Hey Racketboy,
Just bought a model 2 saturn and was interested in buying a mod chip for it. Thanks.
Awesome, pure awesome! Racketboy is very quick and responsive, and his mod chip works wonderfully! I can now stash my originals away for safekeeping! Thanks racketboy, I will try to buy more from you, though I don’t do ebay at the moment.
Good to see the latest date from pleased people was just a few weeks ago. Im planning to buy one and install over Christmas break…
i have a segs saturn and it will not turn on do you have any idea what the problem may be
i have a sega saturn and it will not turn on do you have any idea what the problem may be
Thankyou for the chip just brilliant works perfect. Installation was very easy besides trying to fit the chip into the cd lens slot on mobo just ued the blade of the scissors to trim down the sides for a perfect fit.
I dont know which Saturn version I have. On the outside, it has round BLACK buttons; does that make a difference? I noticed the circuit board below the lens is a bit different, the 32 pin chip appears to be below the plastic part of the lens. Also, how big is the mod chip? From the pictures and from looking at my saturn it appears too big. If anyone could help me that would be great.
i just ordered this and i forgot one thing, do the backup games you burn have to be burnt at a certain speed like 4x or something? because i have a dreamcast and i couldent get burnt games to run unless i burnt the games at 4x speed. i have img burn and it was burning some games at 10.1x speed, is that too fast or does it not matter? if someone could help that would b great
For the Saturn, I usually do 4X or 8X.
Best of luck!
hey dawgs thanks racket for the mod.. i just have one question dudes, i burned a game using alcohol (sf3 US) and when i boot it up it plays only the music of the game in a cd player…
???
Thanks!
Hi, can you tell me if this modchip will instal/work on a white *import* Saturn?
Sorry by import I meant Japan…
The region on the Saturn doesn’t matter — the main concern is what it looks like inside.
Hi got my chip today thanks but I can’t get it to work have hoked it up as shown in the guid and followed very carfully
I have a model 2 saturn and am not new to the mod sece hace moded plenty of system in past but for some reason this will not work! With the chip in the saturn will not even spin up a disk no matter whats in there the lens will not fire anything but take it out an put the ribbon back on its own and it will work fine any ideas??
Thanks for the chip, works perfectly, just definitely could’ve used a smaller soldering tip than the only one I had at home. Now I can finally put the saturn back onto my shelf and play more than Space Hulk….
Excellent Mod chip!
Thank you so much for being one of the remainder USA Saturn mod chip venders. I appreciate the great response to my faulty chip problem, and the second chip worked flawlessly. It was a pleasure doing business with you and I hope you can satisfy Saturn fans for years to come.
Just a notation: When putting solder from point A to B it helps a lot if it is done on both sides. For one reason or another I did it on one side and had no response from the system, but when I applied it to the other side it worked fine. Does it matter which side you solder points A and B together or was it probably just a bad connection on the first try?
hello i live in the uk can you guys ship out a mod chip for me ? thanks
Yup — I ship to the UK all the time 🙂
Mod chip and Memory card came the other day. Memory card didn’t seem to work but then i recalled that the old memory card I had died assuming it was the card. I’m not convinced it is the Saturn. Also I have the 64 pin Saturn which means a lot of pain in the ass. If i cant extend the memory what is the point of getting to play a lot of games. I’m on the hunt for a model 2 Saturn now. Excellent service from Racket boy, some confusion with the payment but he was responsive and pleasent
Whoops I re-read what i typed. I should say I’m convinced it is the SATURN that is broken NOT the memory card from Racket boy.
I have installed this on my Saturn w/ relative ease compared to Xbox, Wii, PSX and others and able to play those “games”. I have a question does a modchip exists that allows to play JAP games on a US saturn w/o the 4-1 in cart.
Hi mach_six! Nope — there aren’t any chips to take care of regions, but you can patch the ISOs of your games before burning so you don’t need a 4-in-1.
Easy and free 🙂
Thanks Racketboy!
Installed within 15 minutes flat, so far works perfect for all the backups I have for my Model 2 Saturn. A way better solution to the swapping disc. I recommend this chip to anyone , and its really easy to install.
The shipping took about ten days, pretty good.
P.S. you are going to have to slightly file down the terminal of the modchip to get it to fit, but other then that, its all game playing.
Thank You