I’ve had a handful of people asking me for a good set of intstruction on how to install the Sega Saturn mod chips
I’m not responsible for any damage you may do to your Saturn by performing this modification. There isn’t much to worry about, but I just don’t want anybody mad at me 🙂
Thanks to Jess Ragan for his help in creating this guide!
What You Need
A model 2 (32-pin – usually round-buttoned) Saturn
Phillips head screwdriver with a long thin neck that can reach the Saturn’s case screws.
A copy of a Saturn game for testing purposes.
A nail file or something similar (may only need this if chip does not fit snugly)
Step 1 – Preparation
Keep your chip safe by leaving it in the anti-static bag that I ship them in.
Unplug your Saturn
Turn your Saturn upside down on a table
Remove the Saturn’s case screws
Put the screws in a safe place
Turn the Saturn right side up.
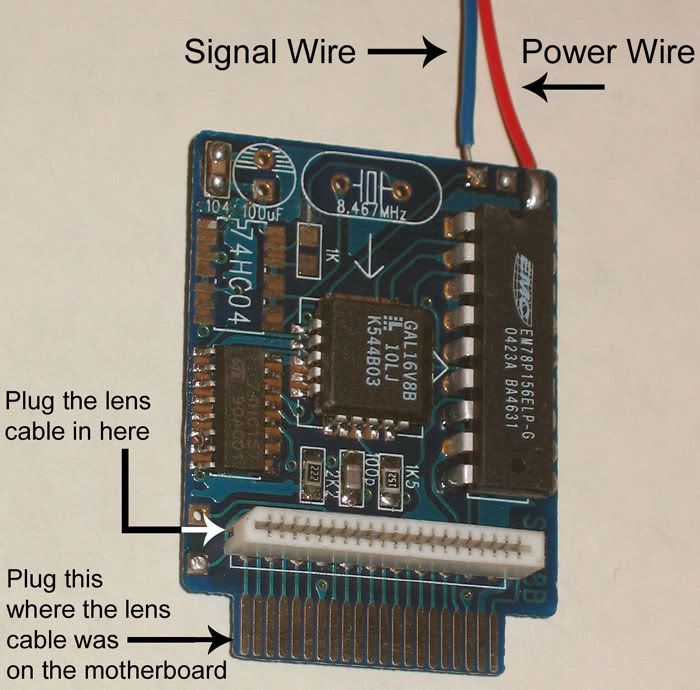
Step 2 – Install Chip and Hook-up Lens Cable
Look at the twisted white ribbon cable running from the center of the system to the shiny metal box on the right hand side.
Part of the ribbon will be taped to this metal box.
First peel the tape off the metal box, then gently unplug the right end of the ribbon cable.
Take this end of the cable and plug it into the connector on the modchip as pointed out below.
Plug the chip itself into the plug where the lens cable was.
If the chip does not plug in easily, you may need to file down the side edges of the plug in order to give it a better fit. However, you shouldn’t put too much pressure on the chip because it can crack easily. And a very gentle side-to-side wiggle can help insert it into the socket.
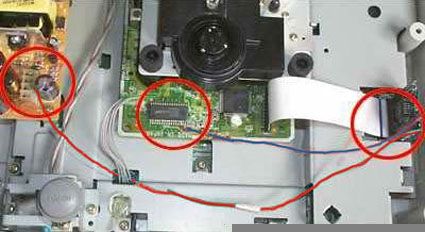
Step 3 – Getting Link Cables Layed Out
Below you can see the linking (soldering) points of the two cables from the IC chip towards the motherboad.
You can also see how the lens cable is to hooked up to the chip.
A close-up shot of both solder points follows in the next steps.
You may need to add some extra wire to extend the link cables’ reach across the machine.
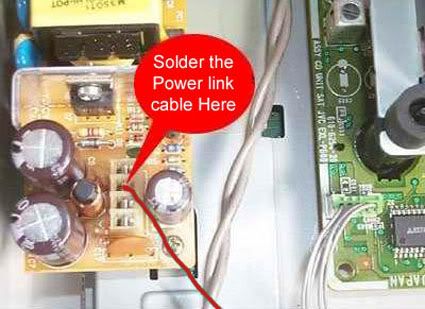
Step 4 – Connect the Power Link Cable
The small wire soldered into the left side of the mod chip is called a jumper cable
Attach this jumper cable to the Saturn to power the chip
On the left side of the Saturn, there are four metal pins in a vertical row
Take the end of the jumper cable and plug it into the second pin from the top (on the back of the unit) even if you see 5 pins instead of 4. (It’s the one marked 5VA — if one does not work, try the other).
Below is a close-up of where to solder the power cable (red)
Please note the power wire MUST solder to the power socket directly!
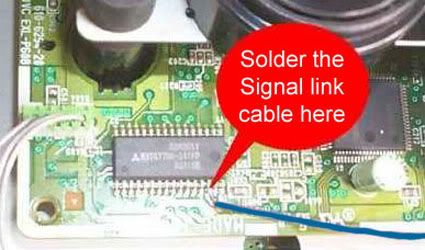
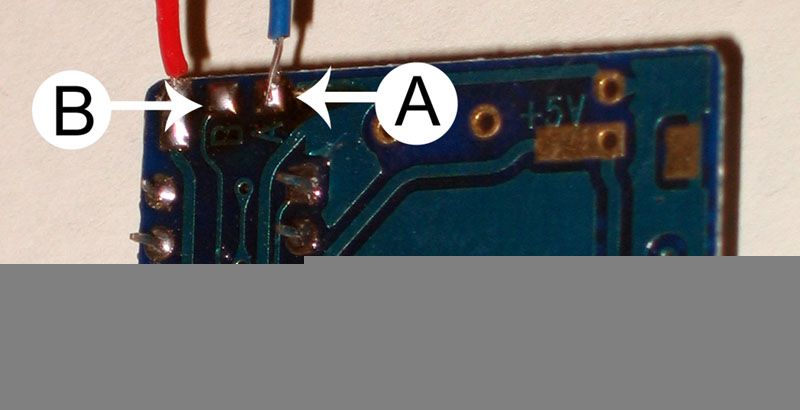
Step 5 – Connect the Signal Link Cable
There are two ways to do this step:
The original way was to solder the signal (blue) wire to pin 14 of the 32-pin chip.
To make this easier, put 2 pieces of thin cardboard surrounding and isolated the 14th pin
Then you soldered to the 14th pin very easily, ignoring the other pins
Below is close-up of where to solder the Signal cable (blue)
OR
You can get rid of the signal cable altogether and link the signal point to point B with a bit of solder instead of linking to pin 14 of the 32-pin chip.
Stick to good brand name CD-Rs and do not use CD-RWs
Burn at the slowest speed that your burner and media will allow
Check the region of the image before burning and make sure it matches the target console (use Saturn Region Patcher.)
If a burned game fails to boot but the Saturn displays the “Game disc is unsuitable for this console†message, then the burn and mod chip are working correctly but the region of the image is set to something different than the console’s region. If the console only displays audio tracks, the then the problem could be a bad image, bad burn, and/or mod chip installation issues.
When you click on links to various merchants on this site and make a purchase, this can result in this site earning a commission.
Affiliate programs and affiliations include, but are not limited to, the eBay Partner Network or Amazon Associates.
Great chip, fast shipping. Only had to solder the power wire and make a solder bridge between points A and B. The red power wire was a little bit short, but still reached.
Hey, Got my chip installing on a model 2 32pin. I got everything in and used the A+B method, soldered at the power point. But when I tried to fire her up afterwards the drive motor would not spin, and even if there was nothing in the drive it said checking disc. After checking for snug connections i noticed the drive open indicator position did not matter it still did it. Long story short 10 mins later I resoldered the A-B connection, and vwalla everything works great. My advice to anyone doing this method is to completely unsolder the wire the comes on the chip and drop a bead bridge between the two for the best connection.
I had two failures before getting it successfully working, but that was just difficulties getting the cd cable passthrough properly plugged in. I very slightly filed the edges of the connector and tried again, and it’s all up and running.
I used the A->B bridge technique, on a model 2 Saturn which works great so far. For a hardware mod chip, this was about as painless of an install as I think you can get.
Looks like my Saturn is back in business! Very cool.
Wass Up Racket Boy, I got your chip in today. It took about three day’s, not including new years day, and the day after. I quickly got it working in about 2 hours. I wish the directions would be a little clearer though. I did everything in the guide, but could’nt get it to work. I then looked over the guide a bit more, and in the picture, which I could hardly see, that there were 3 pins,were the wires were going into. I was doing the A + B method. What I did was solder the power wire, over the middle connection then into the signal wire. I soldered all three in to it. I then diagnosed the problem by doing it all over again, reconnecting everything, and doing the soldering again. But I had to Desolder the 3 braids and connect the power wire, then the a+b method solder. Everything is good to go. I almost thought is wasnt working, because I put in a downloaded ISO,and it said “Game Disc Unsuitable for this system.” Then I figured it was a japanese game and did’nt patch the iso. But I quickly burned my U.S Game and it boots FLAWLESSLY NOW.
Directions I Did.(Model 2)
1) Take out 5 Screws underneath Saturn.
2) Lift out top, and Disconnect Ribbon Cables for drive, and ground yourself.
3)On the chip, desolder the signal wire, and save it. Connect the middle tab to the signal tab with solder.
4) Shave off sides with scissor, the sides that goes into the old ribbon cable.
5) Plug CD Ribbon cable to modchip, then into the Mother Board.
6) Use the extra signal wire and solder it to the end of the power wire. It’s a little to short, and if installed with tension my come out over time. So I just used the signal wire and soldered it the the 5 volt cable.
7) Check to see if it works, and put back case and screws.
P.S. Racket Boy, Could I buy the complete U.S. Saturn Game Set?
I bought the mod chip from Racketboy, and have now got it working on an Australian Saturn.
Saturn: MK-80200A-03 (32pin model 2 equiv)
I initially soldered the signal line to pin 14, but this didn’t work at all (CD spindle didn’t power up and start spinning). I found that when I switched to the (simpler) A+B method it all worked perfectly!
Thanks.
(most trouble I had was discovering that the Australian Saturn is set to Europe region – was expecting the east asian one…)
I just received my Sega Saturn that I got from eBay (model 2). I had my chip for a few days now so today was the day! I followed all instructions I could find here, then I decided to try it. (Btw, I used the 14 pin method using scotch tape only) When I saw that the Saturn animation didn’t showed anymore, I knew there was something wrong. I tried many things for a few hours, then I thought that there was probably a power problem. I finally got to put the red wire in its place carefully. Then I started my Saturn again, the animation was back! My brother was totally skeptical about all that. I told him: “Believe me, it’s gonna work!†So I patched Radiant Silvergun then burned it. You know what? It works!!! Everything is just fine! Thank you RacketBoy! I know absolutely nothing about electronics and I managed to mod my Saturn so believe me, anyone can!
Great mod, fantastic instructions. I soldered to the 14th pin (I couldn’t get the loop option work). Everything works great. Thanks for being the last option out there 🙂 Now we just need these kind of instructions for the NES 2 a/v mod!!!
Have you any plans to get the Saturn mod chips back in Racketboy? If not does anyone know where a UK gamer and Shining Force 3 lover might find one or a pre-modded Saturn?
Thanks Racketboy for the ultra-fast shipping! Some things I noticed in the progress of installing the chip:
1. Since I had a 64-pin chip instead of the 32-pin chip on the motherboard, I used the A-B method, just melting the solder already on the contact B and connecting the black wire to it.
2. First time I checked it, I put the mod chip in backwards. 2nd time, I had the lens cable in backwards. Then it worked.
3. It works, but in a weird way. CD-R and real game both boot into the cd-player. After hitting ‘play’ when the songs of the disc appear, I hit reset and the system boots into the game. A little more intricate than I would have liked, but can’t really complain. Guardian Heroes works great.
Hey racketboy. Do you have more Saturn Modchips. I would like to buy one more, and pick up another model 2 saturn. How much would you like for 1 more chip and the set of Saturn ISO’s? Please racketboy.
Email me at [email protected]
Thanks
i bought one of your chips a while ago but couldn’t get it working. its a 32 pin pal saturn and i connected the A & B points together.
the weird thing is that with the chip installed not even originals boot. it only enters the menu where i can play the music that’s on the cd (original or backup).
any idea whats wrong?
hey racketboy, I was wanting to purchase a modchip, but it says in the comments here you might not have any, but it also says in the page for the modchip that they are in stock… sooo? I was willing to pay for one tonight
Hey Racketboy, do you know how I can get Rocketbeetle (from the segaxtreme.net forums)’s attention. He’s never on the forums and I need to know more about that switch he installed on the saturn. Like what kind of switch do I need and where do I get it?
Just wanted to let you know I got my modchip yesterday and installed it last night in my Model 2 system. Installation was a breeze, even with what little soldering skill I have. Got a solder line from A->B, had to trim the excess board on either side of the mobo connector of the chip to get it to fit. The power lead was plenty long so there were no worries with that. Worked right away.
Thanks! The chip works flawlessly. The power wire was a little too short, but who cares?
If this was eBay feedback I’d have to say “A+ seller, will buy again!”
Installing for a friend, I’m getting the “disc unsuitable for this system error”, too bad he didn’t give me any real games to rule out problems with.
Sounds like they are imports that need to be patched.
Check out this link:
Playing Imports On a Saturn
Great chip, fast shipping. Only had to solder the power wire and make a solder bridge between points A and B. The red power wire was a little bit short, but still reached.
Hey, Got my chip installing on a model 2 32pin. I got everything in and used the A+B method, soldered at the power point. But when I tried to fire her up afterwards the drive motor would not spin, and even if there was nothing in the drive it said checking disc. After checking for snug connections i noticed the drive open indicator position did not matter it still did it. Long story short 10 mins later I resoldered the A-B connection, and vwalla everything works great. My advice to anyone doing this method is to completely unsolder the wire the comes on the chip and drop a bead bridge between the two for the best connection.
hi my name is Carlos and I live in Chile, would you accept western union money transfer as payment?
Just got my Saturn Mod chip.
I had two failures before getting it successfully working, but that was just difficulties getting the cd cable passthrough properly plugged in. I very slightly filed the edges of the connector and tried again, and it’s all up and running.
I used the A->B bridge technique, on a model 2 Saturn which works great so far. For a hardware mod chip, this was about as painless of an install as I think you can get.
Looks like my Saturn is back in business! Very cool.
Wass Up Racket Boy, I got your chip in today. It took about three day’s, not including new years day, and the day after. I quickly got it working in about 2 hours. I wish the directions would be a little clearer though. I did everything in the guide, but could’nt get it to work. I then looked over the guide a bit more, and in the picture, which I could hardly see, that there were 3 pins,were the wires were going into. I was doing the A + B method. What I did was solder the power wire, over the middle connection then into the signal wire. I soldered all three in to it. I then diagnosed the problem by doing it all over again, reconnecting everything, and doing the soldering again. But I had to Desolder the 3 braids and connect the power wire, then the a+b method solder. Everything is good to go. I almost thought is wasnt working, because I put in a downloaded ISO,and it said “Game Disc Unsuitable for this system.” Then I figured it was a japanese game and did’nt patch the iso. But I quickly burned my U.S Game and it boots FLAWLESSLY NOW.
Directions I Did.(Model 2)
1) Take out 5 Screws underneath Saturn.
2) Lift out top, and Disconnect Ribbon Cables for drive, and ground yourself.
3)On the chip, desolder the signal wire, and save it. Connect the middle tab to the signal tab with solder.
4) Shave off sides with scissor, the sides that goes into the old ribbon cable.
5) Plug CD Ribbon cable to modchip, then into the Mother Board.
6) Use the extra signal wire and solder it to the end of the power wire. It’s a little to short, and if installed with tension my come out over time. So I just used the signal wire and soldered it the the 5 volt cable.
7) Check to see if it works, and put back case and screws.
P.S. Racket Boy, Could I buy the complete U.S. Saturn Game Set?
JJCoolBoy3000
For any other Australians:
I bought the mod chip from Racketboy, and have now got it working on an Australian Saturn.
Saturn: MK-80200A-03 (32pin model 2 equiv)
I initially soldered the signal line to pin 14, but this didn’t work at all (CD spindle didn’t power up and start spinning). I found that when I switched to the (simpler) A+B method it all worked perfectly!
Thanks.
(most trouble I had was discovering that the Australian Saturn is set to Europe region – was expecting the east asian one…)
Hi,
I just received my Sega Saturn that I got from eBay (model 2). I had my chip for a few days now so today was the day! I followed all instructions I could find here, then I decided to try it. (Btw, I used the 14 pin method using scotch tape only) When I saw that the Saturn animation didn’t showed anymore, I knew there was something wrong. I tried many things for a few hours, then I thought that there was probably a power problem. I finally got to put the red wire in its place carefully. Then I started my Saturn again, the animation was back! My brother was totally skeptical about all that. I told him: “Believe me, it’s gonna work!†So I patched Radiant Silvergun then burned it. You know what? It works!!! Everything is just fine! Thank you RacketBoy! I know absolutely nothing about electronics and I managed to mod my Saturn so believe me, anyone can!
Thanks a lot!
– Kurt Ohboy
Great mod, fantastic instructions. I soldered to the 14th pin (I couldn’t get the loop option work). Everything works great. Thanks for being the last option out there 🙂 Now we just need these kind of instructions for the NES 2 a/v mod!!!
Hey there I want to buy a Satmod I live in Mexico who buy?
Have you any plans to get the Saturn mod chips back in Racketboy? If not does anyone know where a UK gamer and Shining Force 3 lover might find one or a pre-modded Saturn?
There is a possibility, but I can’t make any promises.
Thanks Racketboy for the ultra-fast shipping! Some things I noticed in the progress of installing the chip:
1. Since I had a 64-pin chip instead of the 32-pin chip on the motherboard, I used the A-B method, just melting the solder already on the contact B and connecting the black wire to it.
2. First time I checked it, I put the mod chip in backwards. 2nd time, I had the lens cable in backwards. Then it worked.
3. It works, but in a weird way. CD-R and real game both boot into the cd-player. After hitting ‘play’ when the songs of the disc appear, I hit reset and the system boots into the game. A little more intricate than I would have liked, but can’t really complain. Guardian Heroes works great.
Hey racketboy. Do you have more Saturn Modchips. I would like to buy one more, and pick up another model 2 saturn. How much would you like for 1 more chip and the set of Saturn ISO’s? Please racketboy.
Email me at [email protected]
Thanks
hey racketboy,
i bought one of your chips a while ago but couldn’t get it working. its a 32 pin pal saturn and i connected the A & B points together.
the weird thing is that with the chip installed not even originals boot. it only enters the menu where i can play the music that’s on the cd (original or backup).
any idea whats wrong?
hey racketboy, I was wanting to purchase a modchip, but it says in the comments here you might not have any, but it also says in the page for the modchip that they are in stock… sooo? I was willing to pay for one tonight
Silviu, have you gone through the suggestions in the troubleshooting page?
http://www.racketboy.com/retro/2005/06/sega-saturn-modchip-troubleshooting.html
Rob, yes, I have some at this moment.
Thanks for your interest!
awesome, ordered one anyway this morning before i read this, can’t wait to put the baby in!
I think I’ll buy one when I get paid.
Hey Racketboy, do you know how I can get Rocketbeetle (from the segaxtreme.net forums)’s attention. He’s never on the forums and I need to know more about that switch he installed on the saturn. Like what kind of switch do I need and where do I get it?
hi, do you still have modchip in stock?
thx!
Just wanted to let you know I got my modchip yesterday and installed it last night in my Model 2 system. Installation was a breeze, even with what little soldering skill I have. Got a solder line from A->B, had to trim the excess board on either side of the mobo connector of the chip to get it to fit. The power lead was plenty long so there were no worries with that. Worked right away.
Thanks! The chip works flawlessly. The power wire was a little too short, but who cares?
If this was eBay feedback I’d have to say “A+ seller, will buy again!”
does this work on a model 1 pal uk saturn?
Not a model 1, sorry…