I’ve had a handful of people asking me for a good set of intstruction on how to install the Sega Saturn mod chips
I’m not responsible for any damage you may do to your Saturn by performing this modification. There isn’t much to worry about, but I just don’t want anybody mad at me 🙂
Thanks to Jess Ragan for his help in creating this guide!
What You Need
A model 2 (32-pin – usually round-buttoned) Saturn
Phillips head screwdriver with a long thin neck that can reach the Saturn’s case screws.
A copy of a Saturn game for testing purposes.
A nail file or something similar (may only need this if chip does not fit snugly)
Step 1 – Preparation
Keep your chip safe by leaving it in the anti-static bag that I ship them in.
Unplug your Saturn
Turn your Saturn upside down on a table
Remove the Saturn’s case screws
Put the screws in a safe place
Turn the Saturn right side up.
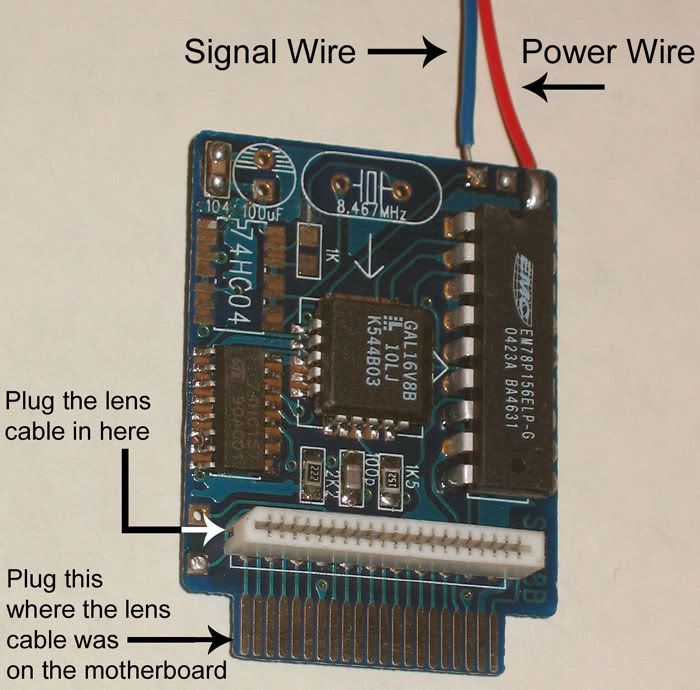
Step 2 – Install Chip and Hook-up Lens Cable
Look at the twisted white ribbon cable running from the center of the system to the shiny metal box on the right hand side.
Part of the ribbon will be taped to this metal box.
First peel the tape off the metal box, then gently unplug the right end of the ribbon cable.
Take this end of the cable and plug it into the connector on the modchip as pointed out below.
Plug the chip itself into the plug where the lens cable was.
If the chip does not plug in easily, you may need to file down the side edges of the plug in order to give it a better fit. However, you shouldn’t put too much pressure on the chip because it can crack easily. And a very gentle side-to-side wiggle can help insert it into the socket.
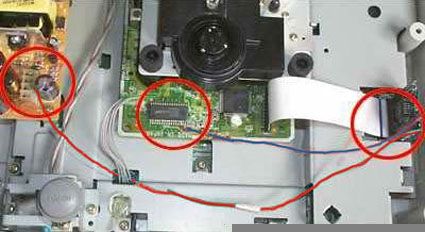
Step 3 – Getting Link Cables Layed Out
Below you can see the linking (soldering) points of the two cables from the IC chip towards the motherboad.
You can also see how the lens cable is to hooked up to the chip.
A close-up shot of both solder points follows in the next steps.
You may need to add some extra wire to extend the link cables’ reach across the machine.
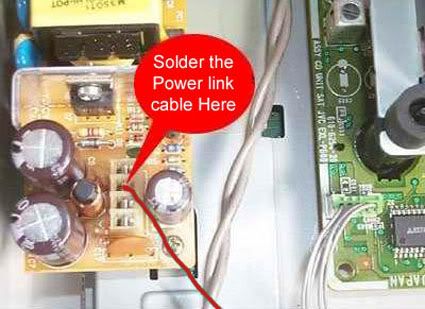
Step 4 – Connect the Power Link Cable
The small wire soldered into the left side of the mod chip is called a jumper cable
Attach this jumper cable to the Saturn to power the chip
On the left side of the Saturn, there are four metal pins in a vertical row
Take the end of the jumper cable and plug it into the second pin from the top (on the back of the unit) even if you see 5 pins instead of 4. (It’s the one marked 5VA — if one does not work, try the other).
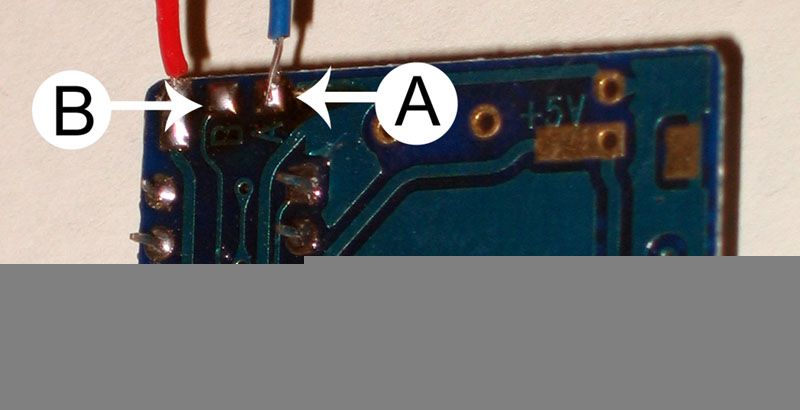
Below is a close-up of where to solder the power cable (red)
Please note the power wire MUST solder to the power socket directly!
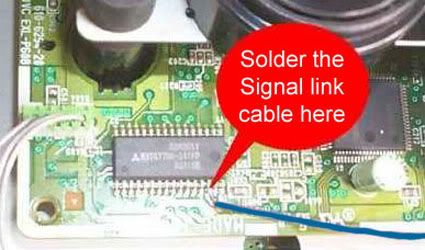
Step 5 – Connect the Signal Link Cable
There are two ways to do this step:
The original way was to solder the signal (blue) wire to pin 14 of the 32-pin chip.
To make this easier, put 2 pieces of thin cardboard surrounding and isolated the 14th pin
Then you soldered to the 14th pin very easily, ignoring the other pins
Below is close-up of where to solder the Signal cable (blue)
OR
You can get rid of the signal cable altogether and link the signal point to point B with a bit of solder instead of linking to pin 14 of the 32-pin chip.
Stick to good brand name CD-Rs and do not use CD-RWs
Burn at the slowest speed that your burner and media will allow
Check the region of the image before burning and make sure it matches the target console (use Saturn Region Patcher.)
If a burned game fails to boot but the Saturn displays the “Game disc is unsuitable for this console†message, then the burn and mod chip are working correctly but the region of the image is set to something different than the console’s region. If the console only displays audio tracks, the then the problem could be a bad image, bad burn, and/or mod chip installation issues.
When you click on links to various merchants on this site and make a purchase, this can result in this site earning a commission.
Affiliate programs and affiliations include, but are not limited to, the eBay Partner Network or Amazon Associates.
I just wanted to give a big THANK YOU to racketboy! Your tutorial was great and following everything to the T helped out. Whoever does this make SURE you really push that chip into the slot on the board! That messed me up for a bit and yes, bridging the A+B spots on the chip was much easier than adding a cable to that extremely small 14th pin.
Thanks also for the quick shipping and service. If you sell anything else other than the chip and the RAM Expansion cart, I would buy from you. Great help!
I´ve just installed a modchip in my sanyo saturn console, the A+B method didn´t work though, but I´ve done the “A to 7th pin of the sanyo chip” bridge and your chip worked flawlessly.
Big Thank You.
It has been a pleasure doing business with you and I am very satisfied with your communication throughout the transaction and how fast the mod chip arrived. The mod chip works great. If anyone is doing the signal wire method, I would suggest melting some solder on the end of the signal wire and then soldering it to the 14th pin because this way you don’t have to worry about holding the wire, solder, and soldering iron. It made it a lot easier for me anyway.
I have a model 2 32 pin Sega Saturn. Installed the chip with the A-B bridge, and the cd-rom won’t spin up. I get checking disc and 2 green cubes. I read it could be a power problem. Is here another point I can soldier the power to on the chip?
I have received my mod chip just 3 days ago and I have not yet been able to get it to work. I have a 64 pin Model 2 US Saturn, so I followed this site’s instructions ( http://www.angelfire.com/pa/Raluminat/model264.html ).
First time I tried the A+B method but seeing that wouldn’t do the trick I soldered the signal cable to the 8th pin in the 64 pin chip like pointed out on the instructions. I’m still getting the same results.
Disk spins but lens does not attempt to read it like it should were the mod chip not installed ( I tried removing the mod chip and replugging the ribbon to see if my Saturn still worked that way and it did ) and Saturn goes directly to the music playing BIOS where I am able to play the music tracks of the game ( letting me know the device is able to read the disc when the mod chip is inside it ).
What do you suggest me doing ?. Should I desolder the A+B bridge so that only one method is used ?
I have already unplugged and replugged both the mod chip and the ribbon many times to make sure it’s not a matter of the chip not fitting in nice into the motherboard like many other users reported. I even filed down the end of the chip as other users suggested , but that didn’t help either.
Hi I just got mi modchip today, I have a question, the power cable goes on the pin or in the socket? the socket is the round tube that goes bellow of the pin line up?
A>B worked for me. If you look on the model 2 (8000A), pin 14 off that chip on the CD assembly goes to the bottom pin on the ribbon cable. On the modchip, the bottom pin from the ribbon goes to B.
As for the power, I used a small “Y” splade, like you would stick on a wire and then use under a screw with a ground wire or such. I snipped off one branch so I just had one little thin blade. That slipped into the clip next to the post to tap the power fairly snugly. I shouldn’t have any issues with it slipping out and since A>B worked for me, my chip is easy to pop out if (when) I have to swap it into another Saturn. = ]
No one seems to answer this very simple question. I have a Model 2 Sega Saturn (32pin) and I just ordered a mod chip from this website and I cant figure out where I need to solder the power wire to the power supply (5V). There is a socket with a round metal piece and inside the socket is a pin that is sticking up. Do i solder the power wire to the ruond metal piece or the metal pin that is sticking out in the 5V socket?
I installed mine today in my Model 2. Works great. It didnt work at first, but I re-did all the soldering again and re-did the power wire to get it working. Thanks!
Hello Racket Boy, i have bought an Hitachi Hi-Saturn with a pre installed chip… it seems similar to the one installed on model 2, but there is only the red cable solded. At first the modchip worked but now it doesn’t. I also have some problems with the original discs. If i try to boot the sistem it only recognizes them as audio cds. So i have opened the saturn and booted an original cd and it works. When i put back the front on the console, it still recognizes them as audio cd… How can i do?
Had my chip for long while now but only just now had a chance to try it. Installed fine on my model 2 and loads originals perfectly but any copy I tried results in it not being read or loading.
Sadly I only have one type of CD-R media on me at the moment (Sony Corp 97m24s16f) and don’t know what good type to get to try, any good brand I should get??
Or is there a way to test to see if my chip is working perfectly without a working media??
Hey, is the new red chip you’re selling the same as the one in the pics as far as functionality goes? I have a model 1, it’s very important to me that it does…
Hey, Received the chip last week. I have 2 saturns both model 2 but 1 is the 32IC version and the other the 64IC. I installed the mod in the 32IC version. It did play original games but saw the backups as an audio cd. Tried the swap method and found that the backups are working fine so it must be the modchip. After some measuring i found out the power to the chip just wasn’t good enough. Restripped the power cable and resoldered it firmly on the +5v connector. Now it’s working like a charm.
two things, the link to segaXtream forum links to the wrong thread, it goes to some void sticker on nba jam thread.
second, i get the 404 page when i try to add the chip to my cart, are they no longer available?
thanks!
Hey, I have an oval button Saturn. Can this tutorial work on mine or are there major differences between generations? Does this mod chip enable region free play or just backup?
I just wanted to give a big THANK YOU to racketboy! Your tutorial was great and following everything to the T helped out. Whoever does this make SURE you really push that chip into the slot on the board! That messed me up for a bit and yes, bridging the A+B spots on the chip was much easier than adding a cable to that extremely small 14th pin.
Thanks also for the quick shipping and service. If you sell anything else other than the chip and the RAM Expansion cart, I would buy from you. Great help!
I´ve just installed a modchip in my sanyo saturn console, the A+B method didn´t work though, but I´ve done the “A to 7th pin of the sanyo chip” bridge and your chip worked flawlessly.
Big Thank You.
Hello racketboy,
It has been a pleasure doing business with you and I am very satisfied with your communication throughout the transaction and how fast the mod chip arrived. The mod chip works great. If anyone is doing the signal wire method, I would suggest melting some solder on the end of the signal wire and then soldering it to the 14th pin because this way you don’t have to worry about holding the wire, solder, and soldering iron. It made it a lot easier for me anyway.
I have a model 2 32 pin Sega Saturn. Installed the chip with the A-B bridge, and the cd-rom won’t spin up. I get checking disc and 2 green cubes. I read it could be a power problem. Is here another point I can soldier the power to on the chip?
Have you tried soldering the signal wire to the chip instead of the A+B method?
Dear Racketboy :
I have received my mod chip just 3 days ago and I have not yet been able to get it to work. I have a 64 pin Model 2 US Saturn, so I followed this site’s instructions ( http://www.angelfire.com/pa/Raluminat/model264.html ).
First time I tried the A+B method but seeing that wouldn’t do the trick I soldered the signal cable to the 8th pin in the 64 pin chip like pointed out on the instructions. I’m still getting the same results.
Disk spins but lens does not attempt to read it like it should were the mod chip not installed ( I tried removing the mod chip and replugging the ribbon to see if my Saturn still worked that way and it did ) and Saturn goes directly to the music playing BIOS where I am able to play the music tracks of the game ( letting me know the device is able to read the disc when the mod chip is inside it ).
What do you suggest me doing ?. Should I desolder the A+B bridge so that only one method is used ?
I have already unplugged and replugged both the mod chip and the ribbon many times to make sure it’s not a matter of the chip not fitting in nice into the motherboard like many other users reported. I even filed down the end of the chip as other users suggested , but that didn’t help either.
Thank you in advance,
Firtermish
Sorry for what I said before, I was partially wrong.
The modchip does work ! . Thing is, it works differently than I expected it to.
I have to open and close the door trap for the game to be read and played , a bit annoying but at least the chip works fine.
Thank you for the fast shipping ( around 2 weeks from US to Argentina ), great support and website.
Saludos !
Fabian
Hi I just got mi modchip today, I have a question, the power cable goes on the pin or in the socket? the socket is the round tube that goes bellow of the pin line up?
Does this answer your question?
http://www.racketboy.com/forum/viewtopic.php?f=17&t=8930&sid=ae1495935b27cfdc55724d422501e2ec
A>B worked for me. If you look on the model 2 (8000A), pin 14 off that chip on the CD assembly goes to the bottom pin on the ribbon cable. On the modchip, the bottom pin from the ribbon goes to B.
As for the power, I used a small “Y” splade, like you would stick on a wire and then use under a screw with a ground wire or such. I snipped off one branch so I just had one little thin blade. That slipped into the clip next to the post to tap the power fairly snugly. I shouldn’t have any issues with it slipping out and since A>B worked for me, my chip is easy to pop out if (when) I have to swap it into another Saturn. = ]
No one seems to answer this very simple question. I have a Model 2 Sega Saturn (32pin) and I just ordered a mod chip from this website and I cant figure out where I need to solder the power wire to the power supply (5V). There is a socket with a round metal piece and inside the socket is a pin that is sticking up. Do i solder the power wire to the ruond metal piece or the metal pin that is sticking out in the 5V socket?
Try this forum thread (also mentioned above)
http://www.racketboy.com/forum/viewtopic.php?f=17&t=8930&sid=ae1495935b27cfdc55724d422501e2ec
Best of luck 🙂
Wanting to buy a model 2 jap saturn.Would like to know if you still sell the chips.And will it work on the white jap model 2 saturn?Thank you
Yup — still selling them and it should work fine 🙂
just got my chip yeasterday had isssue with the power link had to re strip it but after that works like a charm thanks!
I installed mine today in my Model 2. Works great. It didnt work at first, but I re-did all the soldering again and re-did the power wire to get it working. Thanks!
Hello Racket Boy, i have bought an Hitachi Hi-Saturn with a pre installed chip… it seems similar to the one installed on model 2, but there is only the red cable solded. At first the modchip worked but now it doesn’t. I also have some problems with the original discs. If i try to boot the sistem it only recognizes them as audio cds. So i have opened the saturn and booted an original cd and it works. When i put back the front on the console, it still recognizes them as audio cd… How can i do?
Had my chip for long while now but only just now had a chance to try it. Installed fine on my model 2 and loads originals perfectly but any copy I tried results in it not being read or loading.
Sadly I only have one type of CD-R media on me at the moment (Sony Corp 97m24s16f) and don’t know what good type to get to try, any good brand I should get??
Or is there a way to test to see if my chip is working perfectly without a working media??
Thank you all
Thanks a million for the chip. Good price, fast shipping, and it works great.
I got my chip working using conductive glue rather than solder – seems easier and less expensive
http://www.thinkgeek.com/gadgets/tools/b70c/?source=google_gadgets&cpg=oggdgt1&gclid=CL3phqD5qqQCFUNM5QodKgyA3g
Hey, is the new red chip you’re selling the same as the one in the pics as far as functionality goes? I have a model 1, it’s very important to me that it does…
Yeah, the functionality is exactly the same — color is just different 🙂
Thanks for your interest!
But Model 1s can be trickier to install
Hey, Received the chip last week. I have 2 saturns both model 2 but 1 is the 32IC version and the other the 64IC. I installed the mod in the 32IC version. It did play original games but saw the backups as an audio cd. Tried the swap method and found that the backups are working fine so it must be the modchip. After some measuring i found out the power to the chip just wasn’t good enough. Restripped the power cable and resoldered it firmly on the +5v connector. Now it’s working like a charm.
many thanks.
two things, the link to segaXtream forum links to the wrong thread, it goes to some void sticker on nba jam thread.
second, i get the 404 page when i try to add the chip to my cart, are they no longer available?
thanks!
Hey, I have an oval button Saturn. Can this tutorial work on mine or are there major differences between generations? Does this mod chip enable region free play or just backup?