Sega Genesis/MegaDrive Emulation on Windows PC: KEGA Fusion
Note from racketboy: “For those starting out in the world of classic gaming, emulation is one of the first places people start out in order to get their feet wet. While emulators may be a bit more work to set up and use than the original console, it lets curious gamers play around with the system without investing any financial resources. Our resident emulation enthusiast, Ivo has volunteered to share a series of emulation guides that will focus on helping new retro gamers get started on their emulation journey.”
My intent with this article is teaching how to fish, but in this case, giving you the first fish for a practical demonstration. Analogy aside, each of the basic steps in the process are common to most other console emulators you might want to try running in your PC. I intend to cover other systems in the future without going through the simpler steps again.
Find The Best Emulator for the Job
If you don’t have a site like this to tell you which emulator to use for a given system, you need to do a little research and choose an emulator for the system you want (in this case, the Genesis/Megadrive)
- Google and Wikipedia are amazing tools for research.
- I searched for “Sega Genesis” on Google and the first link is the Wikipedia article and the second link also looks promising as far as emulators are concerned.
- For other systems, you might need to include “emulator” in the search terms.
- In the Wikipedia article you can read about the Genesis in general and find out more, namely about some of its emulators.
I have done the work for you this time: the two best Genesis emulators are KEGA fusion and Gens. For this guide we are going with KEGA. Gens has it’s own unique features but KEGA reportedly has more accurate sound and is slightly easier to use.
KEGA also serves as an excellent all-in-one Sega emulator as it plays ROMs for the Sega Master System, Game Gear, Genesis/MegaDrive, Sega CD, and 32X without much hassle.
Download The Emulator & Some ROMs to Try Out
Once you know the name of the emulator you want (in this case, KEGA), you can Google for the emulator itself and download it. In this case there was the Wikipedia entry as well so you could follow a link to it’s official home page and download it from there.

Often the place where you download the emulator from has some instructions on how to proceed from here, a FAQ section or a forum. If you are having trouble with anything, usually it’s a good place to try and get help. Someone on the forums here might be able to give you some specific help or know the answer to your questions. As far as games/ROMs are concerned, you can rely on Google as well or use a dependable download source like Underground Gamer. There are some freeware ROMs for the Genesis, you can find them in KEGA’s official page (don’t expect anything amazing, though).
Install The Emulator
- Once you have downloaded the emulator, extract the files into an appropriate folder on your PC.
- Usually the file format is .zip or .rar
- From the official site, KEGA came in a .zip, so you probably just need to right click on the icon an extract it to wherever you want.

Run The Emulator for the First Time
Most emulators (for Windows, at least) are rather straightforward to use and won’t even need configuration before running.
- In the case of KEGA, just double-click the main EXE file (on of the files you extracted) to launch the program.
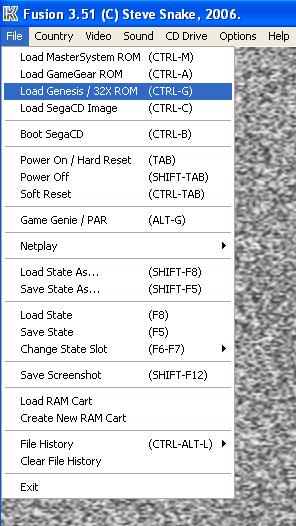
- Once you are in the emulator program, you can find the option to load a game under the “File” menu.
- There are separate options to play ROMs for the Sega Master System, GameGear, Genesis & 32X, and the Sega CD.
Configure Controller Schemes
Even the most straightforward ones can use some configuration for a better experience. KEGA is no exception. If you simply run a game right after starting the emulator for the first time, you might not even know the proper controls since PC emulators typically default to some obscure keyboard combinations. You can usually figure out the default controls by reading a “readme.txt” (or equivalent) that comes with the emulator. It’s rare that a good emulator won’t let you redefine the keys, and the best emulators let you map the controls onto other controllers, like a USB gamepad.
To get your emulator set up to your liking, just navigate into the controllers configuration panel:
- On the “Options” menu, select “Set Config”
- The program will then bring up the “Fusion Configuration” box
- Click on the “Controllers” tab as shown below
- You can then select what kind of controller setup you want to use (3-button or 6-button)
- Then hit the “Define” button to the right to map the Genesis controls to your particular PC gamepad.

Configuring Graphics/Video Options
If you are picky about your window size and video output, you can also tweak your graphics options.

KEGA (like many good emulators nowadays) has a feature that makes pixelated graphics smoother (although making them slightly more blurry in the process). You can learn more about that in Wikipedia as well , but just trying it out and choosing how you prefer to have your graphics is probably more than enough for the average user. Here is a comparison of the SEGA logo without and with the”filter” (respectively):

Playing 32X Games
KEGA has the virtue (at the moment not shared by GenS) that allows you to play 32S games without requiring the respective BIOS files. You can still get the 32x BIOS files and configure them if you want to, but that is not needed (in any case, the process is similar to what is shown below for Sega CD BIOS). Because of this, you will be able to play 32X ROMS just like standard Genesis ROMS.

Playing Sega CD Games
No emulator that I know of runs Sega CD (Mega CD in Europe and Japan) without BIOS files. At least for now, we are hosting them on the site – although you can get them without too much effort by Googling for their names (e.g. “us_scd1_9210.bin”) Just unzip the archive and you’ll have all the BIOS files you might need. Put them in some folder you’re happy with, and configure the locations so that KEGA knows where they are.

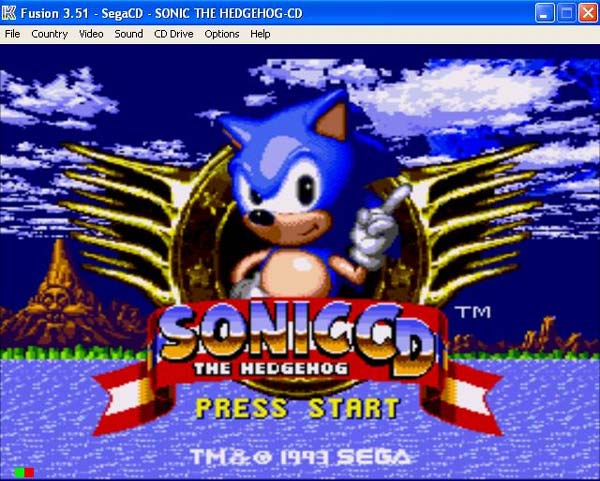
Once you have the BIOS files set up, running a Sega CD game is not much harder than running a ROM. However, with Sega CD games, there are actually a couple different ways to play — you can play real CDs in your CD/DVD drive or play CD images (also known as ISOs) that are stored on your hard drive.
- Playing a Sega CD ISO is just like loading a ROM. Just select “Load SegaCD Image” from the “File” menu
- If you plan on running an actual CD (original or burned), you need to go to the “CD Drive” menu to select which CD/DVD-ROM drive you will be using, then select “Boot SegaCD” from the file menu.
Saving & Restoring Game States
There are also more advanced features that you may or may not care about. Saving and loading at any time is a very important and versatile feature on a emulator, and KEGA doesn’t fall short. Saving states can save you time (e.g. saving just after a lengthy intro you can’t skip), lets you stop playing at any time to resume later, or can help you “cheat” through a particularly difficult part of a game. It’s very simple: just go to the menu and save a state, and later on, while having the same ROM/CD game loaded, load it…

And you should be right where you left it at!
Another feature you might want to configure is the “Save Screenshot”, accessible from the “File” (see above). You can choose between compressed or uncompressed .tga, or (uncompressed) .bmp; you can also change the location where the files are stored. Just go to the “Extra” tab in the configuration window (the same window you access to configure the controllers):

And that’s pretty much all you need to know to run KEGA to play Genesis, 32X and Sega CD games on your PC. My plan is to cover SNES (ZSNES or SNES9x) emulation next, followed by the Amiga (WinUAE; I never dabbled much with Fellow).
Another note from racketboy:
“I want to thank Ivo again for his hard work in creating these emulation tutorials. If you have any questions, comments ,corrections, or even have some additional tips or tricks to add, please post in the comments below, or head to the emulation section of the forums.”
Affiliate programs and affiliations include, but are not limited to, the eBay Partner Network or Amazon Associates.
on my Fusion 3.6 with Sonic CD, all I get is the sound effects which really sucks because Sonic CD has some kickass music. HELP MEEE!
i tried to play some games on Sega CD, and it seems like some dont work. Ie. Sonic CD works perfectly. but Adventures of Batman and Robin seemingly froze after the first cutscene. is it the load times? is there a compatibility list for what games can be played?
i’m having issues getting the sega cd emu to work for shining force iso…. when i load it all i get is the sega cd main screen…. any help?
tHANKS MAN for this
HOW DO I LOAD MY MODEL 2 SEGA CD BIOS I TRIED EVEREYTHING
My emulator does not save my defined keyboard setup.
Why is this? Every time I startup I have to launch emulator again