A question that gets asked from time to time is regarding something to stack multiple consoles. I found myself needing such a thing, and as I usually take the DIY approach to things, I decided to make one myself. I thought I would share the results.
Explanation of the how and why (skip if you just wanna see the pics)...
Like most of my projects, I end up having to complete them quickly to fit a schedule for a larger project. In this case, I was kind of forced into buying a new AVR since my old one was acting up. And that caused a little snowball effect. Long story short, I was rewiring my HDTV setup and wanted to free up some space in my TV stand. I have floor standing speakers to the left and right of the TV stand, so I decided to build a little shelf to stack consoles on top of my right speaker.
I decided to build a shelf for 3 consoles: PS3, PS4 and Xbox 360. The two PS consoles being in enclosed shelves, and the 360 sitting on top. I decided on doing it this way because the 360 runs hot and I figured leaving it on top in the open would allow better airflow. Although with the spacing I chose, there's plenty of airflow anyway, but I figured leaving the top console open would leave zero potential cooling issues. Also, I didn't want to make it too big.
I was going to make a 4 tier shelf. My original idea was to include the three above console, but also include my PS2 phat. I thought it would be awesome to have a shelf with a PS2, PS3 and PS4 all in a row. But I decided against it, at least for now. I currently don't need to free up that much space in my TV stand, and I like the PS2 where it is now, so I decided on the 3 tier shelf. I figure if I end up needing more space (such as if I ever buy a new console) then I could build another one, and probably make it even better.
I made the spacing between shelves taller than it has to be. If I ever want to make a 4 tier version, I could definitely squish them together a bit more. But for only 3 consoles, I don't mind the total height that it is, and I like having a little more spacing for airflow and to make it easier to get stuff in and out.
Anyways, I turned the 4th of July weekend into a 4-day weekend for myself. Knowing that rewiring my entire setup would take most of a day, I planned on doing it then. Which meant that I needed the shelf to be built AND be dry in time to use it. So I only had part of one day during the previous weekend to get it done. That's why it needed to be done quick. I got it built and stained in a few hours, then I pointed a dehumidifier at it for the following week to make sure it was nice and dry.
I actually didn't have to purchase anything for this project. I had everything on hand already. That's why it was cheap (for me). But if you wanted to make something similar for yourself, it wouldn't cost all that much depending on what materials you use.
Here's all the materials that I used:
3/4" plywood with maple veneer (left over scraps from a previous project)
1/4" plywood for the back (garbage picked)
Oak veneer for the front (sourced from a demo)
Wood stain (I always have some on hand)
Wood glue (I always have some on hand)
23 gauge pin nails (to hold the oak veneer on)
The maple veneer plywood is awesome stuff. Unfortunately, the pieces I had to use have been floating around for 3-5 years and took a couple of dents and scratches. It's a veneer, so you can't really sand them out. The dents and scratches end up getting really dark when the stain is applied, but that's OK. It just looks like this shelf is already 10-20 years old, and I don't have to worry about it taking any abuse since it already has LOL. The 1/4" ply is perfect for the back because you want something thin. The oak came from a staircase that I demoed. The stair treads came off in mostly full pieces, so I saved them. Oak is great stuff, and lumber prices have been wacky for the last few years, so there was no way I was throwing it out. The piece I used had a really nice grain pattern, I really like the way it ended up looking.
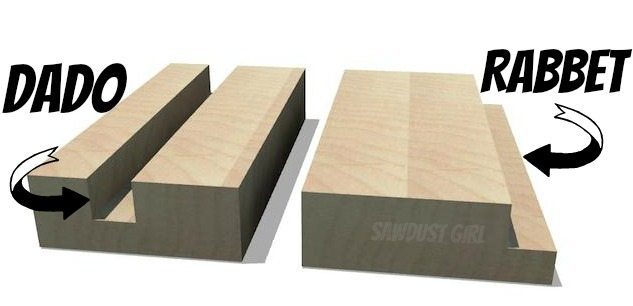
I used a dado for the middle shelf, and rabbets for the top and bottom. Using this construction, I could glue all the pieces together and not have to use any hardware (such as screws, nails, or brackets). It's usually stronger and better looking too. This pic will show you what a dado and rabbet are...
So here's one of my sides cut...
And you can see in this next pic how the top, bottom and middle shelf fit into the dado and rabbets...
And here is a couple of shots after the oak veneer has been glued on and the whole thing has been stained...
You can see in the above pics that I drilled holes in the back, which are for the wires.
Now here's a couple of shots with the consoles installed...
What would I do differently next time? Honestly, nothing really. Aside from allotting more time to make it. I made a few mistakes from rushing, which could have easily been avoiding if I was taking my time. Also, I didn't do any clear coats due to a lack of time. Although I think it looks fine the way it is, 3 coats of poly probably would make it look even better and also add some protection. But overall, I satisfied with how it came out. It's not perfect, but that's OK. It fits in better since non of my other furniture is brand new.
If I had to purchase everything instead of using stuff I had on hand, I would probably go with pine. Pine would be much cheaper and you wouldn't need any edge banding or veneer to hide the plies.
Not everyone has tools for cutting dados and rabbets, but you could still build such a shelf without them. You could easily screw or nail everything together instead of using dados. With a pine board or two, you could cut everything with a handsaw if needed (pine is super soft) then just screw it all together. Be sure to pre-drill the screw holes so nothing splits. And it would help to use a little framing square when assembling. If you were planning on painting it, you could countersink the screw heads then fill them (Ready Patch, wood filler, etc). Sand down the filler before painting, and it would be like the holes were never there! If you were planning on staining, you could use finishing nails instead. You'll still be able to spot the nail heads, but with a medium or dark stain they wouldn't really stick out much.
I forgot to add... One could easily add LED strip lights inside the shelves. I'm just usually not into that sort of thing.
opa wrote:Cool project! Looks good.
Thanks!
Ack wrote:I greatly appreciate the holes put in for cables as well. How are you managing once pulled out the back?
Yeah, the holes were a must since I didn't want to leave the back open. I was briefly thinking about leaving a small channel open on the bottom of each shelf, instead of holes, but I decided the holes would be good enough.
But as for cable management, I've abandoned that long ago LOL. Many years ago, I once tried to neatly run all of the AV and power wires, with cable ties, and label everything. But I end up tweaking my setup so often that if I do proper cable management it just makes it harder to switch stuff up.
Funny you mention cable management thought, because I discovered a missed opportunity when wiring everything up. This shelf is on top of a floor standing speaker, and the 360 is all the way on top, a good 4 or 5 feet off the ground. The power brick for the 360 is heavy, and the wire going too the console isn't long enough so that the brick can be on the ground and still reach the 360. And the brick is too heavy to simply let it hang by the cable. So right now I just have it prompt up on something. But I realized when I was wiring everything up, the shelf I build over hangs the speaker in the back a few inches. It over hangs enough that I could mount the power brick there. Like I said, I only realized this when I was wiring it all up. I might circle back and mount it there at some point. I'll definitely post pics if I do!
Yes, and that was my first thought too. I know you can buy those plastic anchor things for zip ties, the ones that have an adhesive back and a loop for the tie. But I could also staple a couple of zip ties into the wood (T50 staples) so I wouldn't have to buy those plastic adhesive things. Or, I could use some bent coat hanger wire to make a custom bracket to hold it, and then screw that to the shelf. And that's what I'd probably end up doing, if I ever get around to it.
The shelf came out great, Ziggy! Really nice job. In your original post you made it seem like the shelf looked dinged up, but it doesn't look weathered at all, IMO.
Note wrote:The shelf came out great, Ziggy! Really nice job. In your original post you made it seem like the shelf looked dinged up, but it doesn't look weathered at all, IMO.
Thanks!
It's all about taking the pics at the right angles to make the subject look better. I chose the best looking pieces for the left side and top, knowing that those would be the most visible. The bottom and right side pieces have dings/scratches. Also on the right side is some damage from a router slip. I used a flush trim bit in a router for those oak veneer pieces, and since I was rushing I slipped and gouged a bit on the right side. Maybe I'll post a pic of it later.
Ziggy in fifteen years:
"Well my console set up isn't looking as elegant as it used to. What were we nerds thinking with all that wood grain? Here's pics of my latest addition to my gaming set up. After spending six weeks in Spain picking out just the right marble, my package arrived off the boat. I got to work right away and after three years of chiseling I have the perfect pedestal for my Phillips CDi."
Meanwhile the rest of us are all like "I nailed two boards together!"
Note wrote:The shelf came out great, Ziggy! Really nice job. In your original post you made it seem like the shelf looked dinged up, but it doesn't look weathered at all, IMO.
Thanks!
It's all about taking the pics at the right angles to make the subject look better. I chose the best looking pieces for the left side and top, knowing that those would be the most visible. The bottom and right side pieces have dings/scratches. Also on the right side is some damage from a router slip. I used a flush trim bit in a router for those oak veneer pieces, and since I was rushing I slipped and gouged a bit on the right side. Maybe I'll post a pic of it later.
So here's a couple of shots showing damage...
This is the top of it, normally the 360 is hiding some scratches.
And here's the left side where I slipped with the router.
The underside of the bottom has more scratches IIRC. None of this bothers me since I never see these sides. Even the router slip, I just rarely see it from that angle.
opa wrote:Ziggy in fifteen years:
"Well my console set up isn't looking as elegant as it used to. What were we nerds thinking with all that wood grain? Here's pics of my latest addition to my gaming set up. After spending six weeks in Spain picking out just the right marble, my package arrived off the boat. I got to work right away and after three years of chiseling I have the perfect pedestal for my Phillips CDi."
Meanwhile the rest of us are all like "I nailed two boards together!"
You joke, but I frequently have scraps of marble. They're just usually too small to do anything worthwhile with, so I end up chucking them. Perhaps if I had a CDi, I'd be inclined to make a marble pedestal for it.
It's kind of funny though, now that I think about it. I love wood grain, and it's definitely an 80's/90's aesthetic. So it's kind of funny looking at the modern consoles on a wooden shelf (lol, look at me calling 360 and PS3 "modern" consoles). They seem like they should be on glass or metal shelves. But I love wood grain!