Downing's SNES-001 Advanced COMPLETE!!! 6/18

Re: Downing's SNES-001 Advanced
Looks pretty bad@ss whatever it is
Re: Downing's SNES-001 Advanced
Progress!
So as mentioned before, the audio interference was taken care of and I like the new lay out better because now if one just wants to use the controller, they have the option to remove the A/V cable all together.
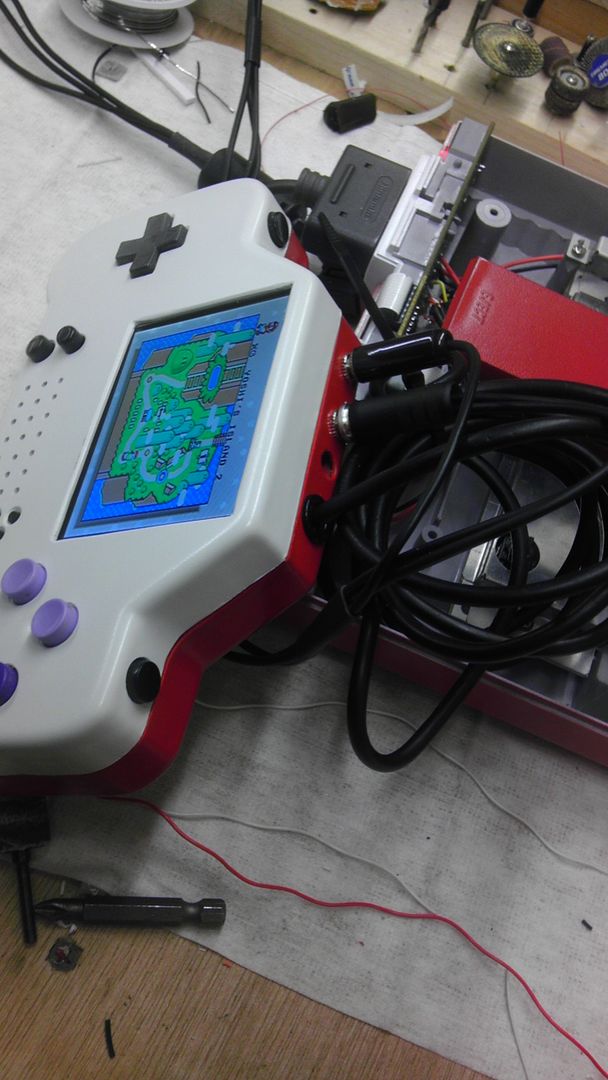
Here is a quick view of both ends of the cable.
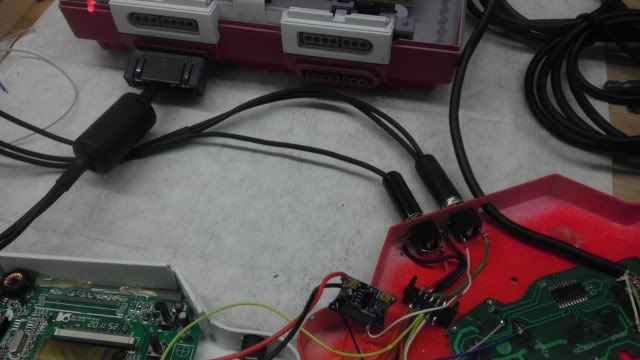
I still need to put a covering around the A/V Controller plug to make it look a bit nicer, but as for the unit itself, it's functional and sturdy. The covering over the wires acts as both a junction box for the spliced wires and a strain relief. These A/V cables are all held together using 3/8" heat shrink tube.

In this pic, the plug/jack on the left is the 12V power supply in and the jack on the right is the A/V. Again, only Mono sound, but that's actually fine for what it is. The shrouded 10 pin header is actually no longer needed as with the previous design it acted as a strain relief for the cable. But since it was super glued in there and wasn't in the way of anything, I just kept it. It won't be there for controller number 2. Having all the strain in detachable cords is the best way to go because if it pulls too hard, it will just pop out of the jack, no resoldering or ripped traces. Looking at it now, I should probably use the header for the controller as a strain relief. Something to think about.
I should mention too I was having a problem earlier today when I was trying to get the A/V to work. Once I had everything connected, I was getting power and video but no sound. I ended up taking everything apart, testing my amp, continuity of the wires and everything, but I couldn't figure out what was wrong because everything was checking out. I then tested the A/V jack in the controller and found the both the Ground and the Audio line had continuity with the grounds in the system. Turns out that after I soldered the plug up and closed it up, I bent the pin that the audio was soldered to and it was touching the ground line so I was shorting out my audio. Bent it back and it worked perfectly!
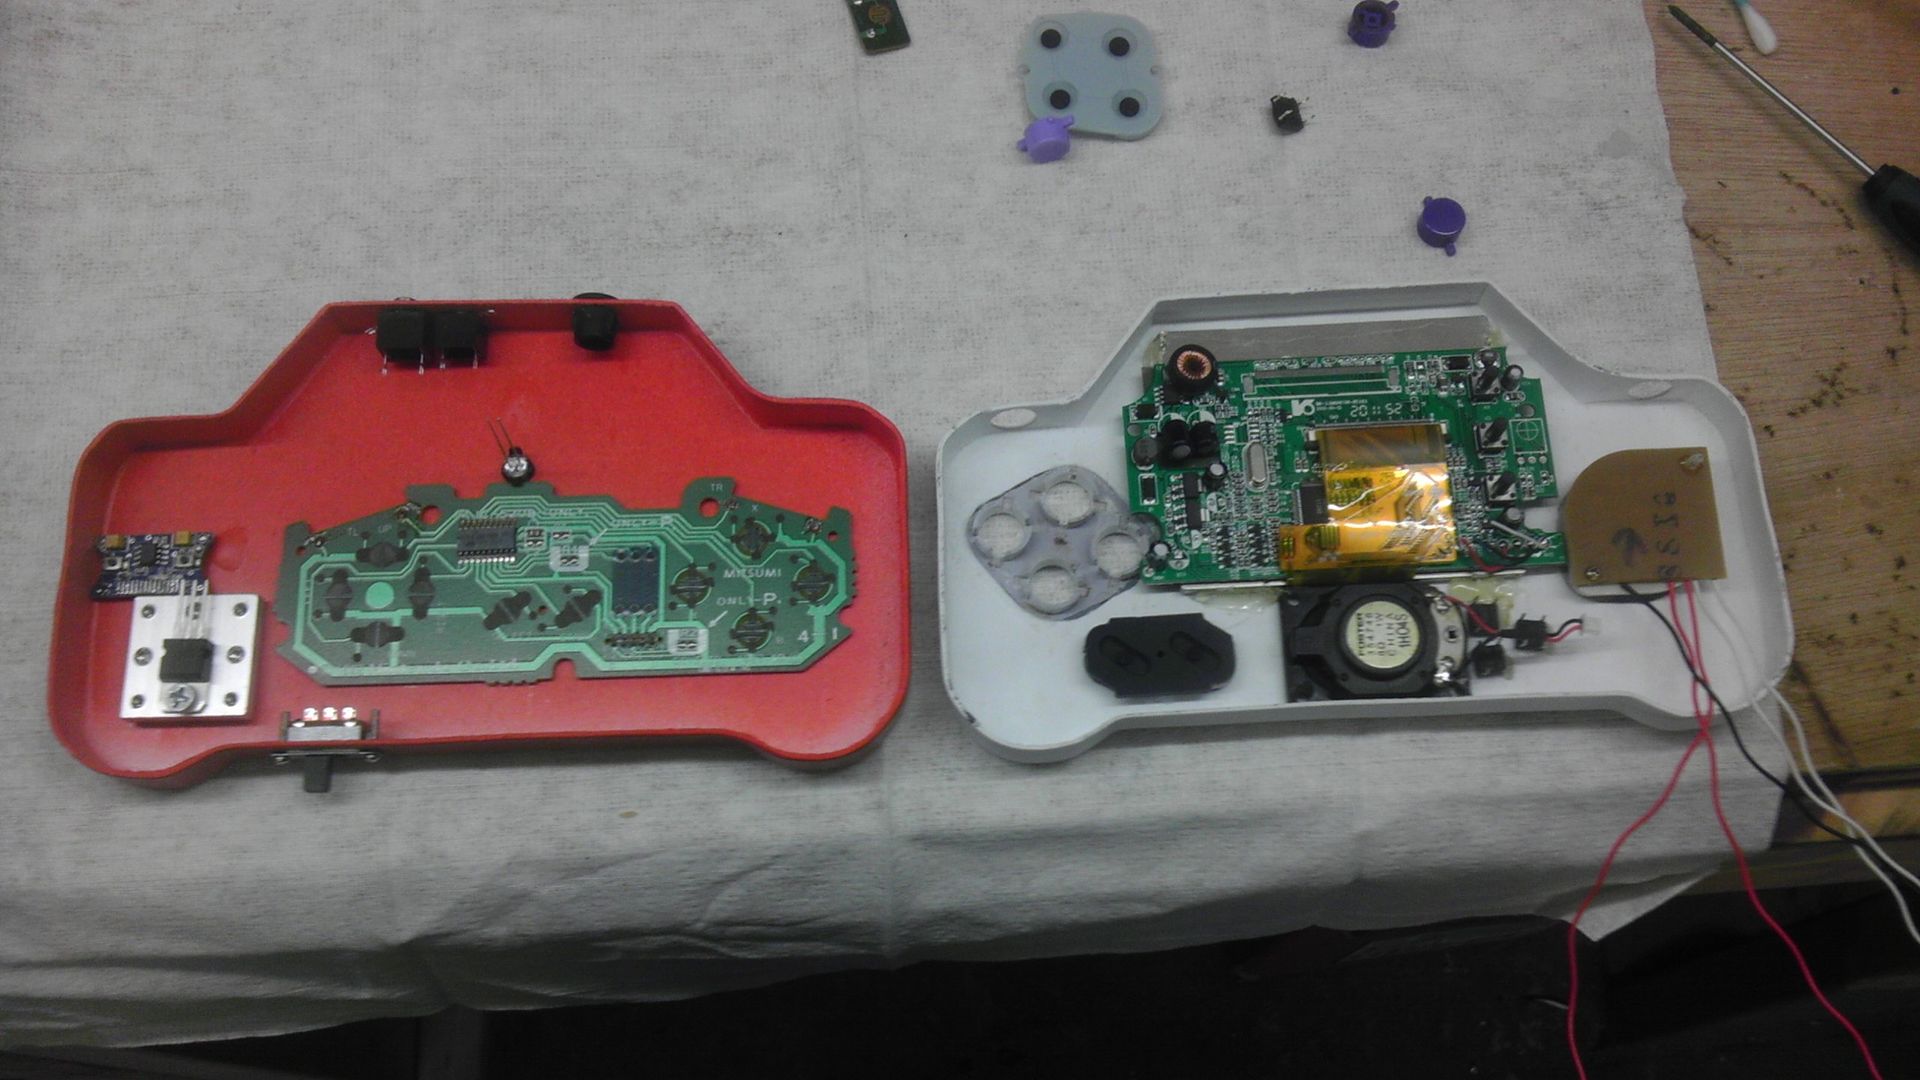
I also got all the controls wired with the exception of the R & L buttons, volume controls and the screen controls. They won't take long though. The issue now those is the responsiveness of the D-pad. It's all in the way I have it mounted, I know for a fact as when it was lose and I was pushing the buttons directly, it was smooth and easy to do. I do like using the original PCB over the tact switches, but getting it perfectly alined is just as difficult when you don't use the mounting from the original controller. Next one I'm going to frakencase in the D-pad from an original NES controller like Bac did. This will ensure that everything will line up correctly and will look better.
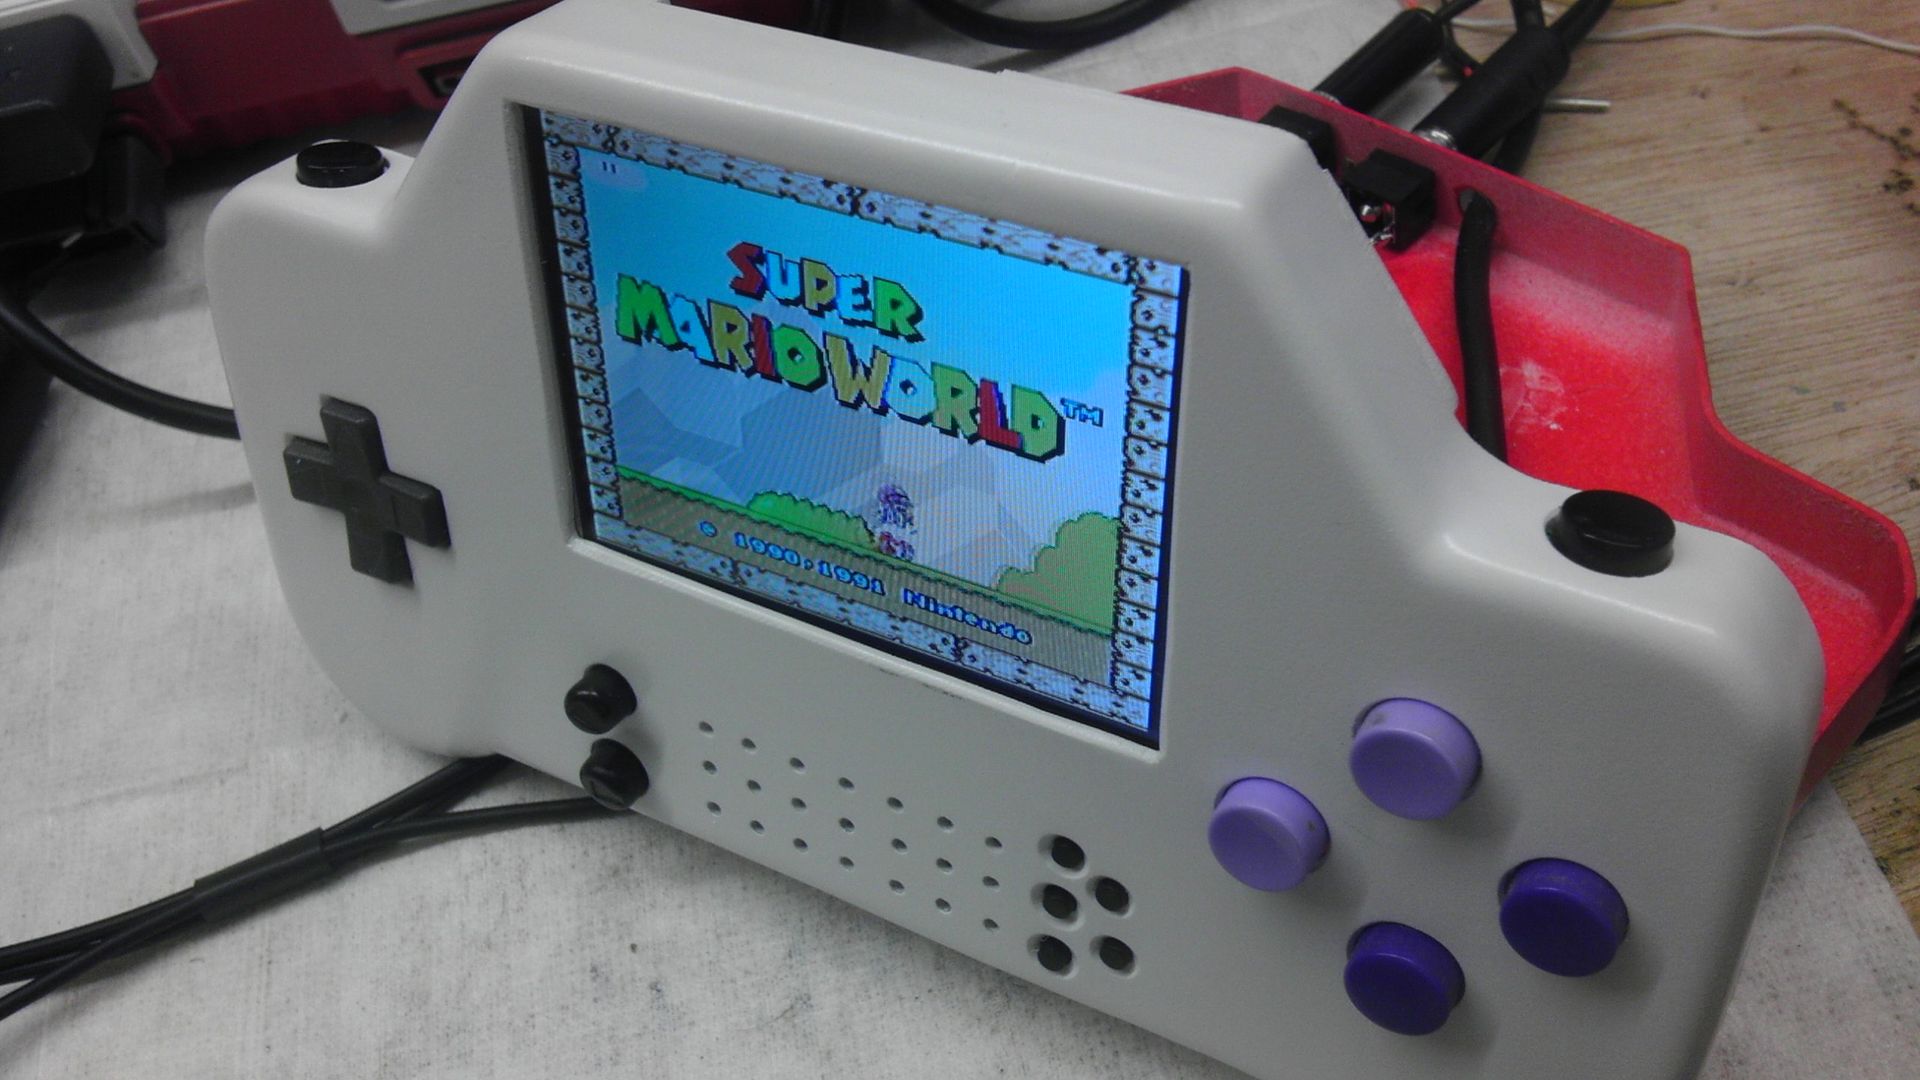
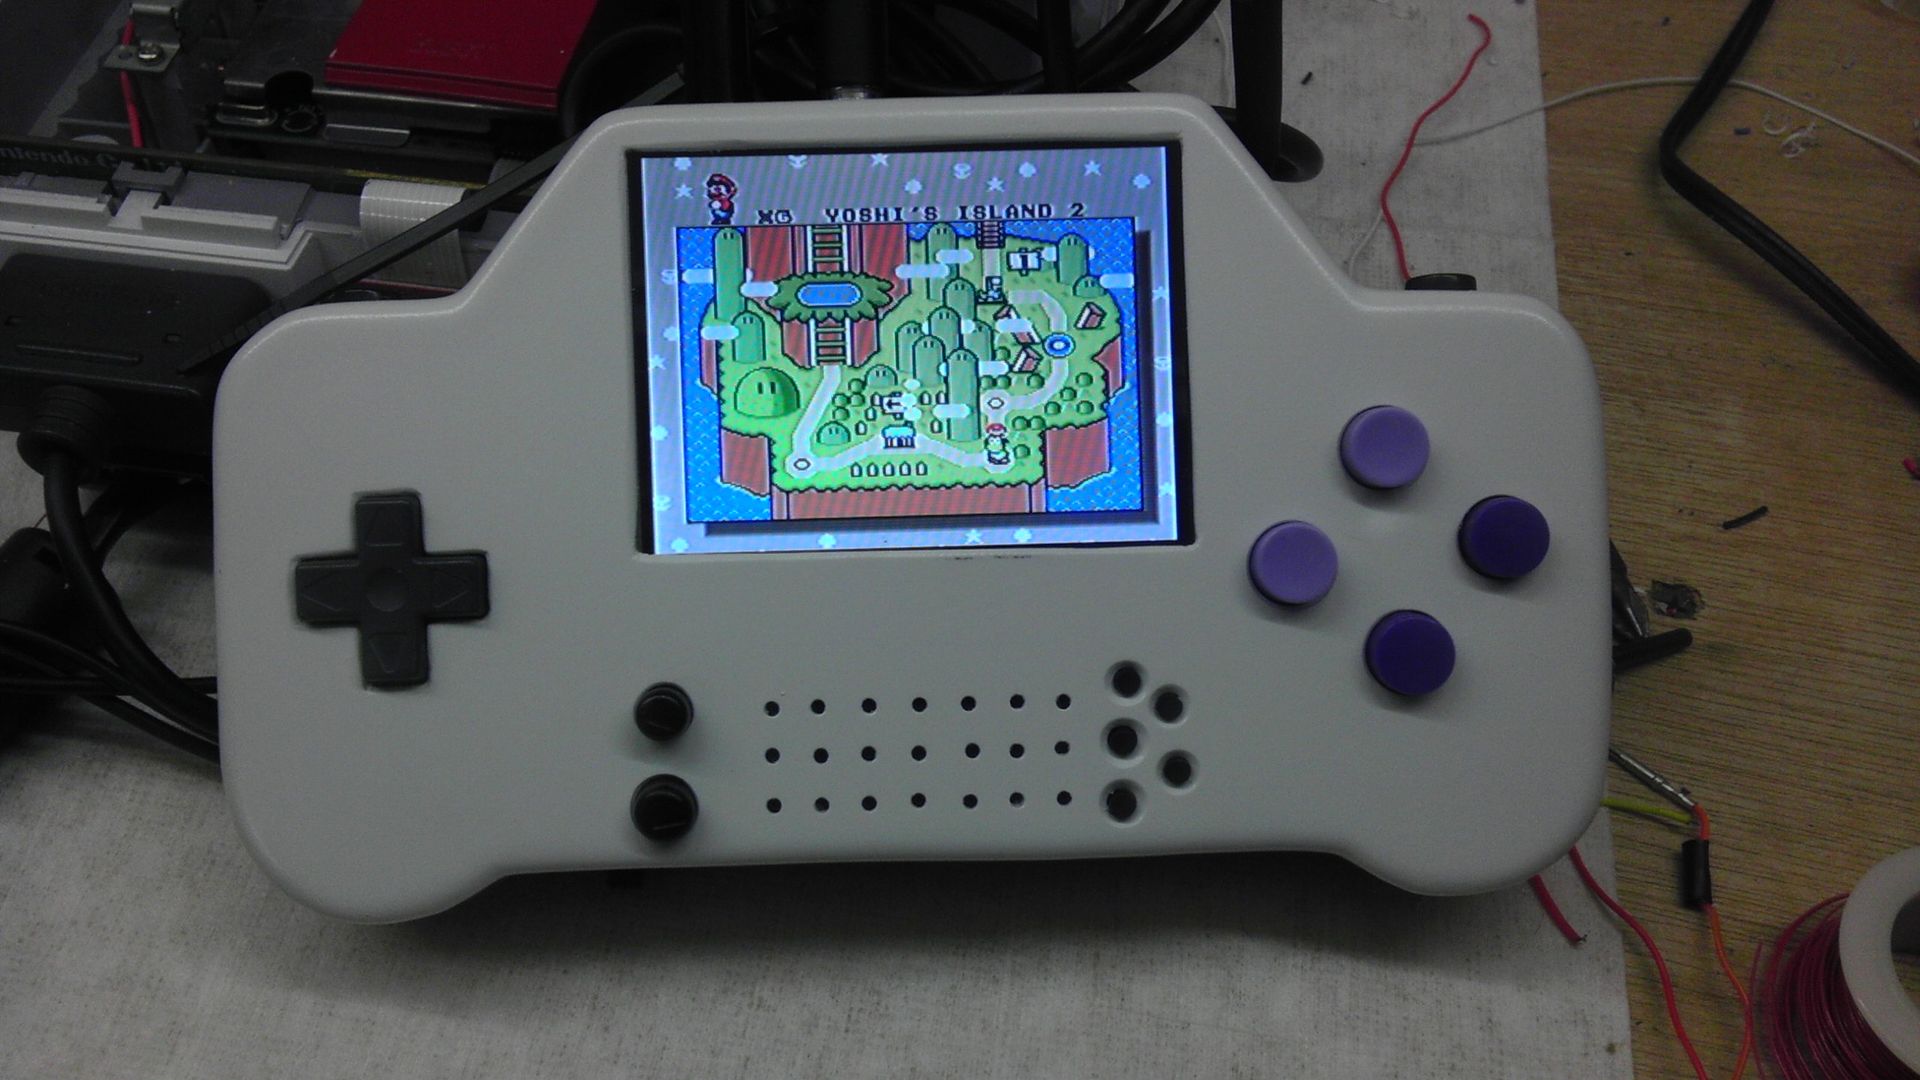
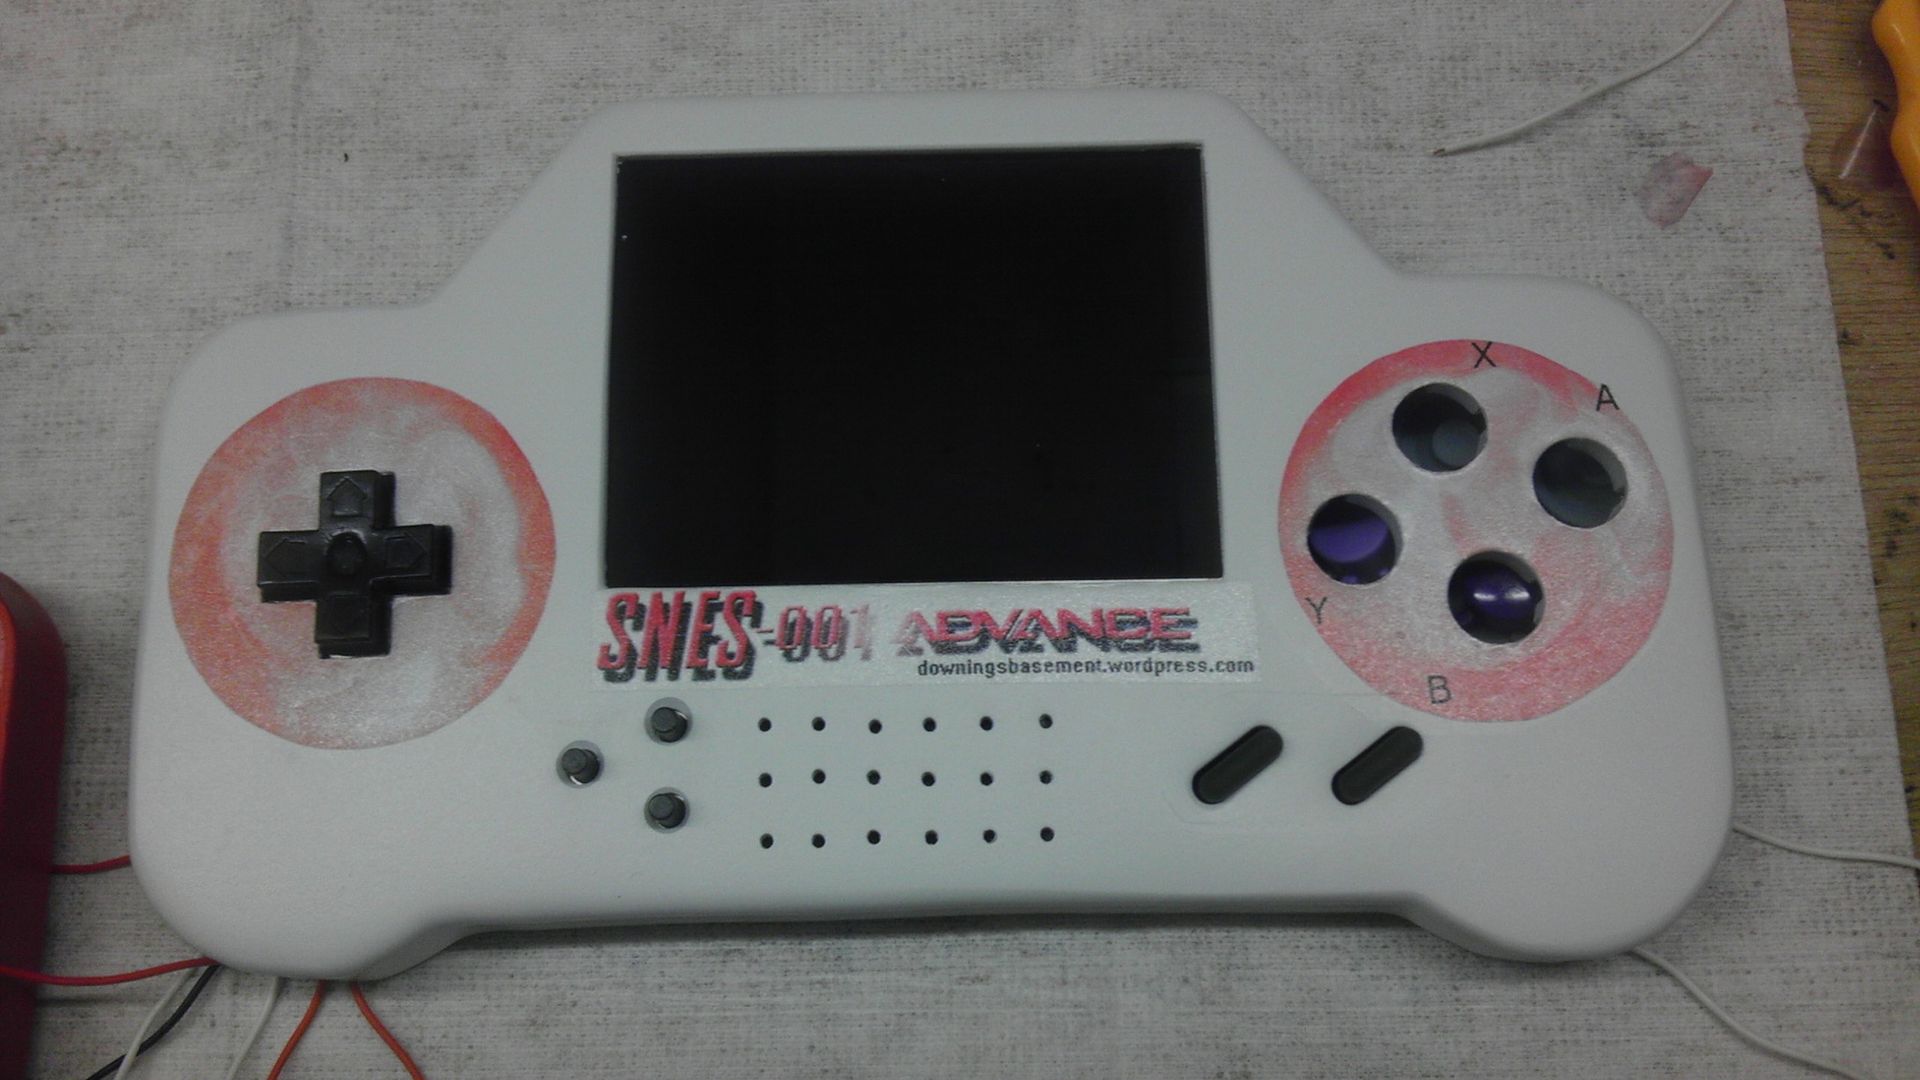
Here are just a few more pics of it in it's "ON" state. Couple more weeks and this should be complete and ready for the auction house! Since I am planning on selling this, I am spending much more time on the quality side of things, not letting anything go that I normally would.
But yeah, let me know what you think. I'll be posting how I make out with this D-Pad issue.
So as mentioned before, the audio interference was taken care of and I like the new lay out better because now if one just wants to use the controller, they have the option to remove the A/V cable all together.
Here is a quick view of both ends of the cable.
I still need to put a covering around the A/V Controller plug to make it look a bit nicer, but as for the unit itself, it's functional and sturdy. The covering over the wires acts as both a junction box for the spliced wires and a strain relief. These A/V cables are all held together using 3/8" heat shrink tube.
In this pic, the plug/jack on the left is the 12V power supply in and the jack on the right is the A/V. Again, only Mono sound, but that's actually fine for what it is. The shrouded 10 pin header is actually no longer needed as with the previous design it acted as a strain relief for the cable. But since it was super glued in there and wasn't in the way of anything, I just kept it. It won't be there for controller number 2. Having all the strain in detachable cords is the best way to go because if it pulls too hard, it will just pop out of the jack, no resoldering or ripped traces. Looking at it now, I should probably use the header for the controller as a strain relief. Something to think about.
I should mention too I was having a problem earlier today when I was trying to get the A/V to work. Once I had everything connected, I was getting power and video but no sound. I ended up taking everything apart, testing my amp, continuity of the wires and everything, but I couldn't figure out what was wrong because everything was checking out. I then tested the A/V jack in the controller and found the both the Ground and the Audio line had continuity with the grounds in the system. Turns out that after I soldered the plug up and closed it up, I bent the pin that the audio was soldered to and it was touching the ground line so I was shorting out my audio. Bent it back and it worked perfectly!
I also got all the controls wired with the exception of the R & L buttons, volume controls and the screen controls. They won't take long though. The issue now those is the responsiveness of the D-pad. It's all in the way I have it mounted, I know for a fact as when it was lose and I was pushing the buttons directly, it was smooth and easy to do. I do like using the original PCB over the tact switches, but getting it perfectly alined is just as difficult when you don't use the mounting from the original controller. Next one I'm going to frakencase in the D-pad from an original NES controller like Bac did. This will ensure that everything will line up correctly and will look better.
Here are just a few more pics of it in it's "ON" state. Couple more weeks and this should be complete and ready for the auction house! Since I am planning on selling this, I am spending much more time on the quality side of things, not letting anything go that I normally would.
But yeah, let me know what you think. I'll be posting how I make out with this D-Pad issue.

Hey guys, check out my new website and project showcase!
Also this is where my Case Making Guide can be found!
-
GameMasterGuy
- Next-Gen
- Posts: 1573
- Joined: Sun Nov 27, 2011 2:38 pm
Re: Downing's SNES-001 Advanced
Looks great! Good job keeping with it, this is pretty interesting looking! Once you get L/R functional, any chance of a gameplay video?
Is that a 3DS XL in your pocket, or are you just glad to see me? ~ZeroAX
Re: Downing's SNES-001 Advanced
Fantastic shot of the "On State". I'm getting pretty excited now that it's nearing the end. Dibs on beta testing. :p
Thing's that I'm looking for at the moment: Super Mario RPG manual(SNES), Lufia 2: Rise of the Sinistrals map and cart(SNES), The King of Dragons Box and manual(SNES), Lufia and the fortress of doom CIB(SNES), Earthbound CIB(SNES), EVO: The Search for Eden CIB(SNES), Harvest Moon CIB(SNES), Mario Paint CIB(SNES), Bomberman Party Pak With Super Multitap(SNES), DoReMi Fantasies CIB(SFC).
Re: Downing's SNES-001 Advanced
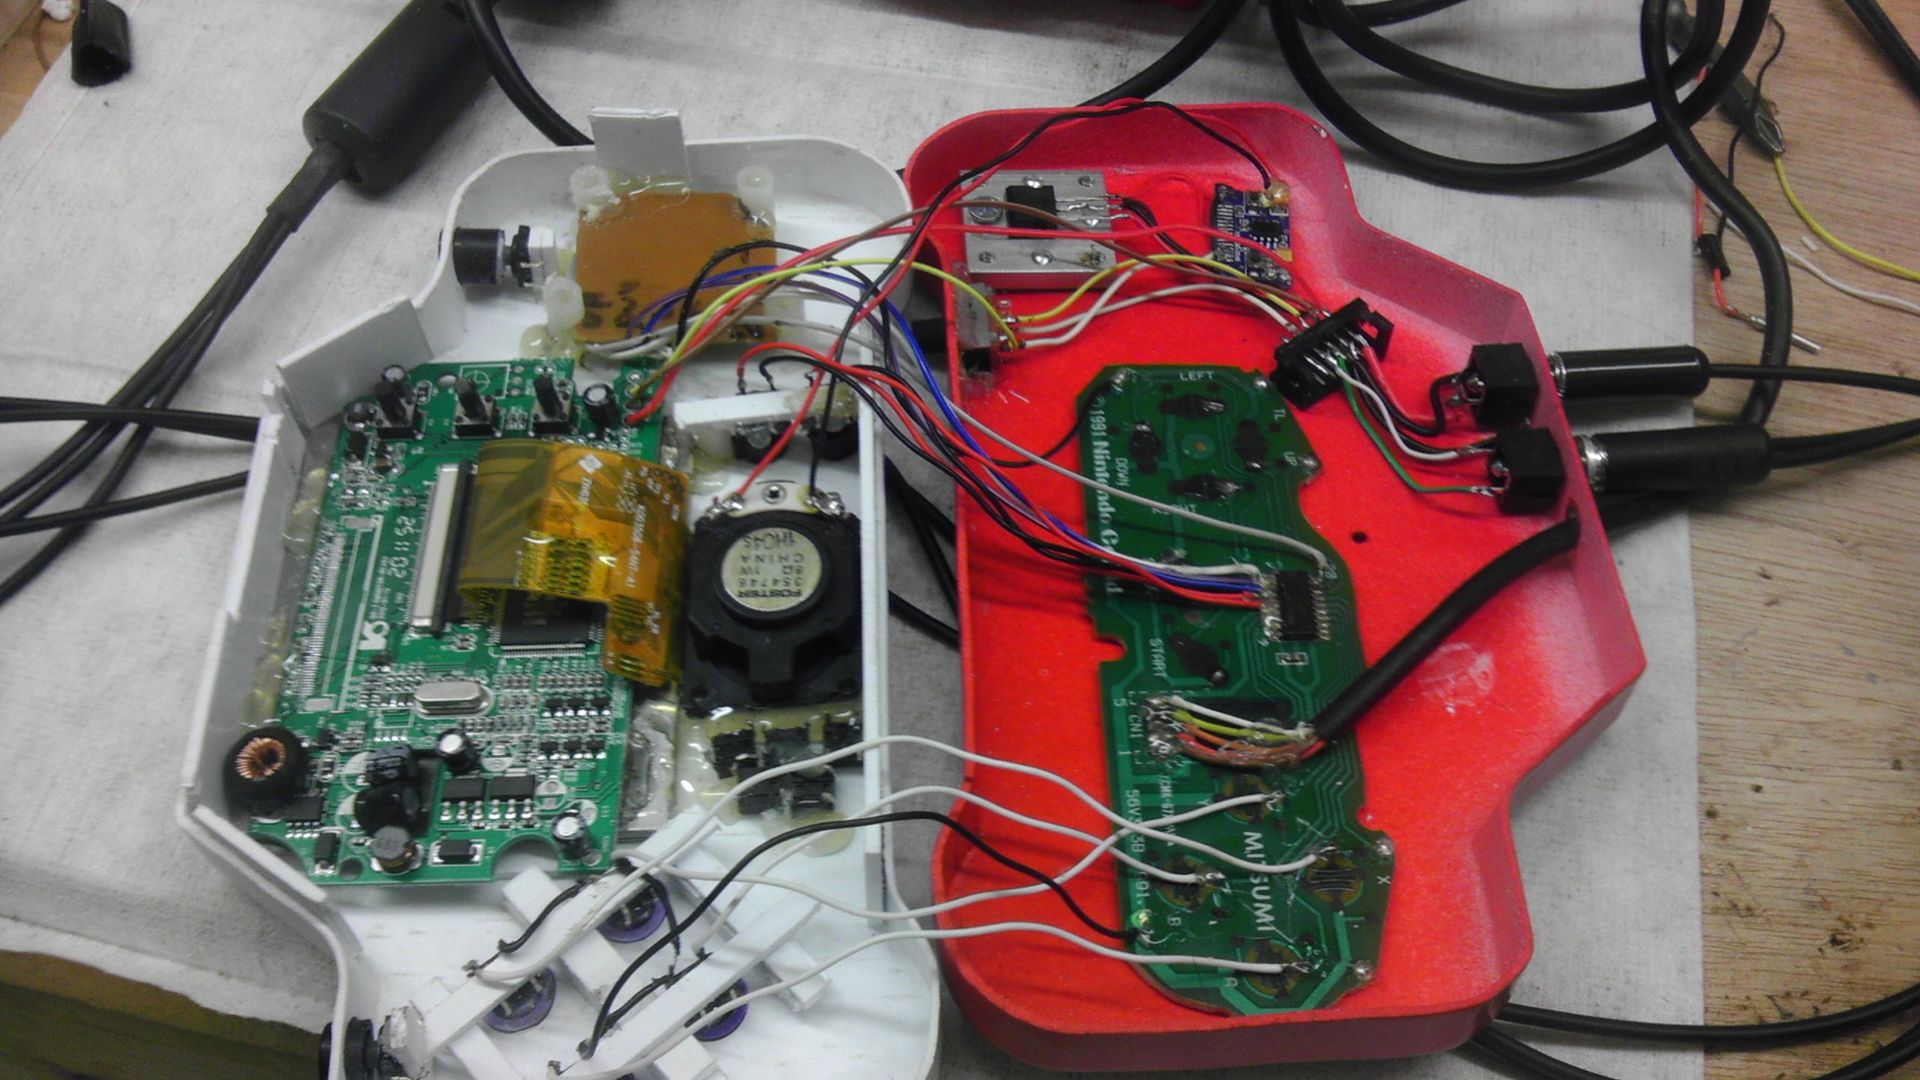
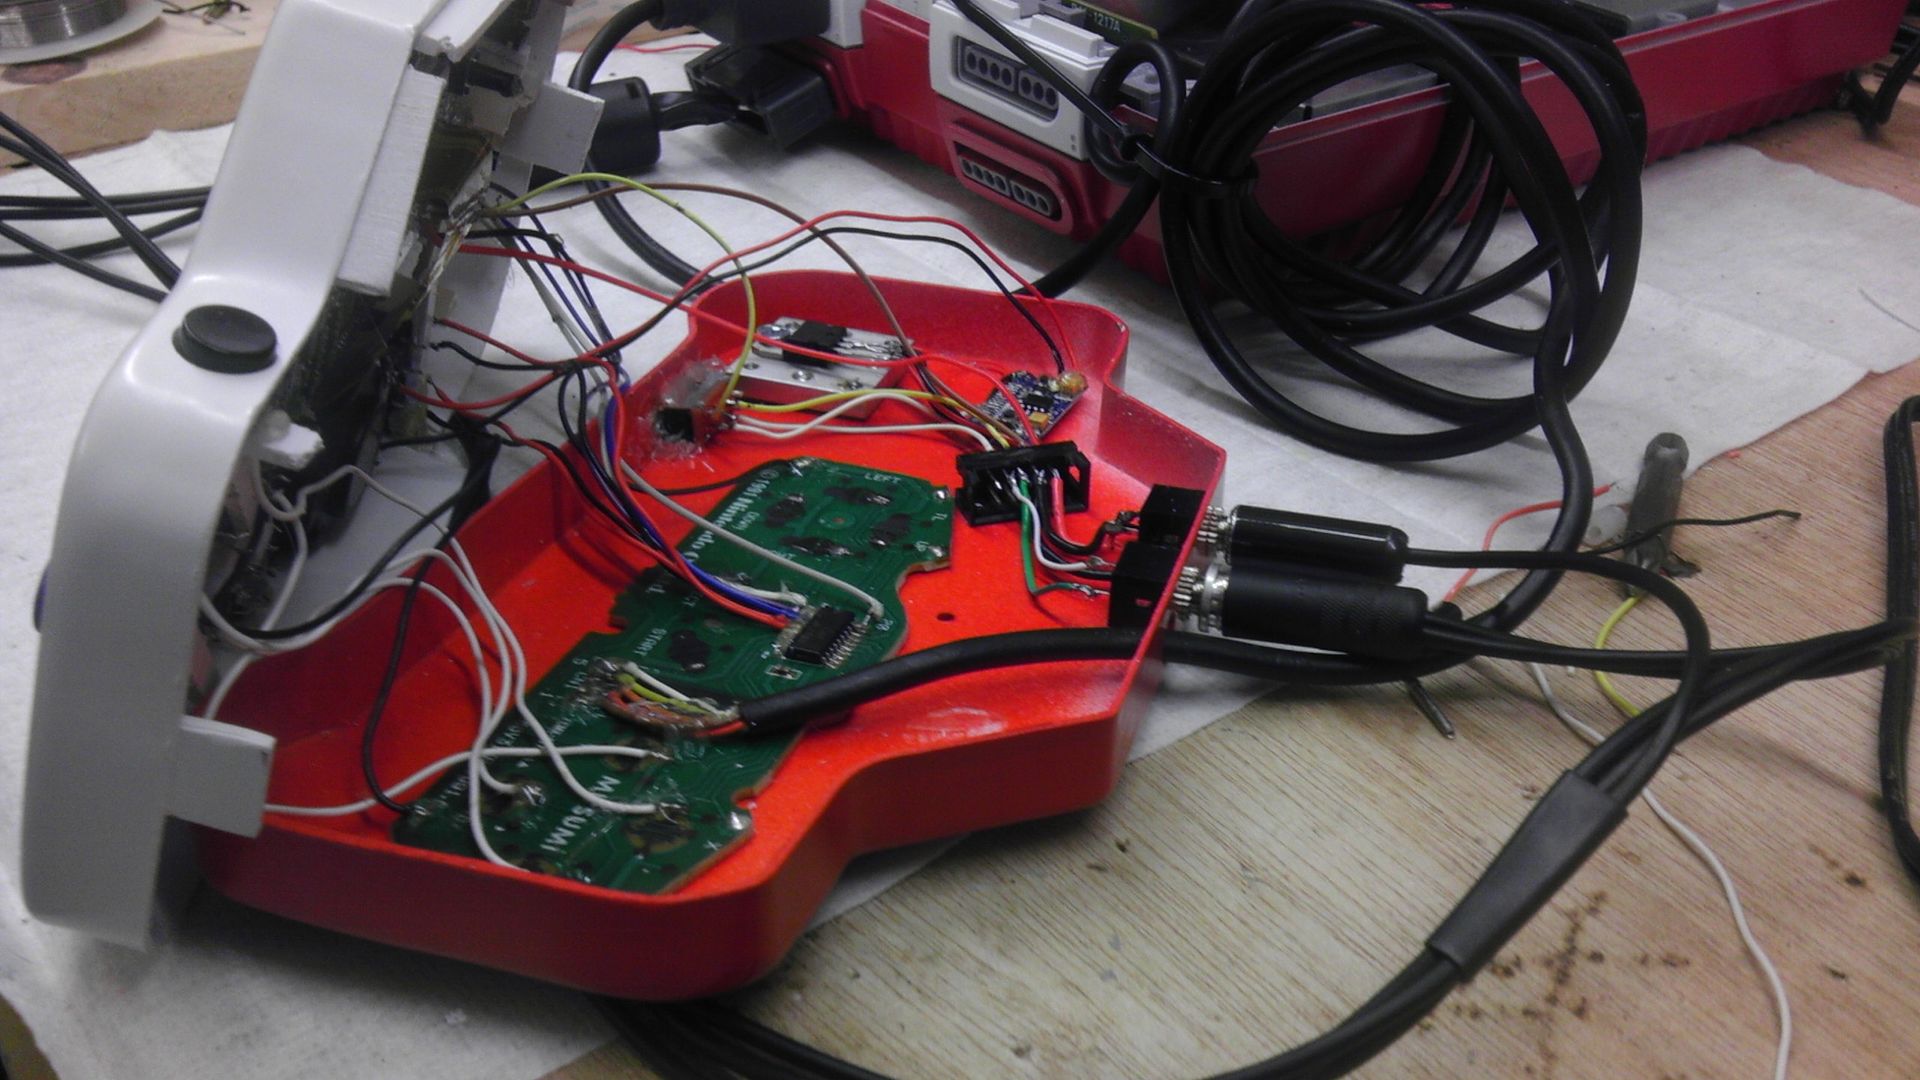
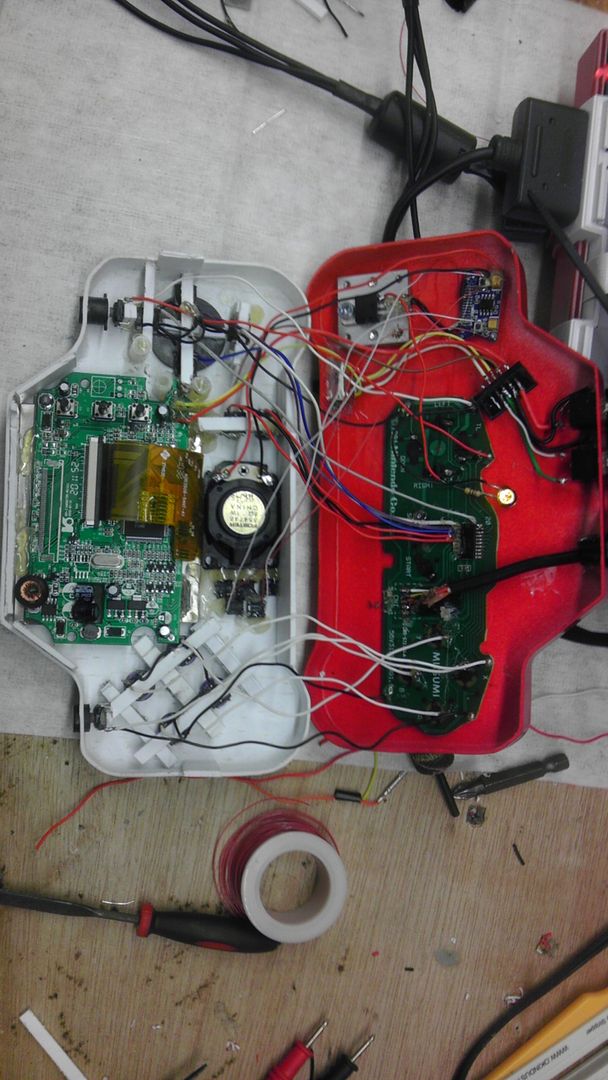
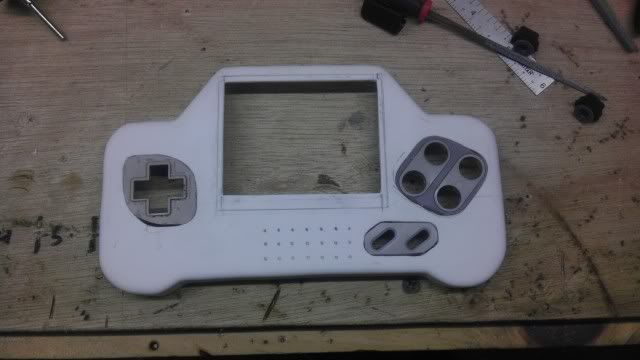
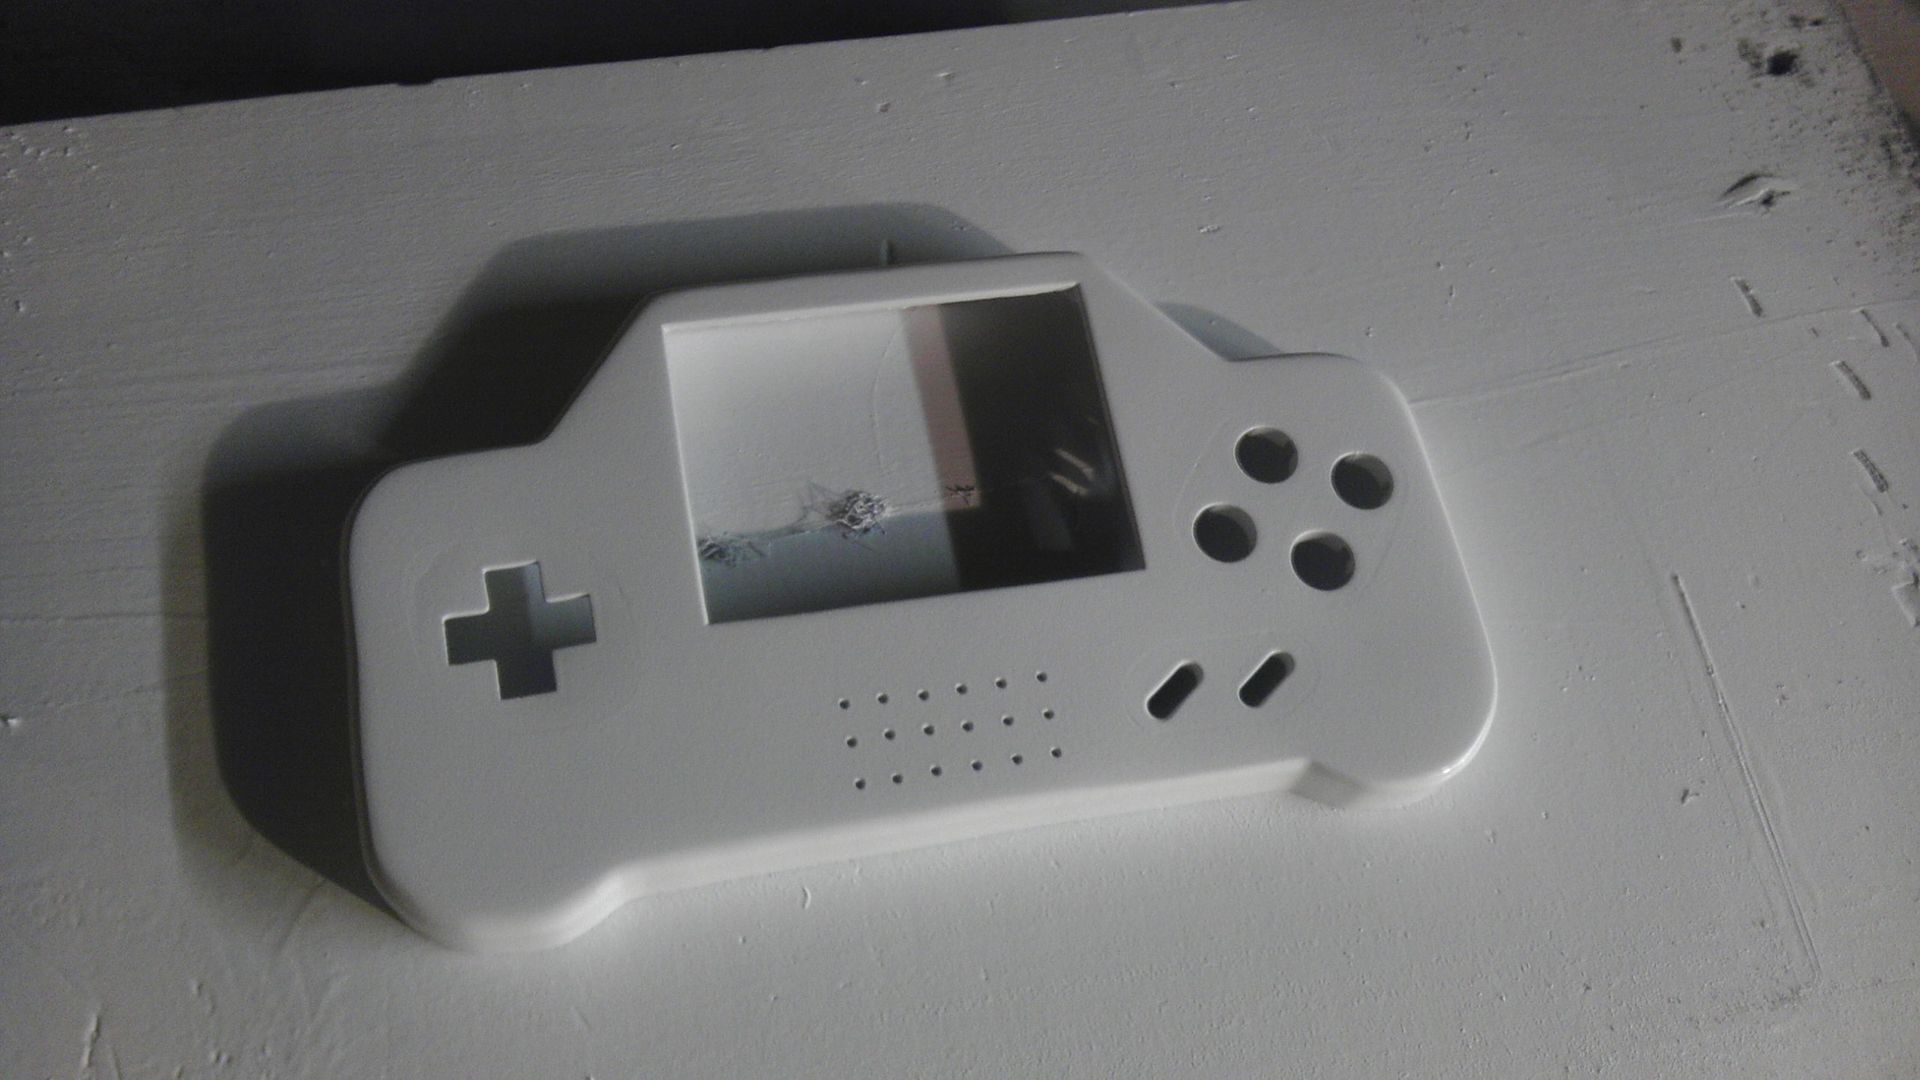
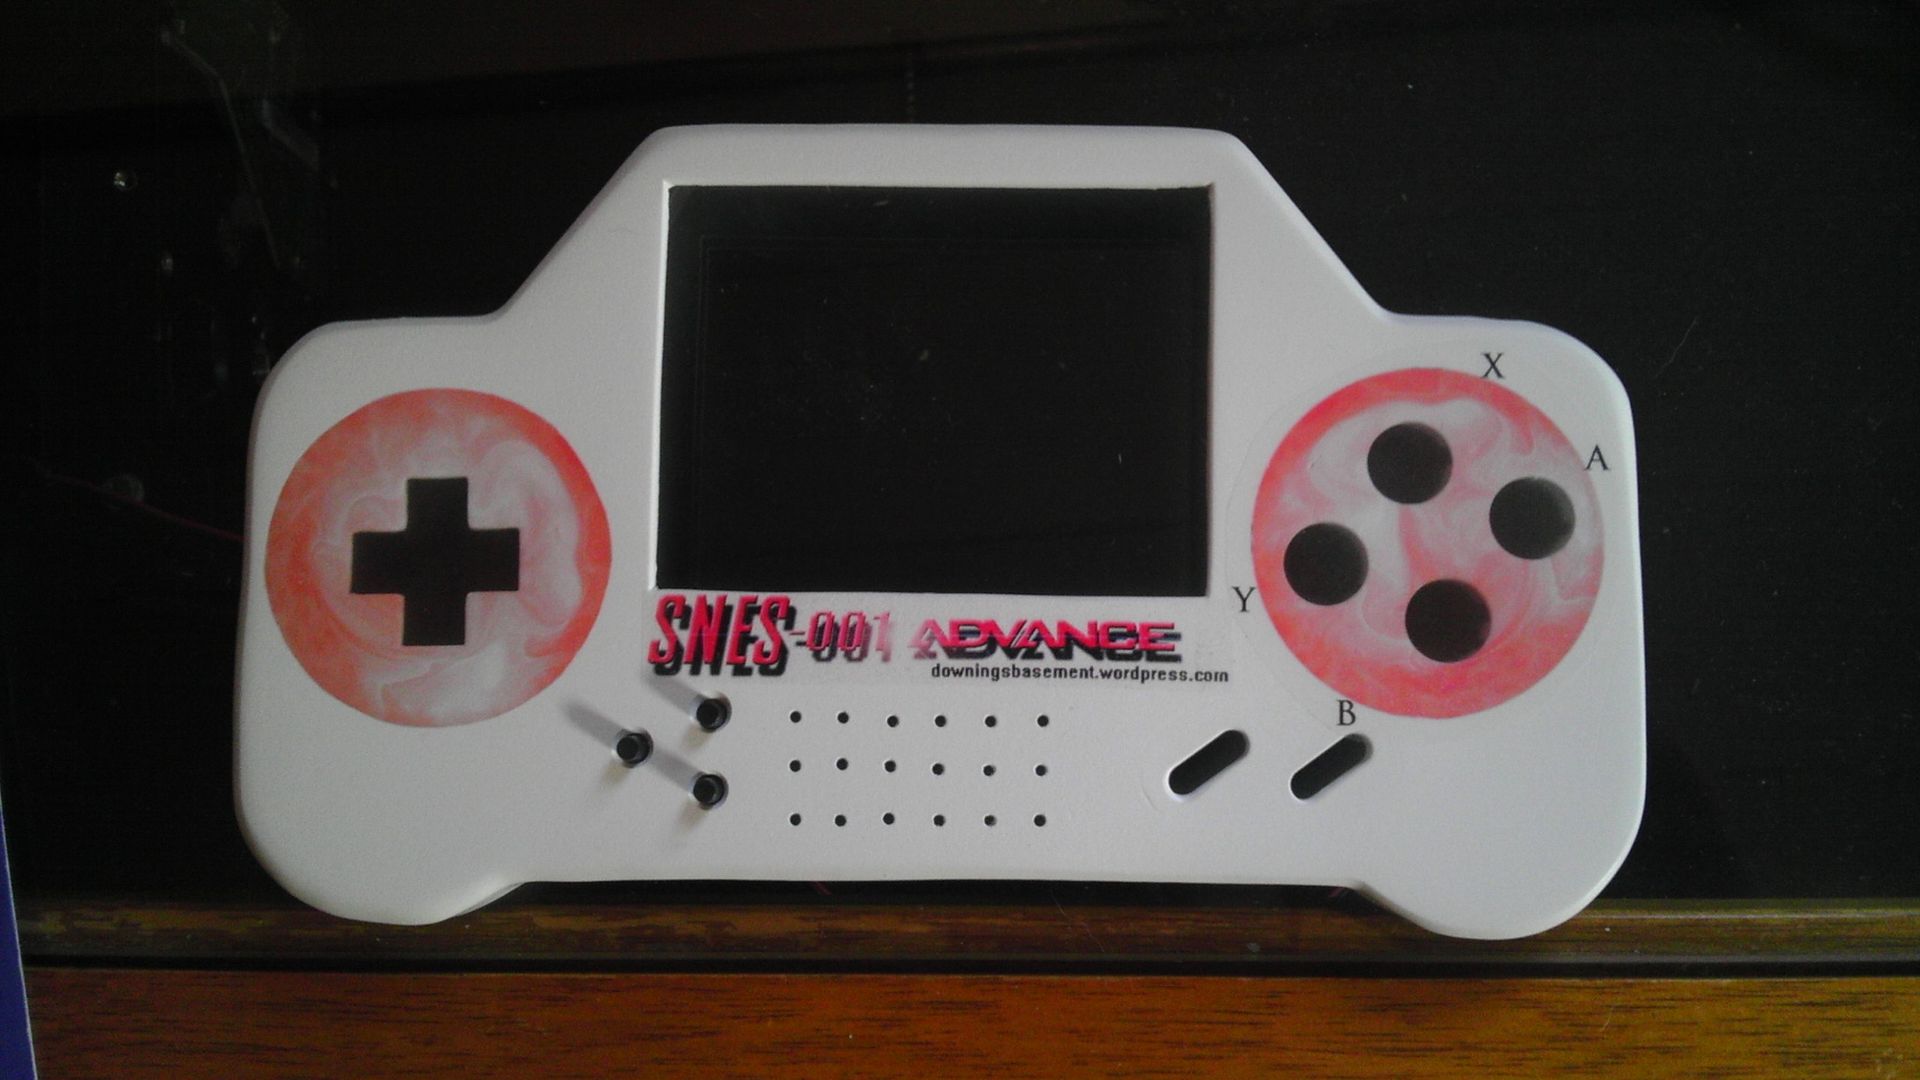
Ok, so with the exception of the Screen tacts, everything is wired up and working including a couple add-on's and changes I wasn't planning on to begin with.
First off, a quick frontal view of everything on the face of the controller. Sound and Video working quite nicely!
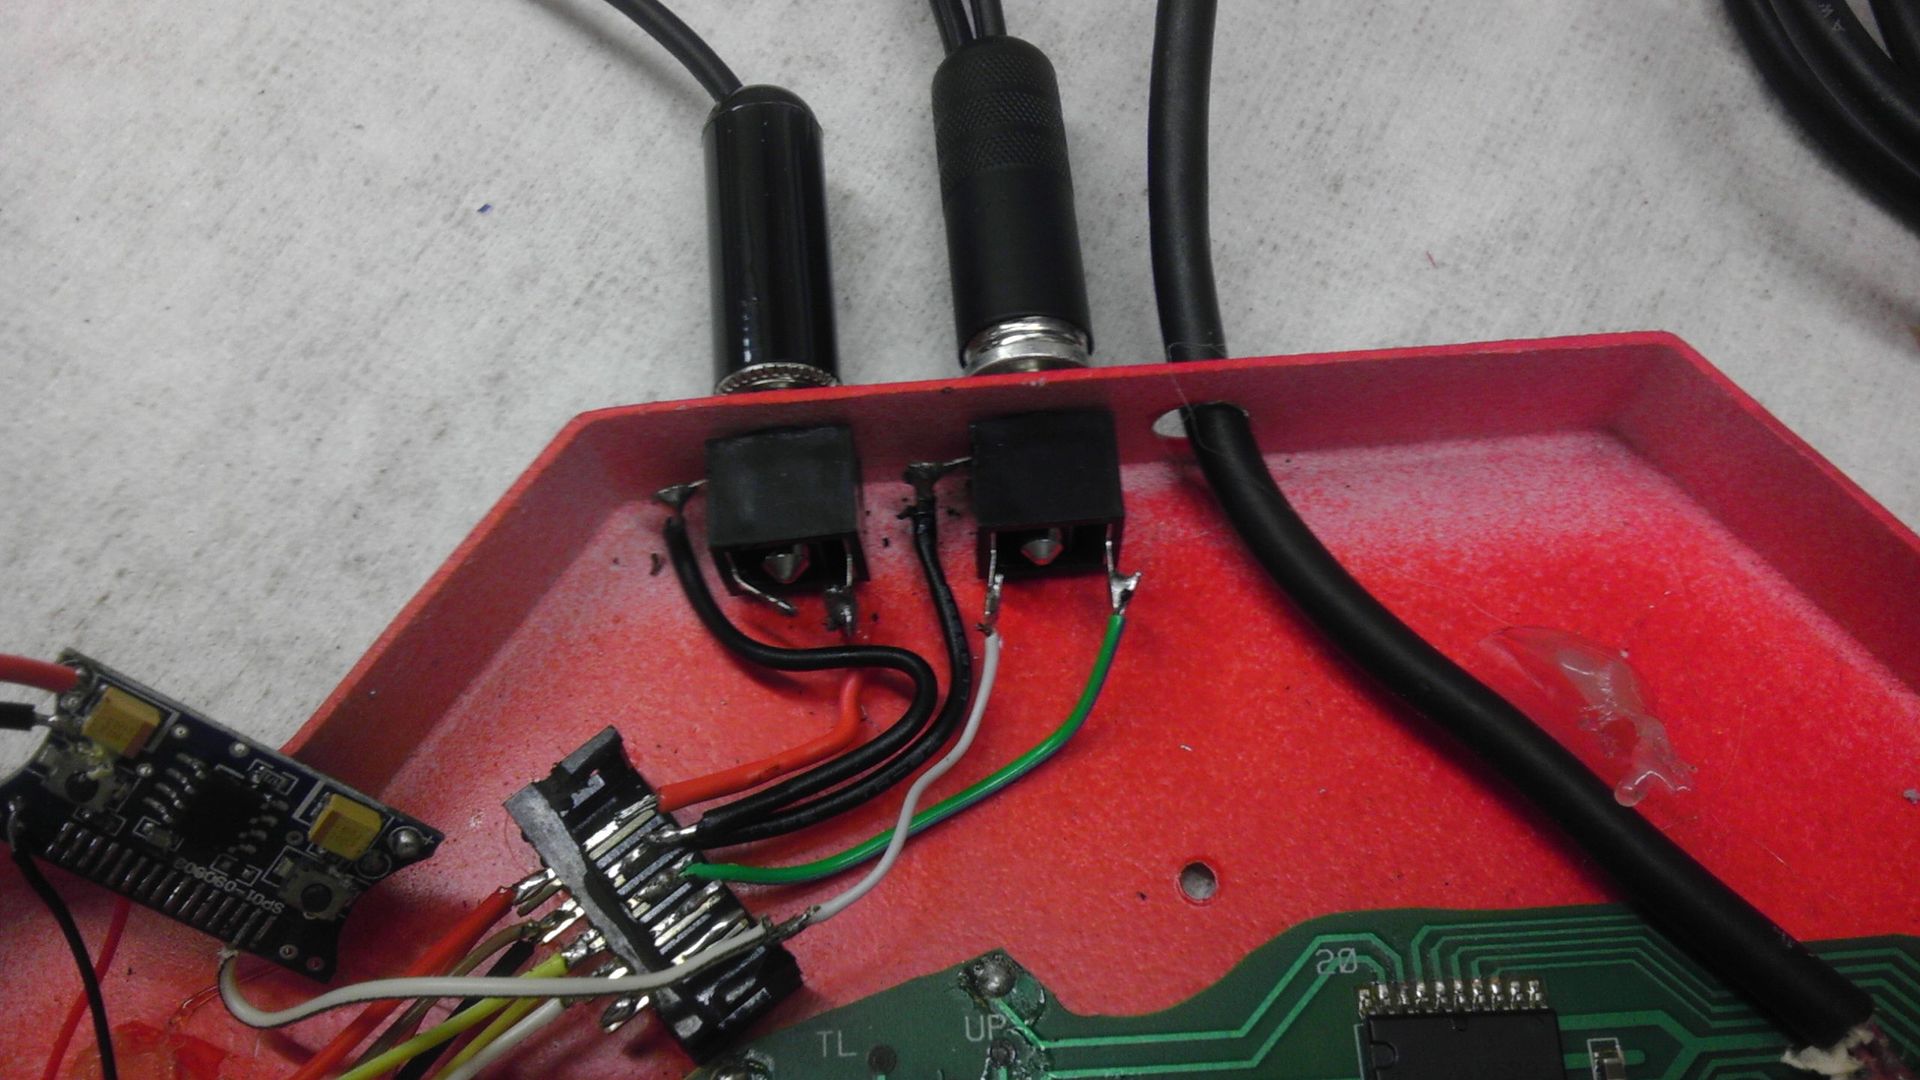
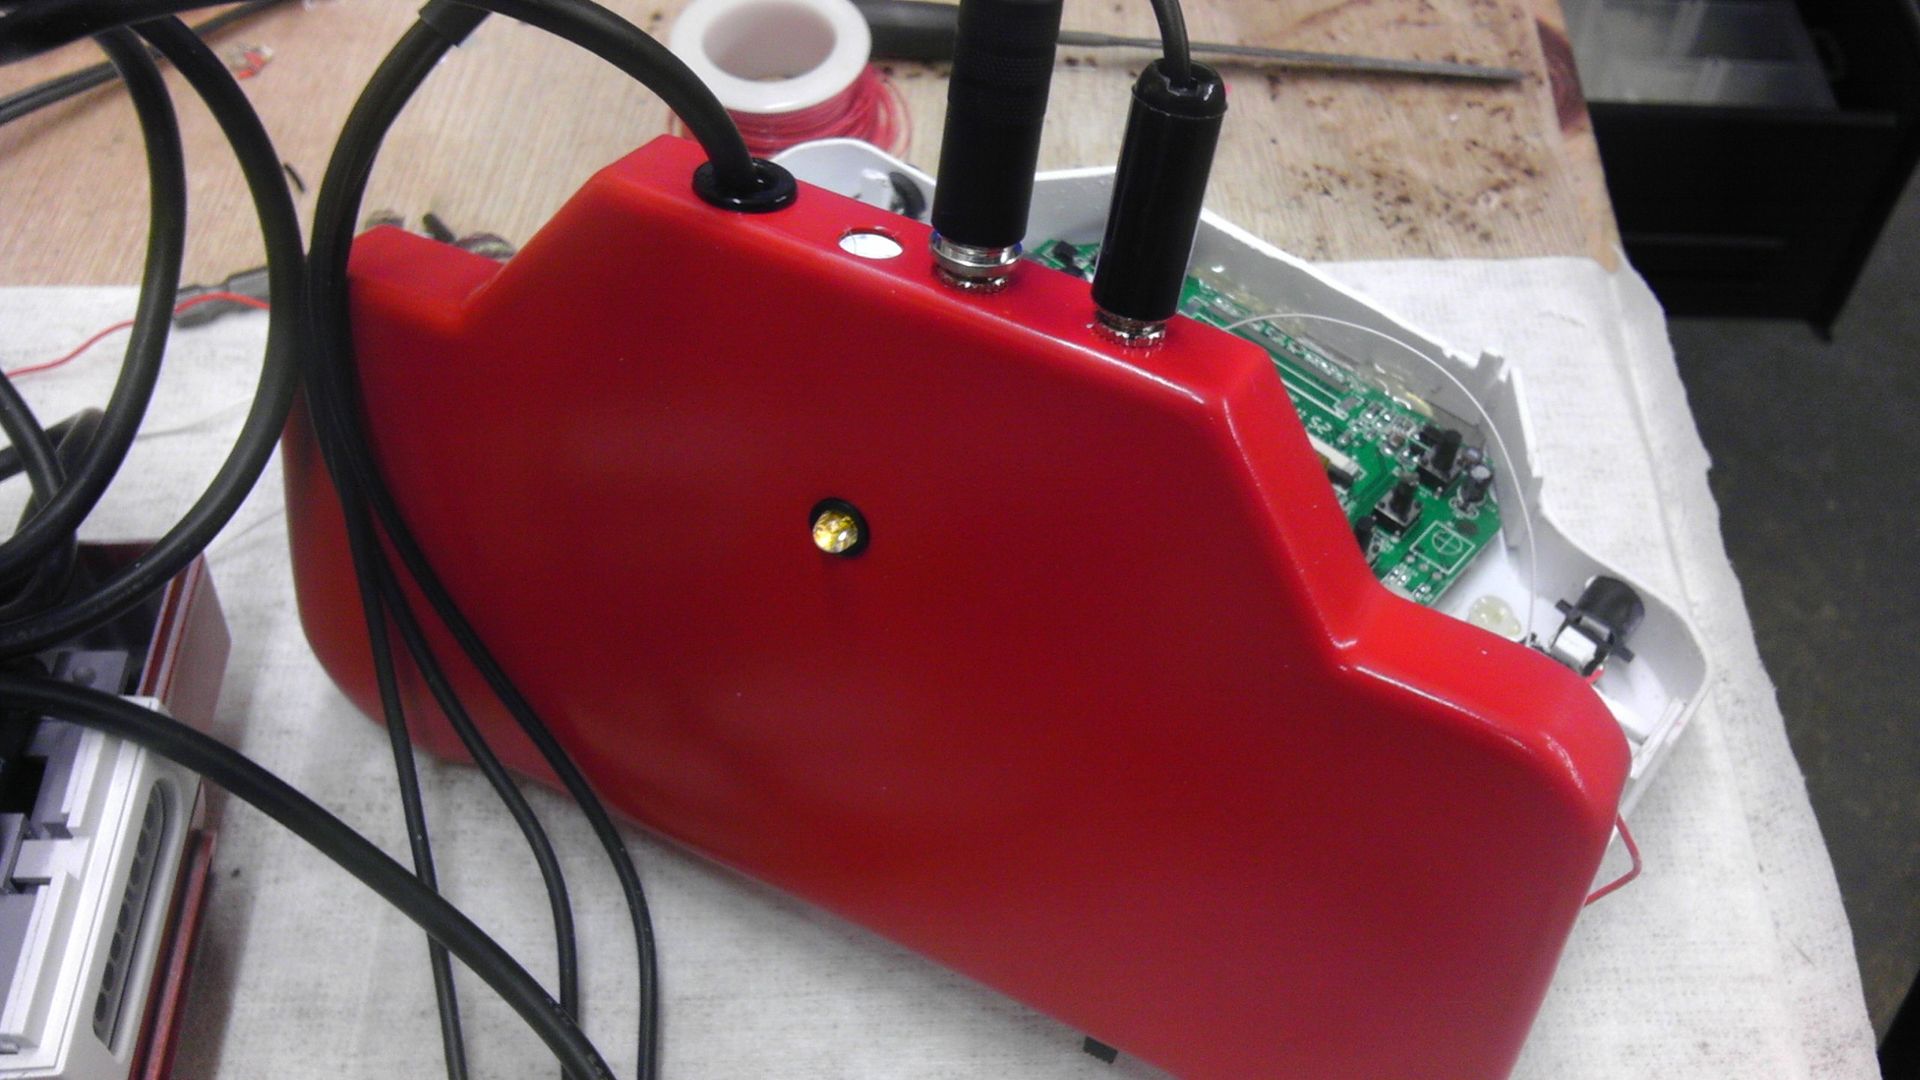
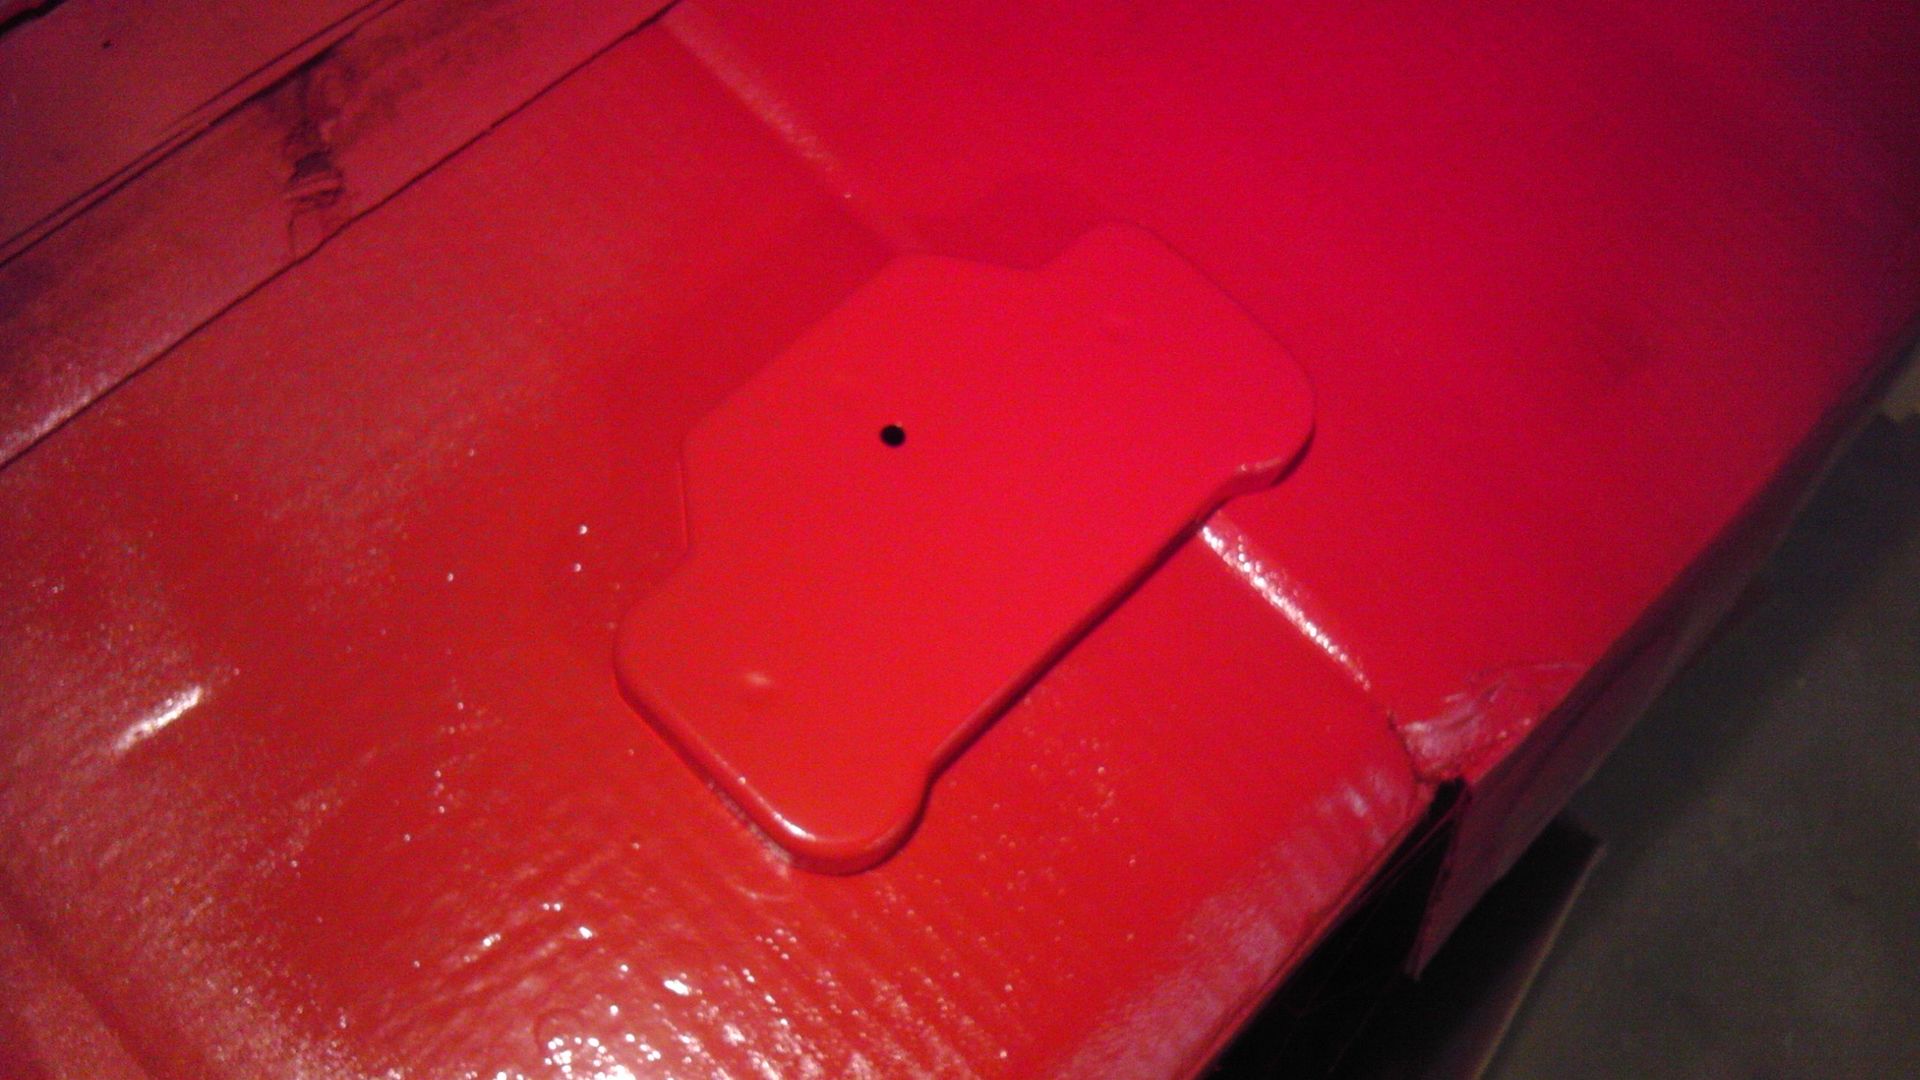
Second, here is the top of the controller with the audio jacks in place as well as the controller line. I decided to move it over a bit more to the right as well as adding an electrical finishing bushing, which basically just trims out a hole, but also will allow me to glue the wire to it as a strain relief as well as make it look pretty.
Third, everything all wired up with the exception of the screen tacts. It got a bit messy in there, but I'm going to clean it up before I close it up just to make sure everything is as secure as it can be.
And finally, the back view displaying the new LED I put in there as well as the finish bushing I put for the control wire.
I should definitely have this controller finished off by the weekend and get a good start on the second one, knowing now exactly what I have to do. Should go much faster than this one. Still not 100% satisfied with the D-pad, but it's workable, responsive and once you get used to it, it works quite well. Will work on beefing it up a bit so it doesn't come apart, but all in all I'm liking where this is going.
First off, a quick frontal view of everything on the face of the controller. Sound and Video working quite nicely!
Second, here is the top of the controller with the audio jacks in place as well as the controller line. I decided to move it over a bit more to the right as well as adding an electrical finishing bushing, which basically just trims out a hole, but also will allow me to glue the wire to it as a strain relief as well as make it look pretty.
Third, everything all wired up with the exception of the screen tacts. It got a bit messy in there, but I'm going to clean it up before I close it up just to make sure everything is as secure as it can be.
And finally, the back view displaying the new LED I put in there as well as the finish bushing I put for the control wire.
I should definitely have this controller finished off by the weekend and get a good start on the second one, knowing now exactly what I have to do. Should go much faster than this one. Still not 100% satisfied with the D-pad, but it's workable, responsive and once you get used to it, it works quite well. Will work on beefing it up a bit so it doesn't come apart, but all in all I'm liking where this is going.
Hey guys, check out my new website and project showcase!
Also this is where my Case Making Guide can be found!
Re: Downing's SNES-001 Advanced
Small update today, though I'm finally getting back into it! Started on the second controller today. I decided to go with a bit of a different layout as well as frakencasing instead of just drilling. I will be doing what Bac has done with the D-pad because I'm about as frustrated with the other controller as can be. Once I have the rest of the buttons cut out, I'll post another update, but for now here's where it's at!
Hey guys, check out my new website and project showcase!
Also this is where my Case Making Guide can be found!
Re: Downing's SNES-001 Advanced
Ok, so I got the front face of the controller sanded an painted tonight. I also added the LED hole and the A/V on-off switch on the back part of the controller. I decided to put the switch on the outside and mount it like it was supposed to be because on the last controller I kinda screwed up using hot glue and pretty much glued the switch shut. Took a lot of Denatured alcohol and time to get it fixed.
You will notice that again, the franken casing isn't perfect. This is of no consequence though as I'll be adding decals around the entire frankencased areas which should cover it nicely.
Trying to get back into this as much as possible, I just wanna get this done and on the auction block, but I can't rush it for that very reason! So it's getting there! I'm still waiting on some high-top tact switches for the screen controls as the regular ones don't sit high enough to push comfortably. I also ordered some very small, very low profile tact switches as well as a trial, so I'll let you know how those work out once they get here.
Hey guys, check out my new website and project showcase!
Also this is where my Case Making Guide can be found!
Re: Downing's SNES-001 Advanced
So before I could really get too far with the internals, I had to put my decals on first because I was going to need to use the open spaces for the x-acto knife to cut the openings for the buttons and d-pad. I did however get the buttons for the screen controls drilled and in place as well as mounting the controllers on/off switch, the A/V & Power Jacks, the controller cable grommet and the LED holder/LED in the back.
Not 100% satisfied with the placement of the YXBA labels because I just kind of guessed at it not knowing where they were going to fall, but now that I have a baseline and can see where the alinement needs to be, I'll probably redo it properly.
I am happy with how the SNES-001 Advance logo turned out though and this is my first successful use of Water-Slide decals. (thanks loveable chevy!)
Much happier with the way this controller is laid out though and tomorrow I should be able to start on the electronics while I'm waiting for the new decals to dry.
The Layout

The Printed Decals
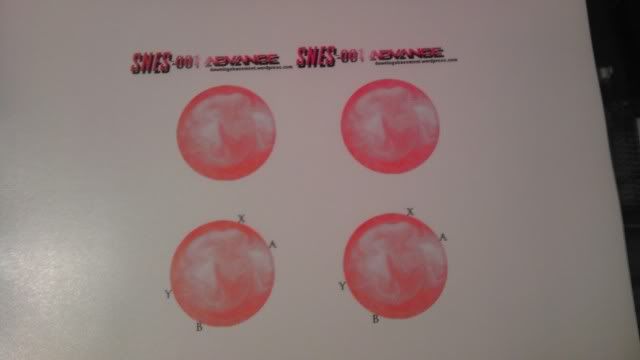
The Decals Placed, Trial One
Not 100% satisfied with the placement of the YXBA labels because I just kind of guessed at it not knowing where they were going to fall, but now that I have a baseline and can see where the alinement needs to be, I'll probably redo it properly.
I am happy with how the SNES-001 Advance logo turned out though and this is my first successful use of Water-Slide decals. (thanks loveable chevy!)
Much happier with the way this controller is laid out though and tomorrow I should be able to start on the electronics while I'm waiting for the new decals to dry.
The Layout
The Printed Decals
The Decals Placed, Trial One
Hey guys, check out my new website and project showcase!
Also this is where my Case Making Guide can be found!
Re: Downing's SNES-001 Advanced
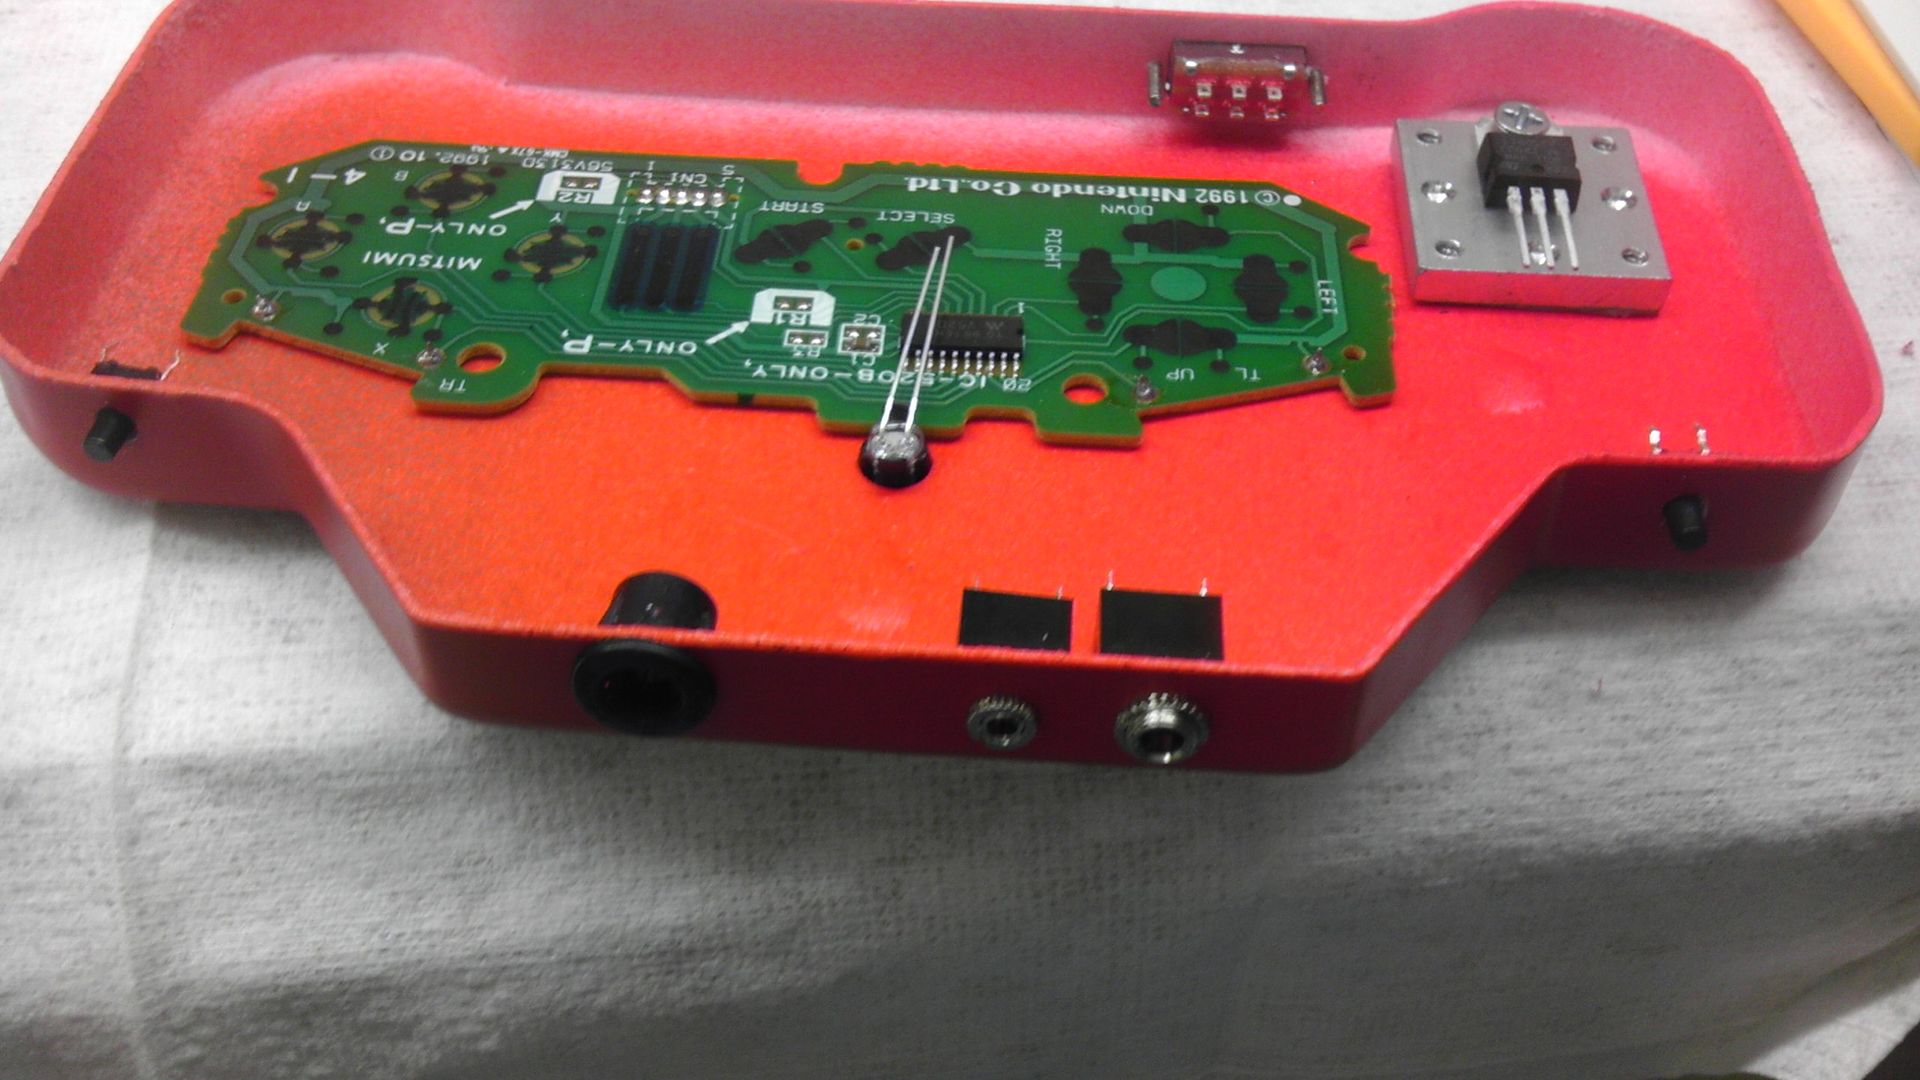
Started with the internals this morning, getting the screen, speaker, controller PCB, D-pad and 7805 mounted. I also made the new decal for the XYBA. Still not perfect, but guessing games rarely are and I'm happy with how much better these turned out. For some reason the lighting was a bit off and the decals look a bit faded in the pic, but they look good in real life still.
Still trying to decide if I wanna use the SNES PCB for the buttons as the feel of the NES d-pad is amazing and secure. Feels just like the real thing because well...it is. I did realize that I mounted the chunk of the NES controller the wrong way and so I have to wire to the PCB a bit differently but it makes no difference regardless. Feels good and we'll see if it works when I get it hooked up to the SNES controller. More updates later this week.
Still trying to decide if I wanna use the SNES PCB for the buttons as the feel of the NES d-pad is amazing and secure. Feels just like the real thing because well...it is. I did realize that I mounted the chunk of the NES controller the wrong way and so I have to wire to the PCB a bit differently but it makes no difference regardless. Feels good and we'll see if it works when I get it hooked up to the SNES controller. More updates later this week.
Hey guys, check out my new website and project showcase!
Also this is where my Case Making Guide can be found!
Re: Downing's SNES-001 Advanced
Started moving on this again today, though I was sick again this morning, so pretty much as wasted day. Anyway, updates in the pics!
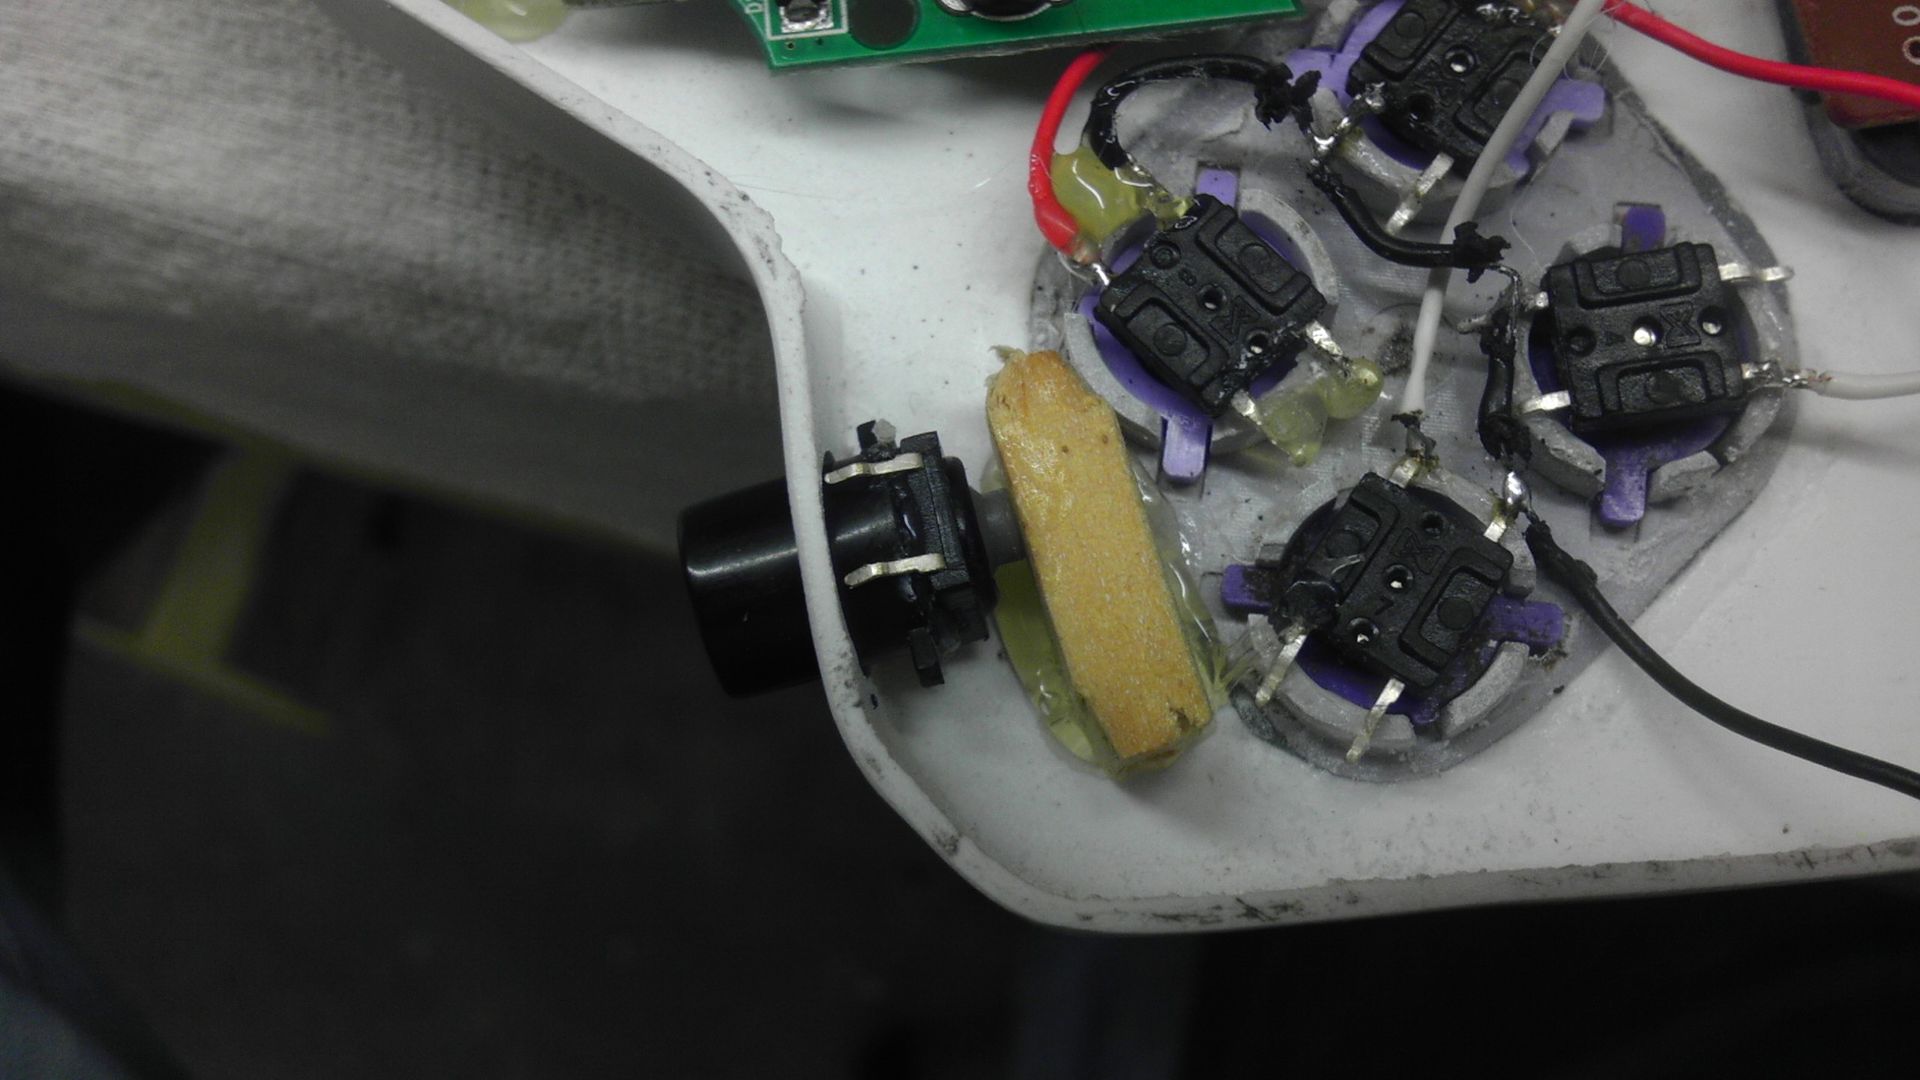
I started with deciding I'd rather go with the rubber tact switches for the YXBA buttons, but I tried a different method of mounting them this time. Because I used the original controller mounts, I had those little lips that the buttons set into to stop them from spinning. So using some loctite super glue, I bent the legs of the tacts backwards so they provided the level base for the buttons and tacked them in place with super glue. Once I have them all wired, I'll then put another back plate over them so they are actually mounted to the casing and won't pop off with a hard button push.
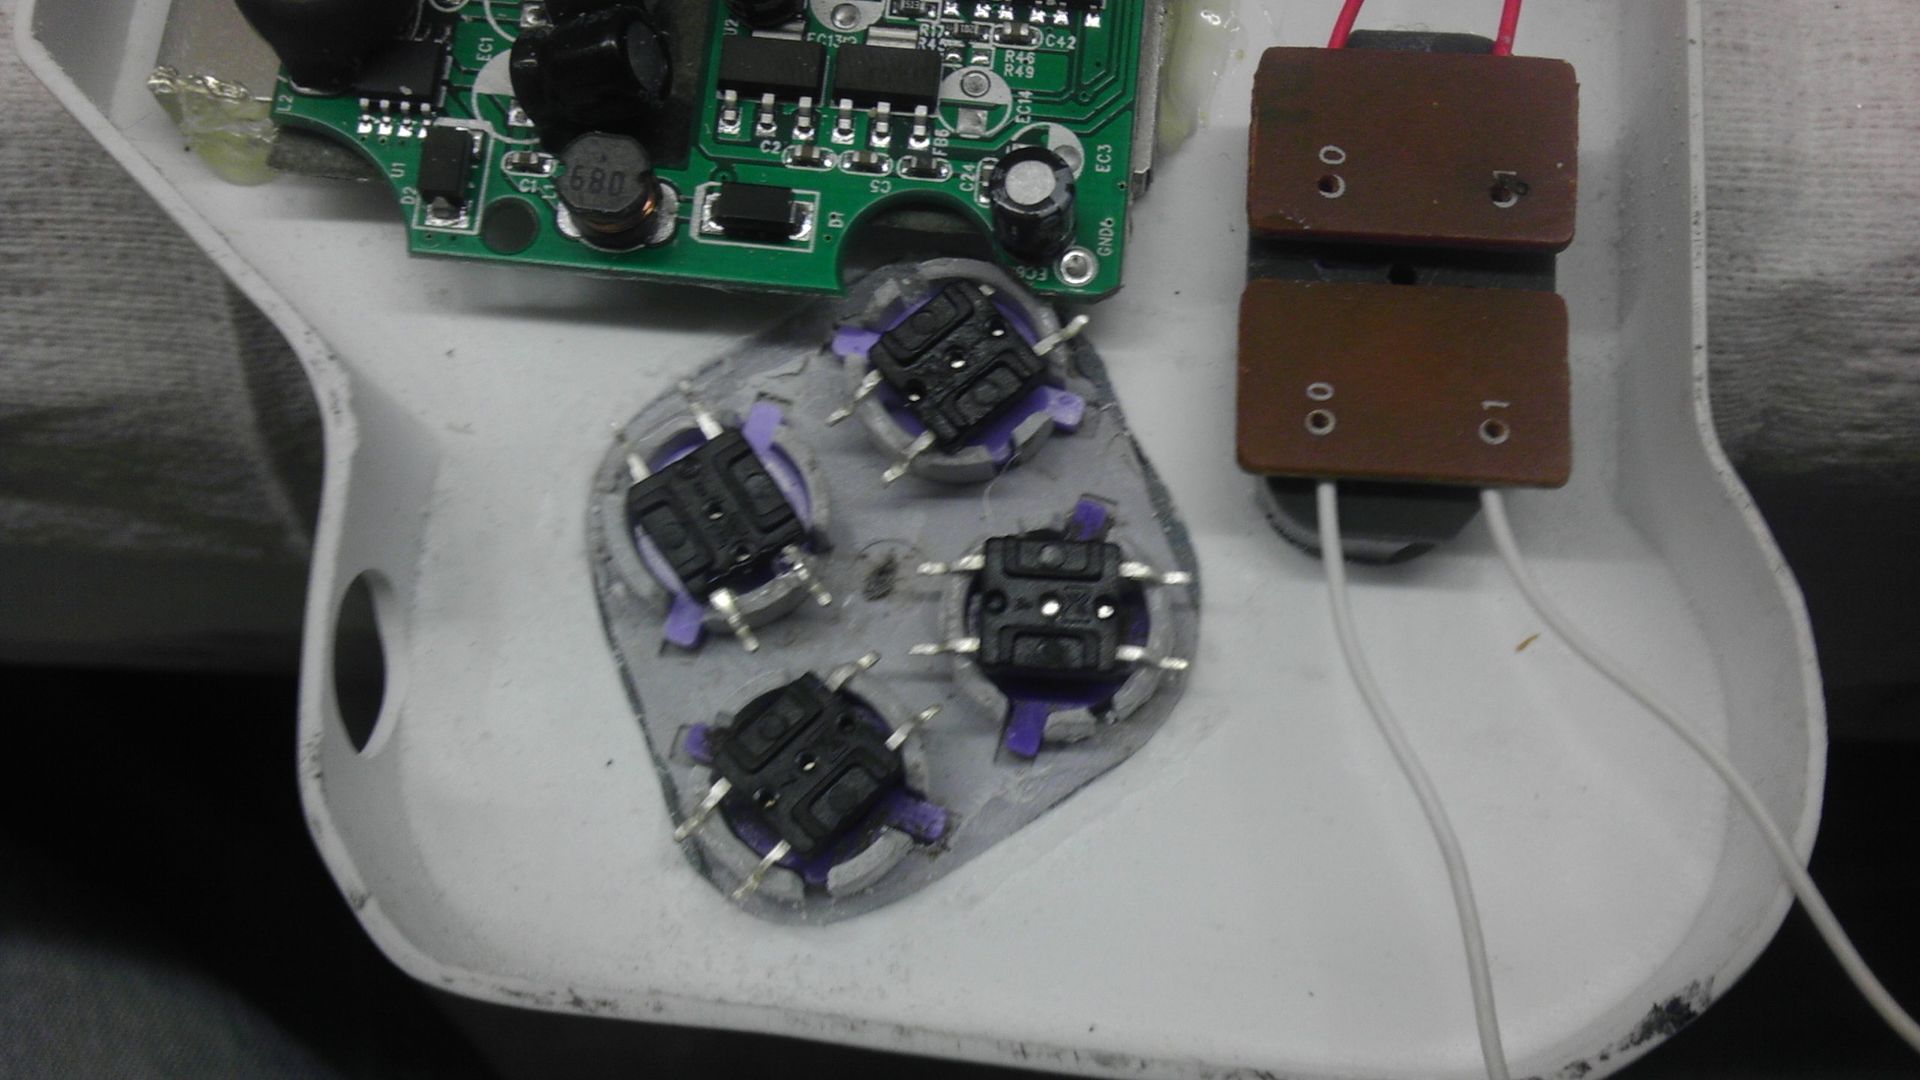
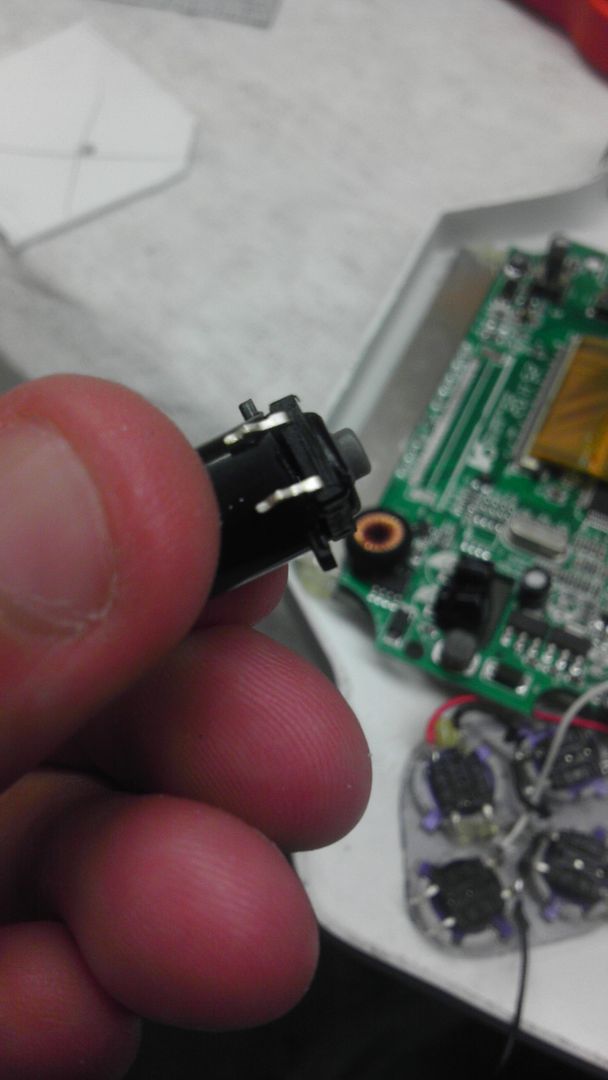
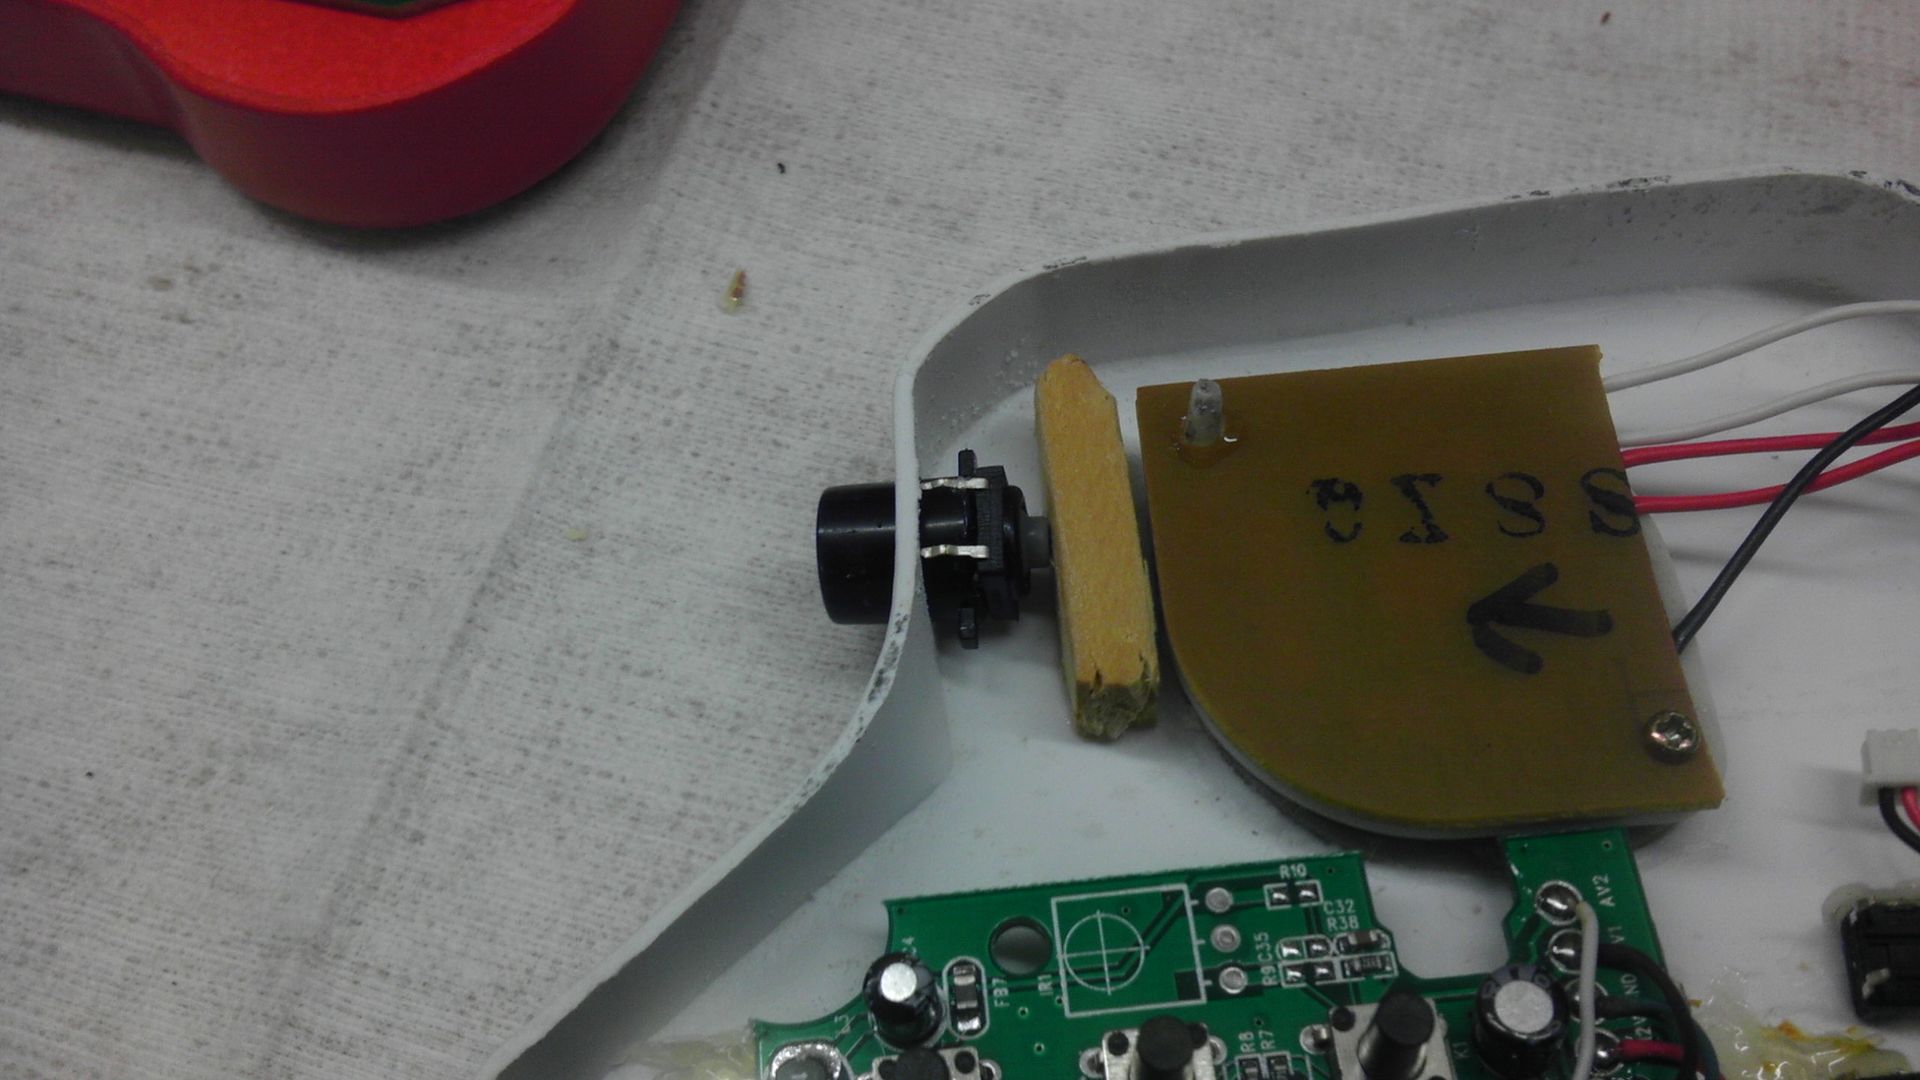
Next I worked on mounting the R&L buttons. Rather than having a button come to the tact and press down that way, I mounted the tact to the bottom of the button with glue and superglued a couple pieces of pine to the deck and so now I have the tact come to the flat surface. Feels a bit more natural that way I think, though I do worry that over time the movement of the buttons might make the solder joint weak, but I wouldn't call this a huge worry really.
The last pic shows the long head click tacks below the R&L buttons. These are going to be my volume up and down. This way you will not have to rearrange the way you're holding the controller to adjust the volume.
Now all that's left is to wire and close it up, make another A/V & Power cable and then redo the first controller correctly using these new methods. Kind of a pain, but will be worth it in the end.
I started with deciding I'd rather go with the rubber tact switches for the YXBA buttons, but I tried a different method of mounting them this time. Because I used the original controller mounts, I had those little lips that the buttons set into to stop them from spinning. So using some loctite super glue, I bent the legs of the tacts backwards so they provided the level base for the buttons and tacked them in place with super glue. Once I have them all wired, I'll then put another back plate over them so they are actually mounted to the casing and won't pop off with a hard button push.
Next I worked on mounting the R&L buttons. Rather than having a button come to the tact and press down that way, I mounted the tact to the bottom of the button with glue and superglued a couple pieces of pine to the deck and so now I have the tact come to the flat surface. Feels a bit more natural that way I think, though I do worry that over time the movement of the buttons might make the solder joint weak, but I wouldn't call this a huge worry really.
The last pic shows the long head click tacks below the R&L buttons. These are going to be my volume up and down. This way you will not have to rearrange the way you're holding the controller to adjust the volume.
Now all that's left is to wire and close it up, make another A/V & Power cable and then redo the first controller correctly using these new methods. Kind of a pain, but will be worth it in the end.
Hey guys, check out my new website and project showcase!
Also this is where my Case Making Guide can be found!