EDIT: this has been updated with a sanwa joystick on the next page. read this first to get the idea for how to do the buttons.
It is pretty easy to mod these sticks to have better buttons, and better switches in the joystick. Soldering is pretty much required for this project. You won't really need any special tools. you'll need
1 phillips screw driver to dismantle the stick
2 flat-head screw drivers to drop out the old buttons
Soldering Iron, wire cutter/stripper
4 cherry brand microswitches (for the joystick itself)
8 sanwa snap-in buttons (or 6, and 2 button plugs if you're hardcore). I used buttons from a Hori real arcade pro 2, which are interchangeable with sanwa/seimitsu snap-in buttons except they don't snap in to this case.
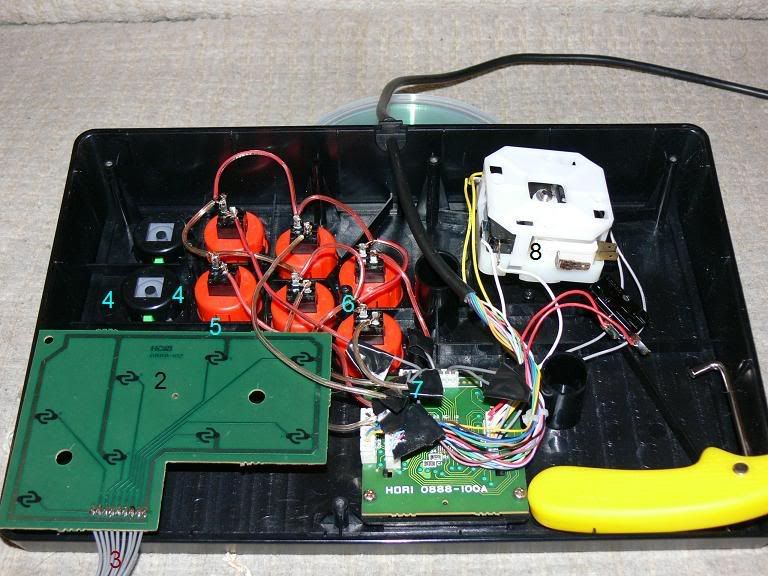
1. (not pictured) take out the screws that hold on the back metal plate, remove it, and then take out the screws that hold in the PCB under the buttons.
2. Trace the button PCB and make note of what buttons go to what pin numbers. my stick has a saturn and PSX plug, I'm assuming yours is the same. if so, I've done this for you but it never hurts to check:
1- GND (COM)
2- B
3- C
4- Z
5- Y
6- X
7- A
8- R
9- L
3. Cut the grey wires close to the button PCB. I split the difference thinking Id have two harnesses, but I was wrong. The button end of the harness seems to be permanent, but the end attached to the "brain" and auto-fire buttons comes right out. That piece will be your new "wiring harness", so leave as much wire on it as you can for attaching wires from your buttons.
4. Use two flat-head screw drivers to pop out the old buttons. there's one clip on the left, and one on the right. push pretty much straight down and they'll come out very easily.
5. Snap in some new sanwa buttons. I used hrap2 buttons originally which didn't snap in securely (they still worked fine, and didn't move around if placed properly)
6. Ground all of the switches together with a common post, and attach that loop to the GND on your harness. In other words, one post from each button should be attached to GND.
7. Solder one wire from each button over to harness, paying attention of course to the layout. I actually put ABC/XYZ where LAB/RXY were for a six button stick. I moved the mapping back to what was labeled when I put in all 8 buttons.
8- As far as fixing or upgrading the joystick goes, take out the four screws first. then you're left with four upside down clips that need to be popped. I was able to do this without removing the ball top with the yellow tool (boot lace tightener) in the lower right corner. the top piece with those clips is what holds the microswitches in place. lift that off and you can replace the microswitches. make sure you use the correct posts on all the switches, I just do them one at a time. Newer "cherry" microswitches may require 1mm or so of filing to fit, it's not bad.
This is a really cheap way to fix up your stick. The buttons are a couple bucks a piece on ebay and the microswitches are dirt cheap. as usual, i accept NO RESPONSIBILITY if you screw this up. On the next page I detail how to cram in a sanwa JLF, but due to space limitations you are left with a joystick that is slightly taller than usual. This doesn't bother me, but may annoy some people.