Bacteria's project: "Project Unity"
Re: Bacteria's project: Alpha Omega
Coming along quite nicely, bac. Thanks for the updates!
Re: Bacteria's project: Alpha Omega
As some of you know, i've been rather sick for the last days with a dormant lung/chest infection, i've had a very rough week and a bit, certainly on the mend now though. Not done stuff on project as wanted to get well first.
The system in the last post certainly seems to work well, and have since the photo was taken, secured a large open heatsink onto the metal strip to the left of the bottom of the ribbon cable as the chip under there gets really hot, this keeps the temperature right down. Another simple add-on - attached a fan assembly onto the large heatsinks over the processors, this will keep the system far cooler than ran originally too.
Only real job left with this is the controller - making a controller section to plug into the master controller. As i'm still not exactly 100% back to health, to put it mildly, i'll do some sideways work tomorrow on the project and maybe for the next days too, something quite critical though:
* Secure metal plates to the side of the skeleton case, each one for a separate power voltage, that will make it easy to know what goes where.
* Connect existing systems to their separate 8P2T switches I bought a while back for the controller (to connect to the master controller). This will keep all the signals separate. The 9th connection will be via the ground, which will be isolated between each console, so the on/off switch, which will on/off the ground line, thus giving the controller the 9 connections it needs.
* SCART - make up a SCART cable, not tried that before; will need to have switches to allow it to swap between 4:3 and 16:9 mode (ie normal and widescreen mode) and also between composite and RGB mode too.
So, before doing the controller for the PS2, may as well rig up the current systems into this "standard" setup so can make a video demonstrating this working, after the PS2 video is made - by then my voice will return to normal too.
I am the Bacman
Re: Bacteria's project: Alpha Omega
Spent ages this morning with an old quality and expensive SCART cable. Cheap SCART cables don't have all the 21 pin connections inside, and had 3 old quality SCARTs. Anyway, was dumbfounded why a little SCART > A/V adaptor worked fine but my simple attempts at replicating it on a female SCART port didn't do anything. Got it down to 2 wires, still didn't work.
So, opened up both ends of the quality SCART cable, having a memory that for some reasons, in the old days when I used SCART cables that some worked others didn't, and made a discovery - sure all 21 pins are wired up nicely however some of the pins at each end are reversed, probably about 1/4 of the pins in fact. That would explain why it didn't work for me!
So, removed one of the ends, tinned the wires, used shrink tubing to stop shorts, worked out which wire was which number (1-21) and labelled them appropriately, then wired the A/V connections to my new wires - all works fine. It is always good when troubleshooting to go right back to basics and build up, when troubleshooting - works.
So, composite working fine on the PS2 on SCART; got to make it RGB now, widescreen/4:3 screen options, auto/select: more testing. The idea is to have each console system working automatically on it's best video quality, be it RGB / S-video / composite, so now is the time to "make the standard" so all the other consoles can suit.
Here's the spaghetti of wires from the SCART end:
I am the Bacman
Re: Bacteria's project: Alpha Omega
Great!
Got the SCART working fine. It's working in switchable RGB and composite modes, auto select (so if a console is turned on it auto selects the SCART rather than having to manually search for it; and the 4:3 / 16:9 (widescreen) mode will work however my old 14" television doesn't seem to want to go widescreen on the PS2.
SCART is great, by the looks of it it also supports component too, although I don't think any of my consoles supports component.
This is great, means just one A/V connection for all systems, no selecting needed as the system will provide the best video quality automatically (ie if a console supports RGB then i'll connect RGB and tell the SCART to run in RGB mode).
This project is certainly complex and with each system to be added, increases by its own factor.
So far, solved the issue with multiple voltage requirements (one power supply in), positive and negative voltages; issue with incompatible controllers (the Master Controller), and 8P2T switches; now the issues with one A/V cable for all systems (as worked out the SCART socket), powering consoles independently.
It proves this system will be completed, over time. Good thing i'm in no rush, absolutely everything in this project has to be forward thought and implications of all decisions, even minor, there is nothing simple about this project. I feel confident though that it will be a success in the end.
I am the Bacman
Re: Bacteria's project: Alpha Omega
To fit inside the recess in the lounge the whole assembly has a maximum of 43cms wide and 34cms high. The SCART cable will be out the back of the console and the power supply input will be too, on the front will be the controller port and the various switches for the console systems. The game cartridges will be front loading as the unit will be recessed.
I've done some calculations, roughly speaking, a CD based console system takes about 7cms for the drive unit holders, and of course the drawer mechanism. That means three drawers = six CD based consoles, leaving around 13cms or so for all the cart based systems.
That means the CD based systems will be: layer 1: GameCube, Amiga CD32; layer 2: PlayStation 2, Philips CD-i; layer 3: Saturn and DreamCast. As there is no space for an extra tier, that means no Xbox, but doesn't matter frankly, i'm not much of a fan of the Xbox anyway.
The cart based systems will still remain as TurboGrafx, N64, SNES, Jaguar, MegaDrive, Amstrad GX4000, Intellivision, SMS, NES, Atari 7800 and Colecovision.
The GameCube with the add-on plays GBA games via original hardware, the PS2 plays PS1 games and the Atari 7800 plays Atari 2600 games.
That means still on target for 20 consoles in one unit; plus maybe some plug'n'plays too for fun, not sure yet.
So that will be the final dimension: 43 x 34 x around 43 cms.
Decided to go the whole hog, it will make working on future systems a bit of a hassle as the regulator boards are now connected to the case skeleton, however it makes sense in the long run.
Connected the power regulators to the casing, removed the crocodile clips and wired the power lines to the metal pieces, and the power lines from the GameCube are connected up. The video lines for the SCART are connected, going to rig up the SCART connector cable to the points tomorrow, then wire up the controller connectors to the 8P2T switch and the on/off switch to the system too. Then, testing.
Secured struts of wood to act as runners for the GC/CD32 consoles to move in and out to load discs. They will keep the system in place.
The wires are long enough for the movement of the section in and out of course.

Once this is ok, (i'll test on composite mode then RGB mode), i'll do the same for the Amiga CD32 system, test that in the same way; then build a shelf in preparation for the next layer.
I've done some calculations, roughly speaking, a CD based console system takes about 7cms for the drive unit holders, and of course the drawer mechanism. That means three drawers = six CD based consoles, leaving around 13cms or so for all the cart based systems.
That means the CD based systems will be: layer 1: GameCube, Amiga CD32; layer 2: PlayStation 2, Philips CD-i; layer 3: Saturn and DreamCast. As there is no space for an extra tier, that means no Xbox, but doesn't matter frankly, i'm not much of a fan of the Xbox anyway.
The cart based systems will still remain as TurboGrafx, N64, SNES, Jaguar, MegaDrive, Amstrad GX4000, Intellivision, SMS, NES, Atari 7800 and Colecovision.
The GameCube with the add-on plays GBA games via original hardware, the PS2 plays PS1 games and the Atari 7800 plays Atari 2600 games.
That means still on target for 20 consoles in one unit; plus maybe some plug'n'plays too for fun, not sure yet.
So that will be the final dimension: 43 x 34 x around 43 cms.
Decided to go the whole hog, it will make working on future systems a bit of a hassle as the regulator boards are now connected to the case skeleton, however it makes sense in the long run.
Connected the power regulators to the casing, removed the crocodile clips and wired the power lines to the metal pieces, and the power lines from the GameCube are connected up. The video lines for the SCART are connected, going to rig up the SCART connector cable to the points tomorrow, then wire up the controller connectors to the 8P2T switch and the on/off switch to the system too. Then, testing.
Secured struts of wood to act as runners for the GC/CD32 consoles to move in and out to load discs. They will keep the system in place.
The wires are long enough for the movement of the section in and out of course.
Once this is ok, (i'll test on composite mode then RGB mode), i'll do the same for the Amiga CD32 system, test that in the same way; then build a shelf in preparation for the next layer.
I am the Bacman
Re: Bacteria's project: Alpha Omega
Another update. Removed the SCART from the PS2 (will be back to that later of course), secured the SCART cable to the Alpha Omega case, wired up all the connections to the metal pieces, connected two switches also to the connections so I can select between composite/RGB and also 4:3/16:9 modes easily. The only thing remaining (*only*) is to rewire the controller connections from the GameCube console to the new switch and into a Playstation controller port. I'll do that after doing the initial testing phase.
Needless to say, if i've many any errors on the power lines, the GC will fry, if i've made any errors on the SCART i'll not get video working or at worst, fry the old television i'm using by killing the port connection inside the television.
I'll be double checking my wiring thoroughly before testing.
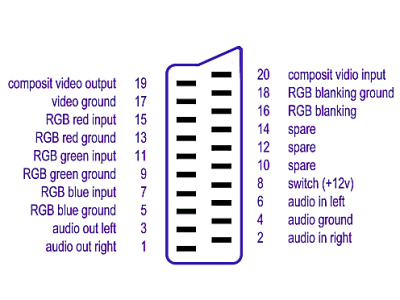
The only other thing is to connect the power on/off switch. Using a 2P2T switch, reason being one side will connect the ground from the power regulators to the grounding on the console and also ground to the SCART, in order to keep the grounding independent per console system (otherwise others will boot, or at least try to). The other side of the 2P2T switch will be for auto selecting if the console is outputting composite or RGB; basically, pin 16 on the SCART is "blanking signal up", if it has 0 volts then you get composite, if between 1 and 3 volts you get RGB as long as of course your system is wired to that.
On SCART, the following pins are relevant:
2: audio right
6: audio left
7: RGB - blue
8: aspect ratio 4:3 or 16:9
11: RGB - green
15: RGB - red
16: composite / RGB mode
20: composite / C-Sync
21: ground
It also appears that other grounds are needed, the audio has a ground connection, as do each of the RGB lines, etc: so (will test this) looks like pins 4, 5, 9, 13, 14, 18 also need connecting to ground.
Here is the SCART pinout. From what i've read, "input" is what you want as SCART was configured in the old days to connect one VCR to another (output) and the main VCR to television (input). You'll also notice SCART can also support component and S-video too.
There are various pinouts for SCART including on Wiki, some are easier to follow than others. This one is a simplified version:
Here's what the system looks like at the moment, pretty much connected up as you see. The space on the right is there for all the many cables from each system to have a place to go to, to connect to their own 8T2P switch and power switch to work.

Needless to say, if i've many any errors on the power lines, the GC will fry, if i've made any errors on the SCART i'll not get video working or at worst, fry the old television i'm using by killing the port connection inside the television.
I'll be double checking my wiring thoroughly before testing.
The only other thing is to connect the power on/off switch. Using a 2P2T switch, reason being one side will connect the ground from the power regulators to the grounding on the console and also ground to the SCART, in order to keep the grounding independent per console system (otherwise others will boot, or at least try to). The other side of the 2P2T switch will be for auto selecting if the console is outputting composite or RGB; basically, pin 16 on the SCART is "blanking signal up", if it has 0 volts then you get composite, if between 1 and 3 volts you get RGB as long as of course your system is wired to that.
On SCART, the following pins are relevant:
2: audio right
6: audio left
7: RGB - blue
8: aspect ratio 4:3 or 16:9
11: RGB - green
15: RGB - red
16: composite / RGB mode
20: composite / C-Sync
21: ground
It also appears that other grounds are needed, the audio has a ground connection, as do each of the RGB lines, etc: so (will test this) looks like pins 4, 5, 9, 13, 14, 18 also need connecting to ground.
Here is the SCART pinout. From what i've read, "input" is what you want as SCART was configured in the old days to connect one VCR to another (output) and the main VCR to television (input). You'll also notice SCART can also support component and S-video too.
There are various pinouts for SCART including on Wiki, some are easier to follow than others. This one is a simplified version:
Here's what the system looks like at the moment, pretty much connected up as you see. The space on the right is there for all the many cables from each system to have a place to go to, to connect to their own 8T2P switch and power switch to work.
I am the Bacman
-
thelolotov
- 32-bit
- Posts: 298
- Joined: Sat Jul 31, 2010 3:17 pm
Re: Bacteria's project: Alpha Omega
Triple check it please, XDbacteria wrote:Another update. Removed the SCART from the PS2 (will be back to that later of course), secured the SCART cable to the Alpha Omega case, wired up all the connections to the metal pieces, connected two switches also to the connections so I can select between composite/RGB and also 4:3/16:9 modes easily. The only thing remaining (*only*) is to rewire the controller connections from the GameCube console to the new switch and into a Playstation controller port. I'll do that after doing the initial testing phase.
Needless to say, if i've many any errors on the power lines, the GC will fry, if i've made any errors on the SCART i'll not get video working or at worst, fry the old television i'm using by killing the port connection inside the television.
I'll be double checking my wiring thoroughly before testing.
Re: Bacteria's project: Alpha Omega
Oh well, turned system on, initially the system didn't work; so on the off-chance of being the least likely component failed, removed the on/off switch and wired the groundings together, and voila - system worked. The RGB/composite switch works nicely - RGB looks far crisper. Problem was, the disc wasn't spinning. Arrghh!
So, thinking the issue might be the 4 amp 12v supply being pushed a bit hard, wired the 7 amp 12v supply from the PS2 and tried that - still no luck. Thought it might be a loose connection on the GC board, so removed the Amiga CD32 from the top of the GameCube boards to have a look - nothing wrong, still same error. Now of course, the Amiga board is raised off the assembly. A niggle in the back of my mind thought, just before resigning myself to having to do a lot of new GameCube work on a new console, "how about the switch" that tells the system if the drive door is shut on the GC - flicked the switch, and low and behold, the disc started spinning. Phew.
Anyway, the SCART is working fine, the GameCube is working fine (after the blip above!), and now i'm going to mount the larger amperage PS2 supply to the rig, may as well, when I get the DreamCast working with a few fans in the system, it will be pushing the 4 amp boundary anyway, so may as well use the PS2 supply at 7 amps and have done with it.
So, got to get the Amiga board back into place again, secure the new transformer into place, re-test; and then crack on with the controller part. Will then do the same for the Amiga.
Proves the old point though about not trying to work on too many systems at once or in this case, leaving things for too long - you forget how you put things together, and silly things like the drive door switch (left it in that mode so can access the memory card and root GC functions).
So, on track, things working - the SCART, power, etc.
----------
YAY! Extended the mains power line to the PS2 transformer, mounted it onto the casing; it all works (GameCube) like a dream. RGB looks really nice too.
Just need to do the controller part now; ie connect the controller pins to the 8P2T switch, and from that to a PlayStation controller plug (looks far nicer than a VGA connector).
I am the Bacman
Re: Bacteria's project: Alpha Omega
More success!
This was my work in progress connector from the console cable to the master controller:

Opened up a Playstation controller connector and wired it up, retaining the outer covering to make it look nice afterwards. The yellow wire is just to make the cable stay in place against the outer covering (I didn't have any more cable ties).

Done, and the covering in place - nice!

This is the new cable connector connected to an 8P2T switch, wired up and finished. Did some preliminary testing on the GameCube, and it works fine; will do more testing tomorrow. All looks fine though. The battery changed for the GameCube settings is also working nicely - the old battery died.

Assuming it passes final testing, the GameCube will be finished, will then get the Amiga working in the same way.
This was my work in progress connector from the console cable to the master controller:
Opened up a Playstation controller connector and wired it up, retaining the outer covering to make it look nice afterwards. The yellow wire is just to make the cable stay in place against the outer covering (I didn't have any more cable ties).
Done, and the covering in place - nice!
This is the new cable connector connected to an 8P2T switch, wired up and finished. Did some preliminary testing on the GameCube, and it works fine; will do more testing tomorrow. All looks fine though. The battery changed for the GameCube settings is also working nicely - the old battery died.
Assuming it passes final testing, the GameCube will be finished, will then get the Amiga working in the same way.
I am the Bacman
Re: Bacteria's project: Alpha Omega
Ok, tested the GameCube fully, using Bomberman Generation as before. Everything works perfectly. Didn't do a proper test last night as it was getting late, also I didn't have the memory card inserted for game saves at the time.
So, onto the Amiga CD32 wiring now! Shouldn't take more than a couple of hours labour when I get onto it, no doubt later today.
So, onto the Amiga CD32 wiring now! Shouldn't take more than a couple of hours labour when I get onto it, no doubt later today.
I am the Bacman