
I have a big box of old (mostly AT) PSUs in the basement and a PSU tester.
Dunno if shipping would make it prohibitive, but I'd be willing to dig them out and show you what's there - even open one to look for bulging caps and test some with my capacitor tester.
The instructions recommend desoldering, but it does say they can be tested in-circuit.
My i486 DOS PC Build - Possible Motherboard Fault?


Re: My i486 Retro PC Build : )
Thanks for the offer, Anapan! But I'm kinda leaning toward using this Thermaltake ATX PSU that I have.
Re: My i486 Retro PC Build : )
I finally got around to dealing with the case a little.
Taking it apart...

Plenty of dead spiders, and it looks like something was spilled in it at some point...

I ended up getting a gel type rust remover, and it worked well. In addition to removing rust it actually removed the paint, or whatever was on the surface of the metal.

Inside of the top cover...

So it kinda looks like hell right now, but I knew that it would. I was planning on spray painting it, so it's no matter.
I got a can of Rust-Oleum Aluminum Metallic and did a test on the bottom of the case...

I'm definitely satisfied with the color and the way it looks. Sometimes those "metallic" spray paints can look kinda fake. These old PC cases, the inner parts aren't ever painted they're just metal. So I wanted it to look like it was just metal, and not painted, and I think that has been accomplished. I will have to give the rest of it a little further cleaning and then can start spraying coats on it.
The top of the case, I'm still undecided if I want to spray it or not.

I got the rust off of it. It wasn't actually rusted, just stained with something. It cleaned up well. It has a little bit of paint missing in spots, but overall it's still very nice. So I might just leave it.
The only reason I was thinking about spraying it is because the front plastic part is yellowed and I was planning on spraying that. I could try and retro brite it, but that wouldn't stop it from yellowing again in the future. Since this is a generic case, and has no logos or anything, I don't mind spraying it. Then it'll never change color again. But I've been having trouble getting just the right color in a rattle can.
I picked up a can of Rust-Oleum Heirloom White, which seems like a really good color match for PC parts that aren't new. As in, mostly ALL parts have yellowed at least a little, and they're not as white as they use to be. We tend to refer to old PCs as beige, but when they were new they were more like a really light grey. And that color isn't easy to find. At least, the stores around here have been a pain in the ass to find stuff. Anyway, I picked up a can of Heirloom White and did a test on a 3D printed part (I was trying to make a 3.5" bay cover) but I didn't like the way it turned out. I think maybe because I got satin and you really need to use flat on plastics or it ends up looking horrible.
I was in the store yesterday and saw the Rust-Oleum color Ivory-Bisque which looked like it might be better than Heirloom White, but they only had it in semi-gloss and that is definitely no good. I might try and find these two colors online in matte or flat. I actually like Krylon Fusion a lot more, but not a lot of stores around here carry it any more.
And it's been a pain in the ass trying to order spray paint online. I have ordered Krylon Fusion from Amazon before. But when I tried to order the Rust-Oleum Aluminum Metallic from them, I was shipped a can of white LOL. This was SOLD BY Amazon. They wouldn't let me do a return on this item, so I had to contact customer support. They gave me a refund, but now I don't want to bother trying to order it from them again. So I ordered the Aluminum Metallic from Wal Mart instead. They wouldn't deliver it unless someone was home, so they skipped my delivery all together even though someone was home all day. Then I got a call from them asking when would be a good time for delivery because it has to be signed for. I told them any time that day. They came later to deliver, and left the package on the stoop without getting a signature LOL. So I don't know, I might try and order from Lowe's or Home Depot next.
And I know I could try and order Krylon Fusion online, which I'd rather use over Rust-Oleum, but I'd have to try and match the color up online. Which is really hard to do. You can't get a true sense of the color on the computer screen. I've actually been thinking about getting my own spray equipment, because I often have a need for small projects like this. If I did, I'd be able to match up colors with a fan deck and spray it that way. Or alternatively, you can get these aerosol cans that you can screw a cup of paint onto the bottom of and effectively make your own rattle can.
https://www.stewmac.com/luthier-tools-a ... spray-unit
I don't know how well they work though, comparative to "real" spray equipment. Anyway, sorry to rant about spray paint.
In other news, I finally cleaned the epoxy off of the CPU...

You can still see the X pattern that was the epoxy, I could probably clean it further but didn't feel like it. I used acetone, and it did work but it wasn't as easy as I thought it was. It did dissolve the epoxy, but only a little at a time. I had to wet it with acetone, then scrape with a plastic putty knife (didn't wanna scratch it) , then wet it again with acetone and repeat several time to get it all off.
Anyway, I mainly wanted to see if it was a 5v or 3.3v CPU. I didn't realize until recently that there was a 3.3v variant of the DX2-66. Since the motherboard supports 3.3v CPUs, I thought there was a chance this could be a 3.3v CPU. But looks like it's just the standard 5v one.
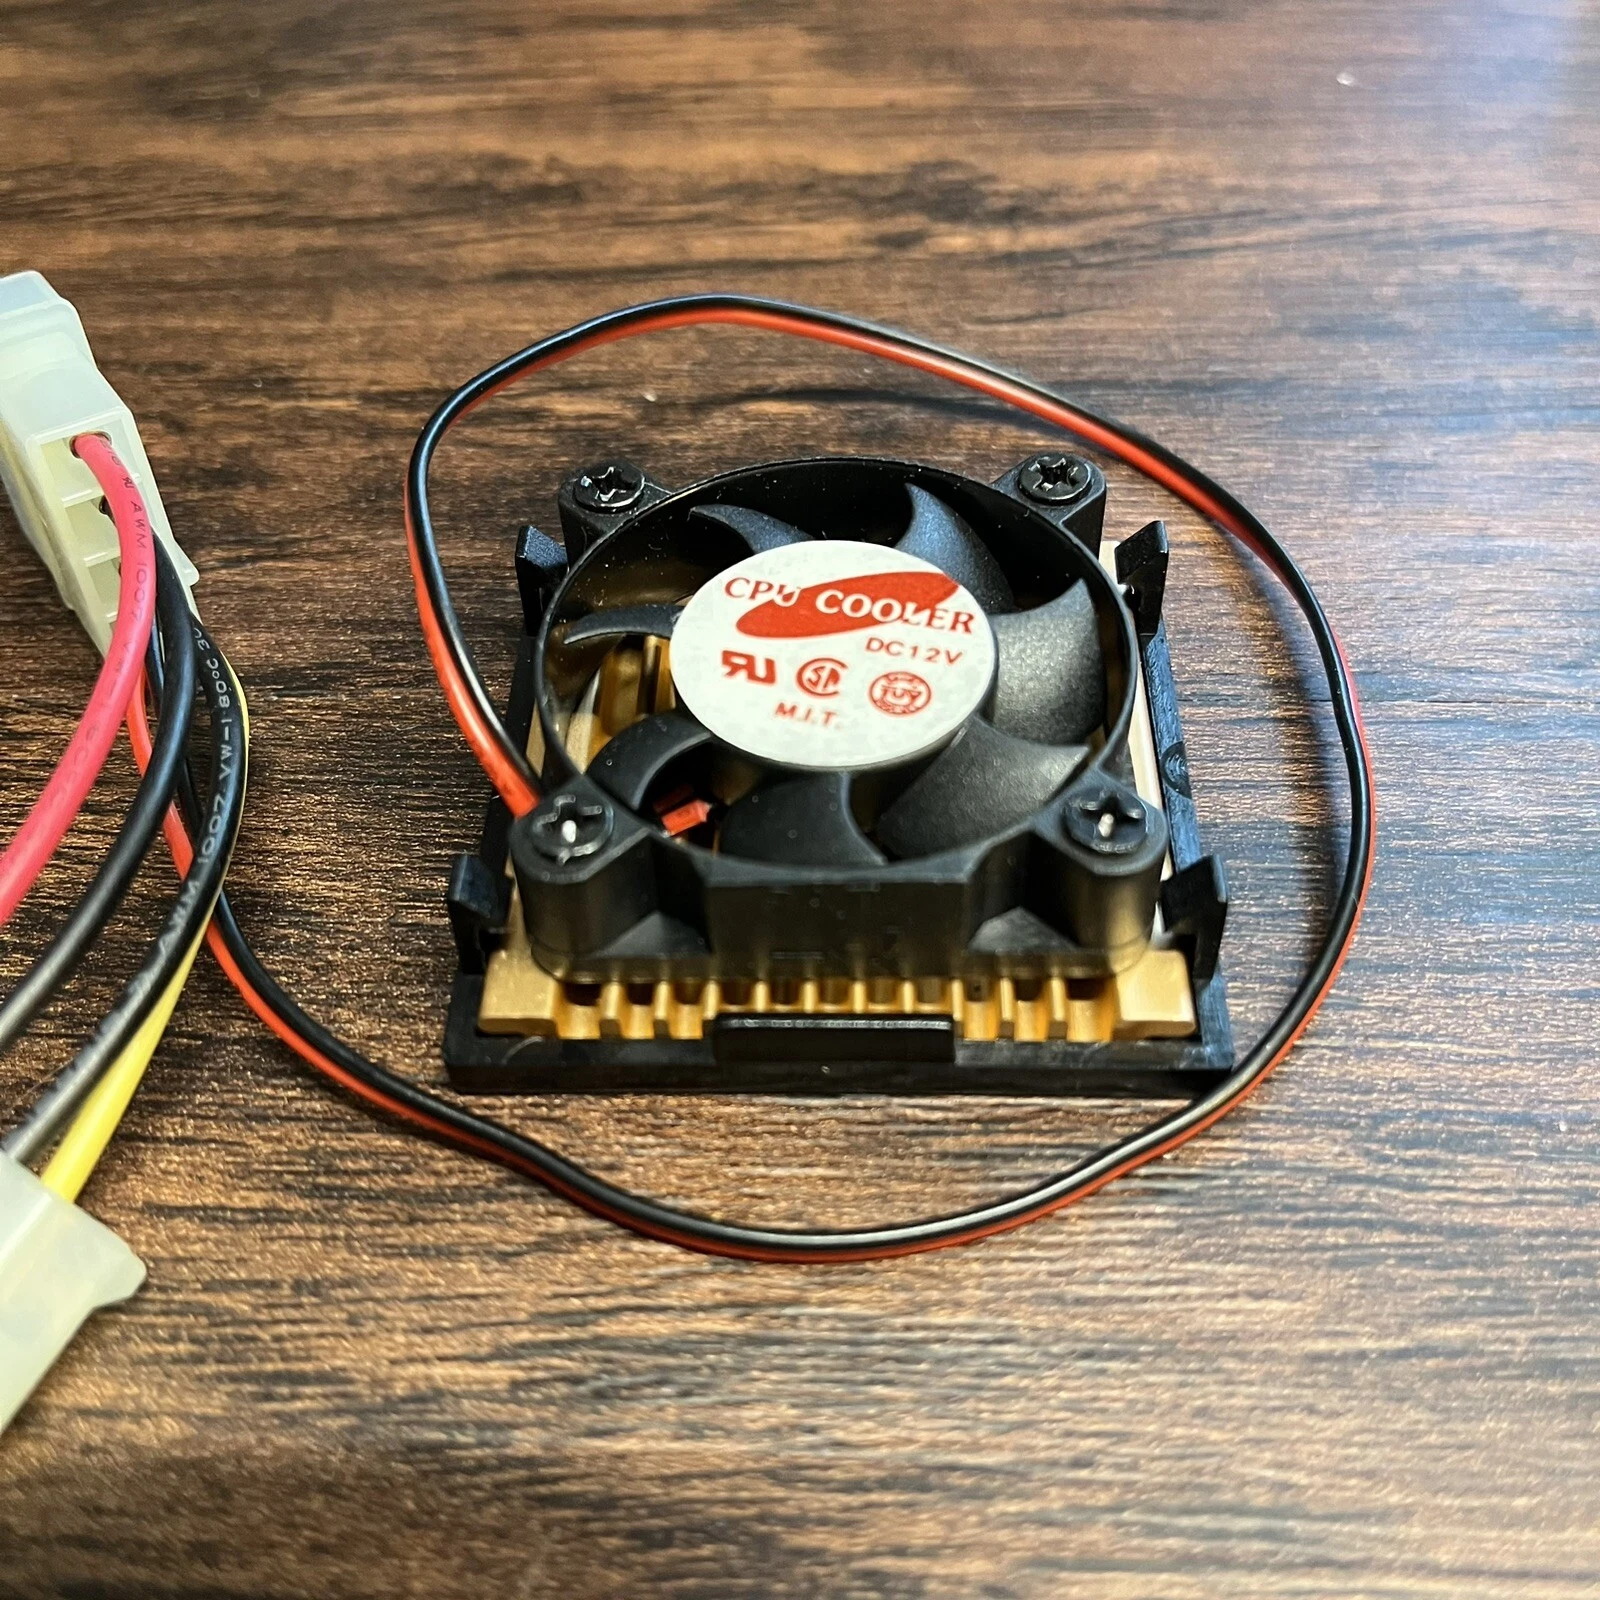
I wanted to clean the epoxy off anyway to get better thermal transfer. This came with a little clip on fan. But I decided that I'll use a heatsink with a fan. I know these CPUs don't absolutely need either, but I think the cooler the better for aging electronics.
Here's what I ended up getting...
Anyways, sorry for a somewhat boring update. After I get the case fixed up and put back together, then I can start actually putting together the PC!
Taking it apart...
Plenty of dead spiders, and it looks like something was spilled in it at some point...
I ended up getting a gel type rust remover, and it worked well. In addition to removing rust it actually removed the paint, or whatever was on the surface of the metal.
Inside of the top cover...
So it kinda looks like hell right now, but I knew that it would. I was planning on spray painting it, so it's no matter.
I got a can of Rust-Oleum Aluminum Metallic and did a test on the bottom of the case...
I'm definitely satisfied with the color and the way it looks. Sometimes those "metallic" spray paints can look kinda fake. These old PC cases, the inner parts aren't ever painted they're just metal. So I wanted it to look like it was just metal, and not painted, and I think that has been accomplished. I will have to give the rest of it a little further cleaning and then can start spraying coats on it.
The top of the case, I'm still undecided if I want to spray it or not.
I got the rust off of it. It wasn't actually rusted, just stained with something. It cleaned up well. It has a little bit of paint missing in spots, but overall it's still very nice. So I might just leave it.
The only reason I was thinking about spraying it is because the front plastic part is yellowed and I was planning on spraying that. I could try and retro brite it, but that wouldn't stop it from yellowing again in the future. Since this is a generic case, and has no logos or anything, I don't mind spraying it. Then it'll never change color again. But I've been having trouble getting just the right color in a rattle can.
I picked up a can of Rust-Oleum Heirloom White, which seems like a really good color match for PC parts that aren't new. As in, mostly ALL parts have yellowed at least a little, and they're not as white as they use to be. We tend to refer to old PCs as beige, but when they were new they were more like a really light grey. And that color isn't easy to find. At least, the stores around here have been a pain in the ass to find stuff. Anyway, I picked up a can of Heirloom White and did a test on a 3D printed part (I was trying to make a 3.5" bay cover) but I didn't like the way it turned out. I think maybe because I got satin and you really need to use flat on plastics or it ends up looking horrible.
I was in the store yesterday and saw the Rust-Oleum color Ivory-Bisque which looked like it might be better than Heirloom White, but they only had it in semi-gloss and that is definitely no good. I might try and find these two colors online in matte or flat. I actually like Krylon Fusion a lot more, but not a lot of stores around here carry it any more.
And it's been a pain in the ass trying to order spray paint online. I have ordered Krylon Fusion from Amazon before. But when I tried to order the Rust-Oleum Aluminum Metallic from them, I was shipped a can of white LOL. This was SOLD BY Amazon. They wouldn't let me do a return on this item, so I had to contact customer support. They gave me a refund, but now I don't want to bother trying to order it from them again. So I ordered the Aluminum Metallic from Wal Mart instead. They wouldn't deliver it unless someone was home, so they skipped my delivery all together even though someone was home all day. Then I got a call from them asking when would be a good time for delivery because it has to be signed for. I told them any time that day. They came later to deliver, and left the package on the stoop without getting a signature LOL. So I don't know, I might try and order from Lowe's or Home Depot next.
And I know I could try and order Krylon Fusion online, which I'd rather use over Rust-Oleum, but I'd have to try and match the color up online. Which is really hard to do. You can't get a true sense of the color on the computer screen. I've actually been thinking about getting my own spray equipment, because I often have a need for small projects like this. If I did, I'd be able to match up colors with a fan deck and spray it that way. Or alternatively, you can get these aerosol cans that you can screw a cup of paint onto the bottom of and effectively make your own rattle can.
https://www.stewmac.com/luthier-tools-a ... spray-unit
I don't know how well they work though, comparative to "real" spray equipment. Anyway, sorry to rant about spray paint.
In other news, I finally cleaned the epoxy off of the CPU...
You can still see the X pattern that was the epoxy, I could probably clean it further but didn't feel like it. I used acetone, and it did work but it wasn't as easy as I thought it was. It did dissolve the epoxy, but only a little at a time. I had to wet it with acetone, then scrape with a plastic putty knife (didn't wanna scratch it) , then wet it again with acetone and repeat several time to get it all off.
Anyway, I mainly wanted to see if it was a 5v or 3.3v CPU. I didn't realize until recently that there was a 3.3v variant of the DX2-66. Since the motherboard supports 3.3v CPUs, I thought there was a chance this could be a 3.3v CPU. But looks like it's just the standard 5v one.
I wanted to clean the epoxy off anyway to get better thermal transfer. This came with a little clip on fan. But I decided that I'll use a heatsink with a fan. I know these CPUs don't absolutely need either, but I think the cooler the better for aging electronics.
Here's what I ended up getting...
Anyways, sorry for a somewhat boring update. After I get the case fixed up and put back together, then I can start actually putting together the PC!
Re: My i486 Retro PC Build : )
Just some more progress on restoring the case...
Yuck, something definitely spilled on this.

One thing that I was a little concerned with was the switches. The reset and turbo switches felt a little sticky, and didn't operate smoothly. The thing that sucks is that direct replacements might be possible, but from my experience they're usually a bit of a pain in the ass to find the correct ones. Unless it's a super common style. Anyway, these switches just sort of friction fit in...

The switch button caps don't have any springs, they just friction fit on the switch itself.

And just a shot of the back of the case where the switches fit in...

Incidentally, there's a date code stamped into the plastic seen in the above pic. Looks like this case was manufactured in September of 1994.
Here's a shot of it all cleaned up...

It's too large to clean at my work bench, so I took it to the kitchen sink. I ended up using Scrubbing Bubbles and the rough side of a kitchen sponge, and a small brush to get in the tight spaces. This actually worked well to remove the grime and the rust stains. Although there was one stubborn rust spot that I couldn't get all the way off. I bet if I scrubbed for longer or with something more aggressive that would have done it, but I didn't feel like it.

It's just a very minor spot. I'm not worrying about it because I'm either gonna Retro Brite this or spray paint it, I haven't decided yet. If I paint it, then that stain will be covered up no problem. If I Retro Brite, I don't know, I'll worry about it then.
The bottom part of the case is looking really good...

If the top of the 5.25" drive cage looks weird, that's because it's mid way drying and that's just how the camera picked it up. But overall I'm very pleased with the color and finish. If you didn't know it was painted, you would take a second look.
Here's the paint that I'm using...

The Metallic aluminum is for the bottom of the case, obviously. The Heirloom White was possibly for the bezel, but I don't think I'll be using it. It's not a bad color match for aged plastics that aren't totally yellowed but aren't their original color. But it's not a total match to my beige drives. Since I'm putting black drives in this build, if I used Heirloom White I think it would look just fine. But I want to have the option down the road to swap beige drives in here (in case I have drive failure). Also, the lowest sheen Heirloom White comes in is Satin, which I don't think is the right choice. You really want flat or matte for plastics like this. Any higher sheen and it always ends up looking bad.
So I hunted for more rattle can colors that would be a good fit, and came up with very little. The only other Rust-Oleum color that might be a good fit is Ivory Bisque, but that only comes in semi-gloss which is definitely no good. So I hunted for Krylon Fusion, which I prefer anyway, and came up with Matte Clamshell. It seems a little lighter and/or less yellow than Heriloom White, which is good.

In the above pic, the cap colors end up looking very similar. They look more distinct in person. It's the lighting in the room plus what the camera is doing, they end up looking closer then they really are in person.
Anyway, I was in Lowe's (home improvement store here in the USA) and noticed this other brand on the shelf. Magnolia Home? I've never used it before. Says it's crafted with Kilz, whatever that means LOL. I've never used "chalk" spray paint before, but I really liked some of the color options they have. They all appear to be matte (hence chalk) so that's good. I ended up picking up the colors Yarn and Shiplap.
I have a blank 5.25" drive bay cover for this case, along with a few 3.5" covers that I 3D printed. I've been using those to test the spray paints with. Here's my latest batch...

I have them labeled on the back, but I forget now which is which just from looking at the picture. But I know the bottom one is Heirloom White (satin). The top I believe is the Krylon Matte Clamshell. And the two in the middle are the Magnolia Home.
Again, it's kinda hard to match a color looking at a computer screen. It's really not the true color. Even in person, it's not easy to match colors with your eyes. But the Heirloom White ends up being too beige. We tend to call old PCs "beige" but more often then not they're more like really light greys. Of course, by now they are all dirty and yellowed. Even one that isn't heavily yellowed, a very slight yellowing will make a light grey color look beige. So yeah, it's kinda hard to find a good fit. But the Krylon and Magnolia colors might be a better fit. I sprayed those test pieces yesterday, I had to wait for them to dry before I could bring them over to my various PC parts and do a color comparison. I've been holding them up to various disc drives and cases that I have.
Yuck, something definitely spilled on this.
One thing that I was a little concerned with was the switches. The reset and turbo switches felt a little sticky, and didn't operate smoothly. The thing that sucks is that direct replacements might be possible, but from my experience they're usually a bit of a pain in the ass to find the correct ones. Unless it's a super common style. Anyway, these switches just sort of friction fit in...
The switch button caps don't have any springs, they just friction fit on the switch itself.
And just a shot of the back of the case where the switches fit in...
Incidentally, there's a date code stamped into the plastic seen in the above pic. Looks like this case was manufactured in September of 1994.
Here's a shot of it all cleaned up...
It's too large to clean at my work bench, so I took it to the kitchen sink. I ended up using Scrubbing Bubbles and the rough side of a kitchen sponge, and a small brush to get in the tight spaces. This actually worked well to remove the grime and the rust stains. Although there was one stubborn rust spot that I couldn't get all the way off. I bet if I scrubbed for longer or with something more aggressive that would have done it, but I didn't feel like it.
It's just a very minor spot. I'm not worrying about it because I'm either gonna Retro Brite this or spray paint it, I haven't decided yet. If I paint it, then that stain will be covered up no problem. If I Retro Brite, I don't know, I'll worry about it then.
The bottom part of the case is looking really good...
If the top of the 5.25" drive cage looks weird, that's because it's mid way drying and that's just how the camera picked it up. But overall I'm very pleased with the color and finish. If you didn't know it was painted, you would take a second look.
Here's the paint that I'm using...
The Metallic aluminum is for the bottom of the case, obviously. The Heirloom White was possibly for the bezel, but I don't think I'll be using it. It's not a bad color match for aged plastics that aren't totally yellowed but aren't their original color. But it's not a total match to my beige drives. Since I'm putting black drives in this build, if I used Heirloom White I think it would look just fine. But I want to have the option down the road to swap beige drives in here (in case I have drive failure). Also, the lowest sheen Heirloom White comes in is Satin, which I don't think is the right choice. You really want flat or matte for plastics like this. Any higher sheen and it always ends up looking bad.
So I hunted for more rattle can colors that would be a good fit, and came up with very little. The only other Rust-Oleum color that might be a good fit is Ivory Bisque, but that only comes in semi-gloss which is definitely no good. So I hunted for Krylon Fusion, which I prefer anyway, and came up with Matte Clamshell. It seems a little lighter and/or less yellow than Heriloom White, which is good.
In the above pic, the cap colors end up looking very similar. They look more distinct in person. It's the lighting in the room plus what the camera is doing, they end up looking closer then they really are in person.
Anyway, I was in Lowe's (home improvement store here in the USA) and noticed this other brand on the shelf. Magnolia Home? I've never used it before. Says it's crafted with Kilz, whatever that means LOL. I've never used "chalk" spray paint before, but I really liked some of the color options they have. They all appear to be matte (hence chalk) so that's good. I ended up picking up the colors Yarn and Shiplap.
I have a blank 5.25" drive bay cover for this case, along with a few 3.5" covers that I 3D printed. I've been using those to test the spray paints with. Here's my latest batch...
I have them labeled on the back, but I forget now which is which just from looking at the picture. But I know the bottom one is Heirloom White (satin). The top I believe is the Krylon Matte Clamshell. And the two in the middle are the Magnolia Home.
Again, it's kinda hard to match a color looking at a computer screen. It's really not the true color. Even in person, it's not easy to match colors with your eyes. But the Heirloom White ends up being too beige. We tend to call old PCs "beige" but more often then not they're more like really light greys. Of course, by now they are all dirty and yellowed. Even one that isn't heavily yellowed, a very slight yellowing will make a light grey color look beige. So yeah, it's kinda hard to find a good fit. But the Krylon and Magnolia colors might be a better fit. I sprayed those test pieces yesterday, I had to wait for them to dry before I could bring them over to my various PC parts and do a color comparison. I've been holding them up to various disc drives and cases that I have.
Re: My i486 Retro PC Build : )
Just a few odd thoughts I forgot to mention...
1) You can see from the pics in the first post of this thread, the rust that was on the outside of the case. Looks to me like another case was stacked on top of this one, and left a rust stain that was the footprint of the other case. It came off easily.
2) It's kinda funny how much more concerned they were with best practices back then. The wires going to the front panel (switches, LEDs, etc) are all looped around a ferrite ring. Also the CPU fan, the power cable (it's just a 2-pin fan) is looped around a ferrite ring. You would never see that now.
3) This case has copper clips to better bond the top and bottom halves. I was kinda thinking, now that I'm painting the case that will make it so that the top and bottom pieces are no longer electrically connected. Meaning the top likely wont be grounded well. But after using the rust remover on the case, it looks like they coated the metal in some kind of paint from the factory. Maybe an electrically conductive paint? At any rate, if I scratch the paint off where those clips go then that should do the trick. And even if the top isn't grounded to the bottom super well, I'm sure that really wouldn't make a difference for me anyway.
4) This case has a key lock switch, which was common back then. It didn't come with the key. Not a big deal, since I don't think I'd ever use it. But I thought it would be a nice touch if I had a working lock switch. It's a standard enough part. But it seems the ones on DigiKey and Mouser are just slightly too big compared to the one that came with this case. I could probably mod the case a big to fit a different switch, but I'd rather not. So I'll just put the original key switch back in. It's not like I need it anyway.
5) The portion of the front bezel where you have two vertical 3.5" drives. I don't have the blank covers for it. I test printed a few 3D models that I found online, but they were all too small. Since I'm not planning on mounting any drives here, I just need to cover it up. So I think I'll just stick to my original idea. Just a flat piece of plastic that I will affix to the back side of the bezel. I was planning on painting it the same color that I paint the bezel. But since I'll have black drives, I was thinking about painting it black. Then it'll look closer to an IBM 5150. Not that that's what I'm going for, but I think it could be cool. Maybe I'll make one beige and one black and see how either looks once the drives are installed. As for how I plan to affix it to the back of the bezel, I was planning on just doing a dab of hot glue on all four sides. That should hold it on just fine, I think, but also allow me to easily remove it without wrecking anything. I would rather have it be removable than permenant. Just in case I ever want to do something different with that spot. Like actually mount a drive there. Or possibly make a turbo display, that would be the perfect place to mount it.
Re: My i486 Retro PC Build : )

Above are the sample laid out on the top metal part of the case. I don't know, I think I'm leaning toward Yarn. What do you guys think?
It's kinda hard to tell from the pics, they look different in person. Shiplap looks very white in the pics, but it's actually a very nice light grey.

Re: My i486 Retro PC Build : )
Nice to see project updates!
Yarn looks the most "what a computer used to look like" to me. Granted, I'm looking at a photo on a monitor so it's hard to give a definitive recommendation.
Shiplap looks white, Clamshell is definitely beige. Heirloom White is... off-white?
Yarn looks the most "what a computer used to look like" to me. Granted, I'm looking at a photo on a monitor so it's hard to give a definitive recommendation.
Shiplap looks white, Clamshell is definitely beige. Heirloom White is... off-white?
Re: My i486 Retro PC Build : )
Yeah, Yarn might be a winner. It looks like Yarn is what a computer used to look like, and Clamshell is that same computer that yellowed slightly.  Clamshell might be good if you're trying to match things, like a case and drives. It's a better fit for my Socket 7 build. But Yarn I think is a better choice for a fresh start.
Shiplap is definitely a nicer color in person. Between the lighting and the camera, by comparison to the other colors, it ends up just looking too white. But in person it's a rather nice light grey. Perhaps too light, but some late 90's and early 2000's cases where closer to white than grey/beige.
But yeah, if you're looking to spray and match something, these three colors are good picks to test with.
Heirloom White might be a good fit for something out there, but the satin finish wrecks it for me.