|
|
Sega Saturn Mod Chip Installation on Sanyo CD Board
While Model 2 Saturns are very easy to modify to play backups, there are some older models that can be a bit more tricky.
One model that is a bit different is those with a mainboard manufactured by Sanyo. Its layout is different and requires a different approach. However,
Mike Gordon has written a helpful guide that allows an installation of my modchips into a Sanyo board. I have taken his initial guide and added my own material to make it a more friendly guide for Saturn beginners.
I'm not responsible for any damage you may do to your Saturn by performing this modification. There isn't much to worry about, but I just don't want anybody mad at me :)
What You Need
- A Saturn with a Sanyo CD board
- One Saturn mod chip
- Something to cut metal
- A soldering iron ( here's a new-to-soldering guide )
- Possibly some extra wire (see step #4)
- Phillips head screwdriver with a long thin neck that can reach the Saturn's case screws.
- A copy of a Saturn game for testing purposes.
- A nail file or something similar (many only need this if chip does not fit snuggly)
Step 1 - Preparation
- Keep your chip safe by leaving it in the anti-static bag that I ship them in.
- Unplug your Saturn
- Turn your Saturn upside down on a table
- Remove the Saturn's case screws
- Put the screws in a safe place
- Turn the Saturn right side up.
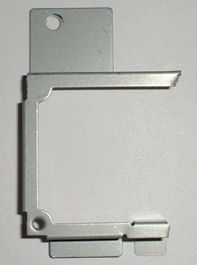
Step 2 - Remove/Modify PC Trap Bracket
Step 3 - Install Chip and Hook-up Lens Cable
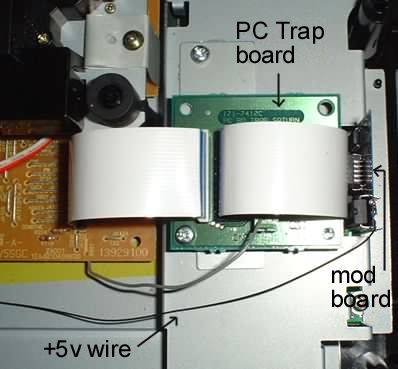
- Look at the twisted white ribbon cable running from the center of the system to the PC trap area on the right. (the right of the two ribbon cables)
- Gently unplug the right end of the ribbon cable.
- Take this end of the cable and plug it into the connector on the modchip as pointed out below.
- Plug the chip itself into the plug where the lens cable was.
- If the chip does not plug in easily, you may need to file down the side edges of the plug in order to give it a better fit.

Below is an overview of the Sanyo system with the mod chip installed: 
click to enlarge
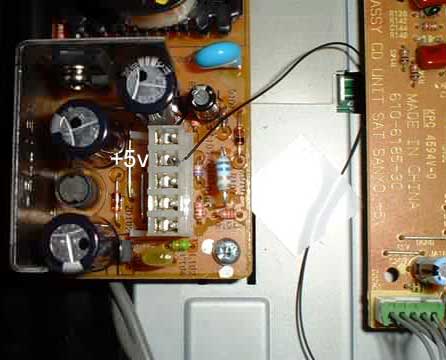
Step 4 - Getting Power Cable Connected
- Below you can see the linking (soldering) point of the power cable
- You may need to add some extra wire to extend the power cable's reach across the machine.
: 
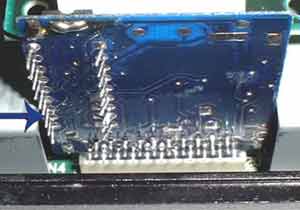
Step 5 - Taking Care of the Signal Cable
- You can get rid of the signal cable altogether and link the signal point to point B with a bit of solder.
- You can also solder the end of the blue cable to the B point.
- Both ways will build a connection from point A to point B
- This experiment has been detailed at this thread at SegaXtreme (thanks, Mal)
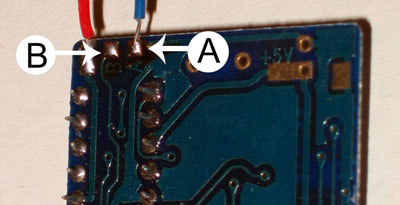 - Be careful that the IC pins don't short out to the Saturn's metal RF shield (blue arrow):
Step 6: Finishing Up
- Before you put the case back onto the Saturn, make sure everything is ready to run.
- Are the connections tight?
- Is the mod chip in well?
- Once everything looks good, re-assemble your Saturn case.
Testing
- Set your Saturn back up, plug in the controllers
- hook it up to your television set
- Put a burned backup CD into the Saturn and turn the system on
- The disc should play just like a real Saturn game.
- If not, you'll need to open the Saturn again and see what you did wrong.
- I will have a troubleshooting page soon
|
|

|