*None of the pictures below are my own, they were found on the internet. I'm just using them to illustrate what I'm talking about. I don't want any one to think that I'm trying to pass off this work as my own.
So as always, I'm researching for more info on this when ever I can. I've come up with a few things, I thought I'd share.
So this goes for the standard SNES game that's around 32Mbits big. Nintendo's mask ROM pin outs differ from the standard pin out of an EPROM, so you're not able to simply drop in new chips. The "standard" way to get around this is to wire each pin of the EPROM to the PCB, so you get something that looks like this:
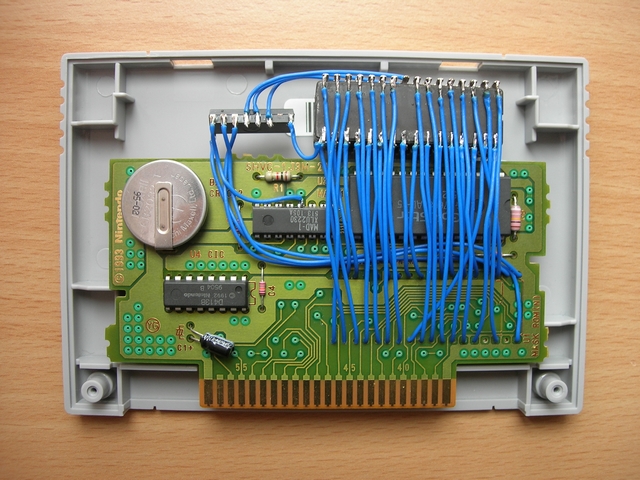
Note that this is not my work, this was posted by kogami on the digitpress forums (he does great work). But anyways, this is what I've been doing. It works great, but it is very time consuming and very tedious work. Preparing something like 40 wires is a pain in the ass. Also, fitting this inside the cart can be a pain in the ass. It
does fit, but takes some effort. You can fit up to 6 EPROMs (which is needed for Tales of Phantasia) using this method, there are 4 EPROMs in the pic (which is what most games will be).
Then I found out there's a couple other ways of doing it, but all have their pros and cons. A game that only needs 1 or 2 EPROMs can be a lot easier. You can just bend the pins up that differ and drop the EPROM into the mask ROM socket, then just wires each pin to it's corresponding pad like in this pic...
EDIT: Opps, I goofed and linked the wrong images. I couldn't find a good pic, but here's what I'm talking about implemented on an NES cart...

And there's yet another method for doing essentially the same thing, it involves cutting the traces on the PCB of the pins that differ and re-routing them to match up with an EPROM so that you can just drop in an EPROM with out having to bend up any pins. You can see what I mean in the following pics from Rom Lab...
And if you need two EPROMs, you can solder one to the underside of the board like this...
So both EPROMs are stacked, as you can see in the side view of the board in this pic...
Note the last three pics are all the same board. Also, they're from the RomLab website as credited in the photo. I didn't see any disclaimer saying not to use the pics, so I hope I'm not upsetting any one (I love that site!).
So yeah, great method. But only effective if you only need 1 or 2 EPROMs otherwise you're back to square one. It is possible to put two chips on the PCB, then two more above the PCB like in this pic (again from kogami)...

...which does make fitting in all in the cart a LOT easier. But if you ask me, I think that's a little more confusing to do. You still have to solder a wire for each pin, so you might as well just stack all four EPROMs to avoid confusion.
Again, this is great, but only really effective when you only need 1 or 2 EPROMs. If you do this, you can stack the EPROMs on the board (2 on either side for a total of 4) but they wont fit inside the case unless you cut out some holes. Obviously most people wouldn't like that.


