Gameport Controllers USB Port - Joy2Key WiiU Pokken Pad PC

Guides to jumpstart your Retrogaming lifestyle
User avatar
CRTGAMER
Next-Gen
Posts: 11933
Joined: Tue Jan 05, 2010 11:59 am
Location: Southern California

Gameport Controllers USB Port - Joy2Key WiiU Pokken Pad PC

Post by CRTGAMER »

Gameport Controllers in a USB Port
Fly that Vintage FlightStick


Joy2Key WiiU Pokken Pro Pad PC - See Top Page 2

Image

Another Guide in making use of controllers by a new method. This time, older Game Port PC Flightsticks and Joysticks for use in newer PCs. This can be used for both Retro games and Emulators as well as the newest games in the store shelves. I recently posted a Thread which expanded the limited use of Buzz Controllers.

YDKJ with Buzz Controllers - viewtopic.php?f=52&p=643690#p643690

I was also inspired by fastbilly1's thread to dig out the old sticks and write this Guide.
http://www.racketboy.com/forum/viewtopic.php?f=26&p=641964#p641964


PS3 and 360 USB Controllers
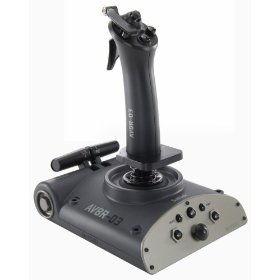
First off, the easy method. PC and most of PS3 and 360 console controllers plug in as standard USB HID so no driver is needed. I tested a Saitek Aviator AV8R-03 PS3 Flightstick which registered as a 13 button Fightstick with Throttle and Rudder. At first, I could not figure the rudder, then realized it was by twisting the stick. USB controllers are so easy to configure, just plug in and set.

Image

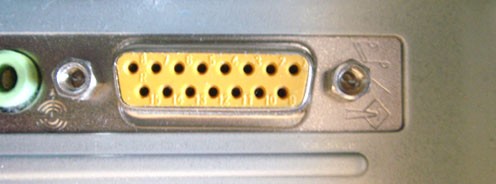
I started thinking about some of my other older PC controllers that seldomly are used, in this case due to hardware changes in newer PCs. Anyone who has been in Thrift Stores or a Swap Meet has seen them gathering dust. Usually sold for just a little money due to the obsolete fifteen pin connector. Joysticks, Game Pads, Driving Wheels and most notably Flightsticks that require the Game Port connection. Older PCs have a game port in the sound card or even a separate dedicated card.

I ran a CH Gamecard III dual Game Port on an AT PC for many years that worked beautiful with either two Analog Joysticks or a Flightstick. The ISA card has two game ports and jumpers which I wired with toggle switches to match the type of controller plugged in. It could even be software speed selected to accommodate different Flightsticks and bus speeds.

Image

Most of my PC gaming is now on a Laptop, alas no game port. This is a loss since there are some really nice controllers with the older connector. Here is a look at a couple of very special fifteen pin connector vintage game controllers.

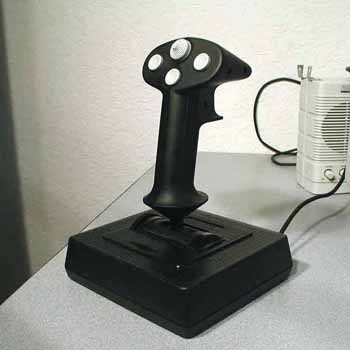
CH Flightstick (Gameport Plug)

Image

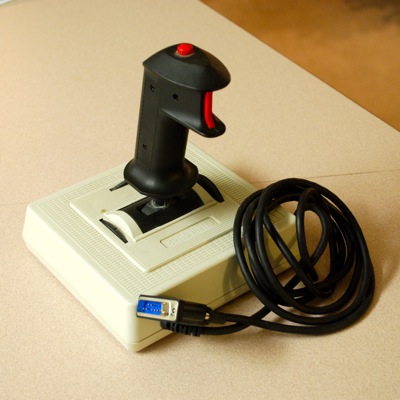
The original CH for the PC! A very well built Flightstick with two buttons and a separate throttle wheel. The CH line operate very smoothly due to solid axles and is no rubber boot around the base of the stick. The springs inside have a light pull compared to other sticks. This has an advantage of the base remaining in place without having to hold it. More importantly, precise adjustments are easy to do against a the light springs when performing Climbs, Dives and Turns. The throttle wheel is a basic and very functional dial. I dabbed a bit of white out at the center point of the dial wheel and potentiometer adjusters for a quick reference. There is also the CH Flightstick Pro that has four buttons and a Hat switch. I'm keeping an eye out, one day I'll find one cheap. Gameport controllers are inexpensive at Thrift Stores, because of the obsolete plug.

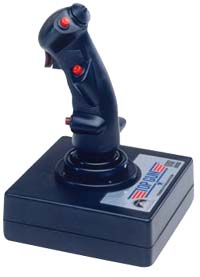
CH Mach 1 (Gameport Plug)

Image

A smaller version with the same construction as the Flightstick with two buttons, solid axles and no rubber base boot to jam things up. The Mach 1 have very nice uncommon feature not seen on newer controls. The springs can be disengaged with a simple slide of a mechanical lock switch! Even more impressive is only one or both axis can be disengaged. This is very handy for a secondary Throttle and Rudder control. Very handy, the older game port sticks I own really need to be put to use again!

Game Port USB Adapter
Image
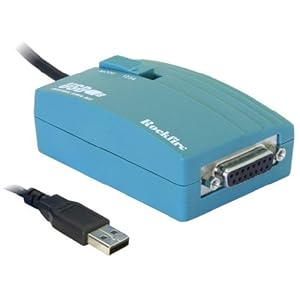
This adapter is a standard instant recognized USB HID, no drivers needed. It allows older game port controllers to work in newer USB controlled games. There are a few different models on the market. I settled for the Rockfire RM-203 which seemed to have the best capabilities. It offers four different modes, I set mine to Mode 2. The Rockfire emulates the four primary axis and four primary switches just like the original game port. It also supports a hat switch.

Rockfire Modes
Mode 1: Avant Garde, Bazooka Fighter, and Thrustmaster FCS compatibles
Mode 2: Maya Fighter, and CH Products Flightstick Pro compatibles
Mode 3: Fire Plus, Fire Dragon, and other 4-axis, 4-button joystick compatibles
Mode 4: Silver Hawk II, Space Ranger, and other sophisticated 2-axis, 6-button gamepad compatibles

The USB adapter works great with a single Flightstick, but what of two joysticks? A dilemma of a second USB adapter or some way to make the single USB adapter work. This is not really a cost issue, more of how the PC would detect the Joysticks as one controller with four axis and four buttons or two separate controllers, each with two axis and two buttons. A look at the old game port layout show two controllers can share the same port.

All Pinouts wrote:http://www.allpinouts.org/index.php/Joystick_PC_Gameport

Image
15 PIN D-SUB FEMALE at the computer

Image
15 PIN D-SUB MALE at the joystick cable

01 -- +5 VDC
02 -- Button 1
03 -- Joystick 1X
04 -- Ground
05 -- Ground
06 -- Joystick 1Y
07 -- Button 2
08 -- +5 VDC
09 -- +5 VDC
10 -- Button 3
11 -- Joystick 2 - X
12 -- Ground (shared with MIDI_OUT)
13 -- Joystick 2Y
14 -- Button 4
15 -- +5 VDC (shared with MIDI_IN)

DB15M/2DB15F Y cable - Two Players
A simple fifteen pin Y Cable is needed, but with one important feature. The Y connection must separate the pair of axis and buttons to each dedicated controller. One could be built from the diagram above, or just buy one. Look for a Y cable that is specific to the game port. I used an older out of stock Radio Shack cable #26-380.

CH Flightstick and Mach 1 Properties.jpg
CH Flightstick and Mach 1 Properties.jpg (56.99 KiB) Viewed 55125 times

PC Flight Mode - Flightstick and Throttle Joystick
The computer instantly recognizes the USB adapter with Y cable as one controller. Without the cable, I can use the Flightstick with its built in throttle. If I use the Y Cable with the Flightstick in the primary port, the throttle is disabled. The other port is covered by the CH Mach Joystick which handles the throttle and rudder. A very nice feature is the springs off mode of the Mach 1 which allows fine setting the throttle at any thrust level. The rudder as well can go spring on or off depending on the requirement. 8)

PC Falcon 4.0
The adapter route allows vintage controller compatibility to any new game that uses the USB port. I wanted to try an older and one of the best Combat Flight Sims. MicroProse Falcon 4.0 from a bygone era of PC Desktop flying. This simulator comes with a huge Ring Binder Flight Manual, older PC games had some serious documentation. One thing I really like about older Disc based PC games is a COMPLETE install option. This saves headaches of popping a CD in just to play a game.

New games also work with the adapter, but Falcon 4.0 is one of the best.
Look at that canopy reflection, this old Flight Simulator holds up well!


Image

After downloading the 1.08 Update to Falcon 4.0, this Win 95 sim works just fine in Windows XP. Using just the CH Flightstick with the adapter, I have Control with Throttle and two buttons. To add capabilities, I added the Y Cable which disables the Throttle on the Flightstick. However, I gained two more buttons, throttle and rudder control on the Mach 1 Joystick plugged in the other end of the Y cable. The Mach 1 Up and Down Spring is turned off for smooth hold increments of the throttle.

My control setup does not have a Hat Switch, but I can use a combination of buttons to engage it. Holding both buttons 1 and 2 makes a left on the Hat. Add button 3 from the Mach 1 is Hat down, pressing Button 4 is Hat right and holding all four buttons is up on the Hat switch. This is a little cumbersome and is a learned process. However, it does prove a Flightstick with one Hat switch works with the USB adapter.

Hat Switch Left = Fire Buttons 1 2
Hat Switch Down = Fire Buttons 1 2 3
Hat Switch Right = Buttons 1 2 4
Hat Switch Up = Buttons 1 2 3 4


It works! Check out the scroll of key commands, Vintage Desk Pilots have tons of controls.
Falcon 4.0 Controls.jpg
Falcon 4.0 Controls.jpg (112.49 KiB) Viewed 55125 times

Mame Arcade Mode - Two Joysticks
I was concerned the PC would not isolate the two controllers for two player games with the Y cable arrangement going into the single USB adaper. Some games will not work in two controller mode unless a second USB adapter is attached. However, Mame works beautiful! Each controller is identified thru the default TAB Menu. A simple trick of assigning the proper control to given action. :mrgreen:

Image

Mame Settings Y Cable USB Adapter
Player One - J1 X Axis, J1 Y Axis, J1 Button 0 and J1 Button 1
Player Two - J1 Slider, J1 Z Rotation, J1 Button 3 and J1 Button 4


Arcade Game with Analog Control
Arcade purists swear by Arcade Digital Sticks, which I tend to agree. However, I really wanted to play Space Duel again with my Mach 1 Joysticks. The springs on and off capability is great depending on the game. I set Springs off for the sideways control to give a more float in outer space feel. Each ship needs sideways stick rotation and three buttons for Thrust, Fire and Shields. Using the above settings, shields is a natural by pulling back on the stick. :mrgreen:

Image

No Input Lag
Time and again I see posts about input lag when plugging controllers into adapters. Electronic signals feed so much faster then one could move a stick or push a button. The lag is usually the result of the game itself keeping up with drawing the screen and producing the sounds. A simple read of buttons or potentiometers have little draw on the CPU of a console or PC.

Helicopters and other Sims
Imagine the four axis control option with a Helicoptor simulator! I have an Apache Sim I'll try next. One stick is the Cyclic and the other stick can serve as the Collective and Rudder controls. Or add a set of pedals to complete the flight. A revisit to the Microsoft Flight Sim series is definitely worth looking into.

Image

Take the sim control a step further with inexpensive PVC pipe. :shock:

Image Image

Image PVC Pipe Flight Control

Conclusion
The Game Port USB adapter is a standard USB HID, Window instantly recognizes it as a game controller without need of any drivers. This leads to discovering a HUGE selection of older Game Port controllers, some of very high quality. There are so many classic older controllers out there that can be tried on a newer PC. I see game port controllers all the time at various Thrift Stores, neglected and sold cheap due to the incompatibility with modern PCs.

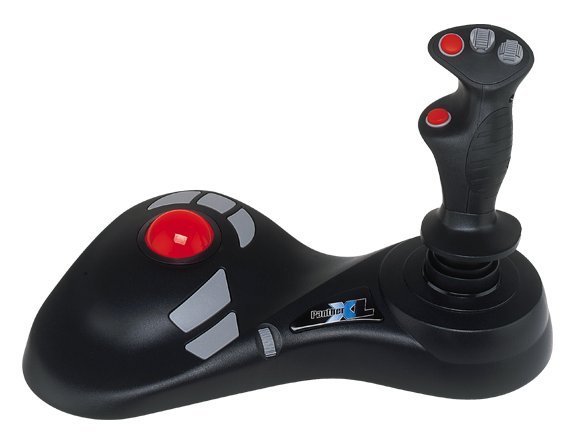
Now if I can get my Madcatz Panther XL combo TrakBall Flightstick to work, that would be something!

Image

Just to get an idea of the various possibilities, here are a few from a member here. Note that some of the Flightsticks buttons or analog controls may not work going the USB adapter route.
sharkiegamer777 wrote: viewtopic.php?f=28&p=298525#p298525

Thrustmaster Top Gun Afterburner II (PC), Suncom SFS Throttle & Stick (PC), Logic 3 Phantom 2 Dual Mode Joystick (PC), Logitech 3D Extreme Pro Joystick (PC), Saitek Cyborg Flight Stick (PC), Gravis Firebird Programmable Flight & Game Controller (PC), Saitek x8-33GU 2 in 1 Joystick (PC), Microsoft SideWinder Force Feedback Pro (PC), CH Products Flight Stick Pro (PC), Microsoft SideWinder 3D Pro (PC), Gravis Destroyer (PC), Genius MaxFighter F-16 Joystick (PC), Logitech Wingman Extreme Digital (PC), Logitech Wingman Light (PC), Logic 3 Phantom Joystick (PC), DSE Joystick (PC), RadioShack Joystick (PC), CH Products Flight Stick (PC), QuickShot Joystick Model:QS-123E (PC), QuickShot Pro Joystick Model: QS-123 (PC), Logic 3 Tornado (PC), Microsoft Sidewinder Joystick (PC), DSX Joystick (PC), Quickshot SkyHawk Joystick Model: QS-209 (PC), RockFire Joystick (PC), Quickshot Joystick Model: QS-6219 (PC), Suncom Analog Edge Joystick (PC/MAC)

Image

References
Wiki Game Port - http://en.wikipedia.org/wiki/Game_port
CH Products - http://www.chproducts.com/13-28464-Home.php
Vintage controllers to new PC - http://www.coralnet.de/retroconnection/
CH Flightstick Pro Mod - http://www.koch-engineering.com/index.php?id=flightstick
Rockfire USB Adapter - http://rockfire.com.tw:8880/index.php/p ... -converter
PVC Pipe Flight Controls - http://www.rogerdodger.net/diyflightsim ... opter.html
Wiki Falcon 4.0 - http://en.wikipedia.org/wiki/Falcon_4.0
50 Most Notable PC Peripherals - http://www.maximumpc.com/article/featur ... s?page=0,4

Rockfire USB Adapter Amazon - http://www.amazon.com/dp/B004HAX7OU/
Game Port Y Cable Amazon - http://www.amazon.com/dp/B001DRWLNS

Right Click for a larger pic
Falcon 4.0, Rockfire USB Adapter, Y Cable, CH Flightstick and Mach 1 Joysticks. Note the Mach 1 Joysticks with the springs in the unlocked mode for throttle and rudder capability.

Falcon 4.0 - USB Nest - Gameport Y Adapter - CH Flightstick - CH Mach 1.jpg
Falcon 4.0 - USB Nest - Gameport Y Adapter - CH Flightstick - CH Mach 1.jpg (209.49 KiB) Viewed 55125 times
Last edited by CRTGAMER on Sun Aug 06, 2017 9:43 pm, edited 47 times in total.
Image
CRT vs LCD - Hardware Mods - HDAdvance - Custom Controllers - Game Storage - Wii Gamecube and other Guides:
CRTGAMER Guides in Board Guides Index: http://www.racketboy.com/forum/viewtopic.php?p=1109425#p1109425

Image
Image
DinnerX
Next-Gen
Posts: 1537
Joined: Fri May 06, 2011 7:57 pm
Location: Trapped in a Karate Kid cartridge

Re: Gameport Controllers in a USB Port - Fly that Vintage St

Post by DinnerX »

Seems perfect for some Dosbox retro fun. I've got a few gameport controllers around here...somewhere.
Since this signature affects old posts, I'm leaving a message here in case anyone searches for my username. This account died in early 2013. I am no longer a fundamentalist.

Don't add to my problems by pretending my past views are still held in the present. I do not have any patience for that. Feel free to ask me what I think now.
User avatar
CRTGAMER
Next-Gen
Posts: 11933
Joined: Tue Jan 05, 2010 11:59 am
Location: Southern California

Re: Gameport Controllers in a USB Port - Fly that Vintage St

Post by CRTGAMER »

DinnerX wrote:Seems perfect for some Dosbox retro fun. I've got a few gameport controllers around here...somewhere.
Great Idea! This setup also works in new games, any USB controlled game with vintage controllers! There are so many 15 pin game port controllers collecting dust at various Thrift Stores. I am going to go nuts the next few months, some real interesting high quality Flightsticks to discover! :mrgreen:

Gameport Hatswitch Flightsticks
I described in the OP how to "fly" various Flight Simulators with Four Button game port Sticks hooked up with the Rockfish USB Adapter. I was curious if multiple button Hat Switch Flightsticks with a game port plug would also work thru the USB port. I pulled the biggest, baddest and longest running Flight Sim series to test fly with, Microsoft Flight Simulator Flight Anniversary Edition. First a look at the game and its history.

SubLogic and Microsoft Flight Simulator

Image

Microsoft Flight Simulator have been around in multiple reincarnations for many years, started out by a game company called subLOGIC. Each version was a true test of the capabilities of a desktop computer of the day, it always seemed a PC was never fast enought to meet the screen draw requirements at a decent frame rate. PC owners would always look for ways to speed up their computer to fly properly with all the graphics kicked up. I go further back to the C64 days, imagine a Flight Sim on a 1 MHz Commodore. I bought a 4MHz Turbo Master CPU board just to play C64 subLOGIC Jet at a decent clip.

Image

Microsoft Flight Simulator 2004 Century of Flight
Image
A special Collectors Tin Edition, I was very lucky to buy this when it came out. Even though it had steep requirements back in 2004, the Flight Sim runs beautiful on newer PCs. An inspired carry over from the subLOGIC Scenery floppy disks, the best feature of MS Flight Sims are all the add ons. Detailed Scenery, Jets, Helicopters, Prop Planes including the Wright Flyer, Airports and Aircraft Carriers, Ships and Cars, yes Cars and even an Army Tank that can be driven.

Image

There are obscure vehicles that can added such as the Star Trek Enterprise, Invaders UFOs or try the SR71 Black Bird on a Mach 3 High Altitude run across the country. A huge unlimited wealth of Freeware addons, the sky is the limit. :D

Image

No enemies, no missile launches, this is Flight Simulation at its best. Choose a plane, select an Airport or Nav location, choose the Weather and Time of day. Then fly anywhere on the planet. I can take a helicopter down the Grand Canyon or buzz thru downtown Vegas in a Tomcat and leave a Sonic Boom. FS 2004 is missing the World Trade Center Towers, these can be easily added back in as an add on download for a proper tribute.

Flight Simulator History Website wrote:http://www.volny.cz/havlikjosef/comparison2.htm

I tried to compare some real photos of worldwide known dominants with the same scenery in Microsoft Flight Simulator 2004. I used MSFS 2004 without any additional scenery except the two buildings of World Trade Center (they are not included in Flight Simulator since version 2002). View from Empire State Building. You can even recognize Miss Liberty in an estuary of Hudson River.

Image

This Flight Sim really comes alive, especially when in external view and panning around looking at the sites. Fly across the landscape, pan the camera when taking off by the Airport Tower or see Niagra Water Falls while doing a low level flyby. :shock:

Right Click for a larger view - My favorite plane that is already included in FS 2004 is the Extra 300 Special. A very quick response plane, no problem making landings on an Aircraft Carrier add on file. I once served on this particular Hull number as part of the catapult crew. Hey, who is the green shirt by the island? :mrgreen:
Extra 300S on deck of CVN70 Carl Vinson.jpg
Extra 300S on deck of CVN70 Carl Vinson.jpg (48.73 KiB) Viewed 54998 times

Mad Catz Panther XL Gameport Plug
Image
This stick is designed for FPS games, the Trakball is set for the look mode in the Frag games. I also own the Dreamcast version, both work great thru their regular connections. The PC version needs a driver installed to read all the buttons, my disappointment is the Trakball does not have a standard Mouse connector. This kills any Mouse controlled games without the special driver installed. It would have been so simple for MadCatz to have included that basic mouse cable, a shame.

Unfortunately the MadCatz Panther does not work with the USB adapter due to the XL Panther Driver needed to read thru the game port. The USB adapter can pick up four buttons, one Hatswitch and four different analog pivots in a control stick. However, only the four buttons on the Panther stick work. When various combinations of these are pressed, the primary Hat Switch directions are picked up. There is a rudder control game port hookup at the base for either a rudder pedal or another joystick. This adds only sideways analog support. This stick has pre set configurations for various FPS games, but only thru a direct connection to a Game Port.

Image

Microsoft Sidewinder 3D Pro Game Port Plug

Image

Part of the MS Sidewinder series, a classic from the Windows 95 days. This stick has digital control readouts in place of the potentiometers to prevent calibration drift. Even though the Rockfish adaptor is advertised as not compatible with digital analog controls, this stick works when set to Analog Mode 2. The four base buttons are disabled in the analog setting, but not a problem since there are Four Buttons and a Hat Switch on the stick. The stick supports all four analog controls including Flight Control, Throttle Control and with a twist of the stick; Rudder Control. :mrgreen:

Wiki wrote:http://en.wikipedia.org/wiki/Microsoft_SideWinder#3D_Pro

Electronically, the 3D Pro used a digital/analog hybrid design, that was intended to correct the outstanding flaws in traditional analog joysticks, such as drift and CPU overhead by using a digital/optical tracking mechanism to keep perfect track of the joystick, and a digital communication method over the analog gameport.

The joystick's popularity has created a small die-hard following, with many people still holding onto them despite their age. This resulted in the creation of a USB adapter for the 3D Pro.

The 3D Pro features as a character (Ã) in the Webdings dingbat font.

Image

CH Products Gamestick 14 Game Port Plug

Image

CH Products are very good Flightsticks, I have owned the CH Flight Stick and Mach 1 sticks for years and always loved them. There is just enough tension to pull the stick to the middle, but the base does not have to be held due to the light tension of the spring. This adds the benefit of not having to fight the stick to perform air maneuvers, a very very tight precise control.

The Gamestick keeps the CH tradition in just the right feel, a light spring solid duel pivot at the base. CH kept the same layout for the potentiometer control of the stick, smart that CH did not mess with a great design. The pivot of the stick is just so perfect for very precise movement. The Throttle control is now at the front part of the base, handy if one does not have an add on Throttle Stick. Its just a slide bar but good enough for analog throttle control.

There are three hat switches and six buttons on the Gamestick. Even so, the additional buttons all work utilizing the standard four button layout, even with the USB adapter arrangement. This is done by making the additional buttons act as multiple combinations of the primary four buttons. Lower left base button would be the same as pressing buttons 1 and three for example. The trick is to have a game can pick up all the buttons, including the combo presses to assign each to different functions.

CH PRODUCTS GAMESTICK 14 Button LAYOUT
Stick Front Trigger - Button 1
Stick Below Trigger Switch - Button 2
Stick Hat Switch - Hat Switch
Stick Left Switch - 3
Stick Right Switch - 4
Base Bottom Left Switch - 1 3 (1 Priority)
Base Bottom Right Switch - 1 4 (1 Priority)
Both Base Hat Switch Up - Buttons 2 3 4 (2 Priority)
Both Base Hat Switch Left - Buttons 3 4 (3 Priority)
Both Base Hat Switch Down - Buttons 2 4 (2 Priority)
Both Base Hat Switch Right - Buttons 2 3 (2 Priority)


The Base Buttons simulate various multiple combinations of the primary four controller buttons. This would work fine with the CH Gamestick driver and if the stick was directly plugged into a game port. However, the stick is routed thru a USB adapter. Luckily holding down two or more of the stick buttons are not identified the same as the Base Buttons. However, MS Flight Sim can only poll one button which is always the lower number of the four buttons.

Programming 14 Buttons in a 4 Button matrix
A great work around is to use a Joystick to Keyboard program. I already use JoyToKey to operate Buzz controllers, but JoyToKey will not assign multiple pressed buttons as separate inputs. Another program, JoystickCursor Tool has the multiple button read assignment feature.

JoystickCursor Tool - http://www.deinmeister.de/jct_e.htm
JoyCursor Tool.JPG
JoyCursor Tool.JPG (89.84 KiB) Viewed 54998 times

I managed to get the CH Gamestick to work with the keyboard utility, verifying the button to key presses with Windows Notepad. At first a no go, Microsoft polls the stick buttons over the keys so this would not work either. However, an easy solution is to shut off the joystick buttons polling in the MS Flight Sim configuration Menu. It can easily pick up each of the buttons as a keyboard press with JoystickCursor Tool. The CH Gamestick keeps the Hat Switch isolated from other buttons so it can stay as is. Only single key inputs can be programmed, so any double key press in MS Flight Sim such as CTRL P are changed to single key input. I only had to change a couple of keys in the game menu, most kept the original keyboard layout.

MS FLIGHT SIMULATOR GAMESTICK KEY COMMANDS
Stick Front Trigger> . (Brakes)
Stick Below Trigger Switch> G (Landing Gear)
Stick Left Switch> Number Pad 0 (Left Rudder)
Stick Right Switch> Number Pad Enter (Right Rudder)
Both Base Hat Switch Up> = (Zoom View In)
Both Base Hat Switch Down> - (Zoom View Out)
Both Base Hat Switch Left> S (Cycle Camera View)
Both Base Hat Switch Right> I (Instrument Panel On Off)
Base Bottom Left Switch> F8 (Flaps Down)
Base Bottom Right Switch> F5 (Flaps Up)
Stick Hat Switch> No Key Needed (Panning View)


I turned off the joystick analog rudder control since the Gamestick has no twist the stick rudder capability. My laptop does not have a separate Number Pad. I temporally add a full sized keyboard to program in a couple MS Flight Sim default number pad keys into the JoystickControl Tool matrix.

Only the rudders need a repeat feature of the keyboard. The keyboard input is set to Typematic (repeat) so the rudder control buttons programed in can be held to cycle. This is easier then having to rapidly press to make a tight turn on the flight deck. The type delay can be adjusted. A compromise over if too quick to cause the view button to cycle too fast or too slow for the rudder steering to be affective.

http://www.combatsim.com/archive/htm/htm_arc1/chgame.htm

The stick is quite comfortable and has a nice response. The throttle resides on the back of the base, sort of an odd position, but most serious sim fans are only going to use this as a step toward a full HOTAS anyway.

However, if you are left handed, you might be unusually interested in this stick which is designed so both left-handed and right-handed gamers can take advantage of the functionality. And if you also do Quake style gaming, the D-pads become especially functional as directional controls in the arcade action style.

You're wondering about reliability? The trigger is rated for 10 million shots, and the Gamestick 14 sports a three year warranty: the best in the business.

Conclusion
With the USB adapter, most vintage game port multi button sticks will work, but usually it will be the four primary buttons, primary Hat switch and all four analog controls. If a unique multi press button setup such as CH Gamestick, then the additional buttons can be easily made to work with a simple Joystick to Keyboard program.

MadCatz Panther XL - USB Incompatible. :?

MS Sidewinder 3D Pro - Eight Buttons and Four Analog USB Compatible. 8)

CH Gamestick 14 - FOURTEEN Buttons and Three Analog USB Compatible. 8) :mrgreen:


I like using either the MS Sidewinder or the CH Gamestick, depending on mood. The MS Sidewinder has a nice built in analog rudder, but the CH Gamestick gains in the additional buttons. The CH also has very precise control due to the solid pivot points of the stick.

Controller References
MadCatz Panther XL Specifications - http://www.vsavoldi.com/fpweb/info/pantherxl.htm
Microsoft Sidewinder Wiki - http://en.wikipedia.org/wiki/Microsoft_SideWinder
CH Flightstick Forum - http://www.ch-hangar.com/forum/forum.php
Image

MS Flight Simulator References
Flight Simulator Wiki http://en.wikipedia.org/wiki/Microsoft_Flight_Simulator
Flight Simulator History Website - http://www.volny.cz/havlikjosef/fshistoryenglish.htm


http://fshistory.simflight.com/

1980-2005: 25 years of Flight Simulator

Whether it started in 1979 or 1980, it's fair to speak of a Legend, when we talk about (Microsoft) Flight Simulator. A legend that has been around since 25 years and is reportedly the program in the public sector, of which the most copies are sold. This website is dedicated to this legend and to its genius creator: Bruce Artwick. But let's not forget the important role of subLOGIC and Microsoft as distributors.

Image

Right Click for a larger view - Game Port Flightsticks. Strange coincidence that the MS Stick cable and Rockfire are color matched. The Gear Shift is for a future mod. 8)
Logitech Gear Shift - MadCatz Panther XL - CH Gamestick 14 - MS Sidewinder 3D Pro - Rockfire USB Adapter.jpg
Logitech Gear Shift - MadCatz Panther XL - CH Gamestick 14 - MS Sidewinder 3D Pro - Rockfire USB Adapter.jpg (248.59 KiB) Viewed 54998 times
Last edited by CRTGAMER on Fri Feb 19, 2016 6:55 pm, edited 6 times in total.
Image
CRT vs LCD - Hardware Mods - HDAdvance - Custom Controllers - Game Storage - Wii Gamecube and other Guides:
CRTGAMER Guides in Board Guides Index: http://www.racketboy.com/forum/viewtopic.php?p=1109425#p1109425

Image
Image
User avatar
CRTGAMER
Next-Gen
Posts: 11933
Joined: Tue Jan 05, 2010 11:59 am
Location: Southern California

Gameport Controllers in a USB Port - Fly Neil Armstrong LLRV

Post by CRTGAMER »

Lunar Pilot - Fly Like An Astronaut in FS9

Image

Neil Armstrong passed away on August 25th 2012. In a strange coincidence just a few days prior, I had downloaded a Space Vehicle for Flight Simulator 2004. A fictitious spaceship from the TV show Space 1999, the Eagle. Weird how it has the same name as the Apollo Missions Lunar Lander and flew similar to the LLRV.

Image Image

I knew about the Lunar Lander Research Vehicle (LLRV) from watching archival footage, the vehicle that the Astronauts practiced on. After hearing of Neil, I really wanted to find a simulator based on the test vehicle. I discovered Lunar Pilot which turned out to be a very nice add on scenario to Flight Simulator 2004. :D

Image

THINGS-TO-COME wrote:http://www.things-to-come.com/lunarpilot/

Lunar Pilot is a computer flight simulation of the Lunar Landing Research Vehicle. The LLRV was originally developed by NASA and Bell Aerosystems in the 1960’s to prepare Apollo Astronauts for the moon landing.

Unlike many experimental aircraft of this enthralling era, the LLRV was never intended to represent an aviational prototype at all. It's only reason for existence was to accommodate and familiarize the Apollo astronauts with the attitudes of a rocket-powered vehicle that flies under distinctive non-aerodynamic regimes, such as those experienced during a lunar orbit and the ensuing touchdown. It is probably the most visionary hardware simulator ever built.

Image

Lunar Pilot was a commercial product, now a freeware download.

Image

LLRV Commander Brooke Harris wrote:This ain't no fixed wing; nothing is fixed here.

Manual
A comprehensive PDF Manual is included. It details how to fly the LLRV, description of the scenarios and a very nice read on the History of the NASA Astronauts and the flights of the LLRV. NASA Archive photos are included in the manual. :shock:

Farmboyzim wrote:http://www.farmboyzimsflightsims.com/Lunar_Pilot.html

THINGS-TO-COME, Lunar Pilot Manual. It's 48 pages long

The manual has some very interesting information in it and I highly recommend that you look at it BEFORE jumping into the hot seat! The interview with Don Mallick was very interesting. These test pilots sure had guts to strap these creations on! The pictures that are included are excellent shots of the LLRV, the crews, and staff. I didn't find a real need to print out the manual, as the operations of the LLRV are fairly easy to understand. It's flying the beast that takes the practice! The avionics of the LLRV are simple and easily accessed. Using Track IR in Virtual Cockpit mode makes flying helicopters, especially landing them, a whole lot easier! This goes double for flying the LLRV. VC mode is definitely the way to go while flying the LLRV.

Instrument Panel
Keep an eye on the bar gauge at the left when landing, it clocks down the last 100 feet. Just like the real LLRV, the vehicle can simulate Lunar Gravity with a flip of a switch on the stick. This is done by increasing thrust automatically to make the vehicle one fifth the weight.

Image

Interesting how in the Flight Sim animation how the pilot moves his arms and legs in tandem with the Flight Stick movement. He turns his head as if looking when the twist "rudder" is applied. When "ailerons" are maneuvered the pilot would actually shift his weight from side to side. :shock:

P51 Mustang
An unusual but nice bonus to the Lunar Pilot program. The synopsis is the pilot is supposed to fly to the Alan Shepard Airport in the mustang, practicing first thru bad weather. Both the P51 and LLRV can be flown anywhere in the Flight Simulator world. In addition, any aircraft can also be brought in to fly at the add on Lunar Pilot Spaceville level.

P51 Mustang: Cadillac of the skies!

Image

The Mustang flies like a dream and is a worthy add on to fly in various cities. I love when the radial reciprocating engine is at idle, the beautiful sounds of the lopey lope of a wide duration high lift cam, characteristic in prop fighter planes and dragsters. That motor is just ready to scream at full throttle. 8)

Lunar Cam
Another bonus as part of the Lunar Pilot package. Sometimes the Tower View Camera is too far away. Lunar Cam is a boot program that can set the camera parameters. This can be used for not only for Lunar Pilot, but any scenario in Flight Simulator 2004.

Image Image

Alan Sheppard Spaceville
One can practice the LLRV in the desert, but landing on the moon surface would be better. A fictitious Airport and Mini City is included as part of the Lunar Pilot package. Strategically located at Cape Canaveral Florida, right next to the Space Shuttle Launch Pad.

Image

All the buildings can be landed on, some are real tricky. Different heights and landing area sizes really put the rockets to the test. There is a huge hangar in Spaceville that contains a simulated moon surface to practice on. Fly in thru the hatch towards the top.

Image

Not enough? Try to hover in to the refuel dock. Now this wasn't part of the Astronaut training!

Image

I am still on the hunt for another add on from the Things To Come site, JetPakNG.
http://www.things-to-come.com/jetpakng/

Image

http://www.prweb.com/releases/2005/05/prweb236200.htm

Things-to-Come Releases JetPakNG for Microsoft Flight Simulator 2004

In the 1960's Bell Aerosystems caught the public imagination with a series of rocket and jet-powered rocket belts. Rocket belt-equipped fliers became a symbol of the future and a fixture at World Fairs, Olympic Games, Football Games, etc. Now you can fly like 007 over your favorite scenery.

JetPakNG is a never before seen add-on for Microsoft Flight Simulator 2004. The flight characteristics of the real world rocket belt have been brought to the virtual world through extensive research with original rocket belt pilots.

JetPakNG ships with two models: JetPakNG and JetPakNG-HS. The second model (HighSpeed) is faster and includes small wings that act as stabilizers during high-speed flight. JetPakNG features a fully animated pilot figure, Virtual Cockpit, realistic sounds, and never before seen smoke effects.

Conclusion
Lunar Pilot is one of the sweetest add ons to Flight Simulator 2004 and is easily installed since it has its own Setup.exe file. The commercial add on package is now freeware. The detailed graphics will need a faster PC over what Flight Sim 2004 requires. However, any recent PC will run this just fine. The LLRV sim puts into perspective how ungainly it is to fly with a rocket strapped to the bottom, a real blast. :mrgreen:

ImageLunar Landing Research Vehicle FS9

References
Lunar Pilot Site - http://www.things-to-come.com/lunarpilot/
Space 1999 Eagle Transporter - http://en.wikipedia.org/wiki/Eagle_Transporter
LLRV and LLTV - http://en.wikipedia.org/wiki/Lunar_Landing_Research_Vehicle
LLRV 1968 Neil Armstrong Ejection - http://airpigz.com/blog/2009/12/12/circ ... stron.html

Lunar Pilot Review
http://index.migman.com/index.php/sw/space/497-lunar-pilot-for-msfs-video
http://www.avsim.com/pages/0206/LunarPilot/LP.htm
http://www.farmboyzimsflightsims.com/Lunar_Pilot.html
http://www.flightsim.com/vbfs/content.php?1106-Things-To-Come-Lunar-Pilot

Nice Pictures Flying to Spaceville - http://205.252.250.26/cgi-bin/yabb25/Ya ... 1314047500


http://www.latimesmagazine.com/2009/08/mojave-lunar-landing.html

The lunar landing vehicle would have to be controlled entirely by propulsion—or thrust. And because the moon is covered with refrigerator-size boulders and pockmarked with asteroid craters, ranging from a few feet deep to hundreds of yards wide, it would have to be piloted by an astronaut and not controlled robotically by NASA scientists back home.

“There were no runways, lights, radio beacons or navigational aids of any kind,” Neil Armstrong said. Which is why, beginning seven and a half years before the big event, a bevy of scientists and engineers got to work, largely in California’s Mojave Desert, planning, designing and ultimately flying a contraption called the Lunar Landing Research Vehicle (LLRV). Employees were bewildered by what “looked like a giant Erector set,” recalled NASA engineer Gene Matranga. In case you’ve never seen one, it can only be described as looking remarkably like the flying bedstead from the Disney movie Bedknobs and Broomsticks. Ugly or not, so important was the LLRV to Apollo 11’s success, a poster still welcomes visitors to the Dryden Flight Research Center at Edwards Air Force Base north of L.A. that reads, “Before we landed on the moon, we practiced here.”

Image
Image
CRT vs LCD - Hardware Mods - HDAdvance - Custom Controllers - Game Storage - Wii Gamecube and other Guides:
CRTGAMER Guides in Board Guides Index: http://www.racketboy.com/forum/viewtopic.php?p=1109425#p1109425

Image
Image
User avatar
CRTGAMER
Next-Gen
Posts: 11933
Joined: Tue Jan 05, 2010 11:59 am
Location: Southern California

Re: Gameport Controllers in a USB Port - Gravis GamePad Pro

Post by CRTGAMER »

I posted four more controllers and discovered an unusual and very different way to play games with a vintage controller. :D

CH Flightstick Pro
A step up from CH Product's flagship model, the Flightstick. Two extra buttons and a Hat switch is thrown in. The stick pivots on solid axis just like the original and includes the same throttle knob on the left. The other two knobs are for fine tuning the center point of each stick potentiometer. These come in handy simulating Trim Adjusters used in real aircraft.

Image

USB compatible with Rockfish adapter :mrgreen:
In testing I found only the analog portion, the potentiometers of the stick function. None of the buttons were picked up. I suspect the buttons need to be removed for cleaning. This stick should have worked with the USB adapter set to position 2. The CH Pro only has three potentiometers, four buttons and one hat switch. Perhaps the Flightstick I tested is defective? The USB adapter manual actually states CH Flight Stick Pro for position two. The Pro Flightstick I bought second hand definitely has not been in proper storage, it had a layer of fine soot coated on it as if exposed to weather.

I bought a second CH Flightstick Pro and confirmed it functions just fine! :D
Having "flown" with the standard two button CH Flightstick, this is a very smooth stick with light springs to make precise control a breeze. New USB capable CH Flightsticks are costly due to their high quality, but older gameport CH Flightsticks are of the same high quality and are inexpensive due to the obsolete game port connector.

Sim HQ wrote:http://www.simhq.com/_technology2/technology_014b.html

This unit is a well-designed and comfortable control stick. It is vaguely reminiscent of the "Handle" currently in the McDonnell Douglas (Now Boeing) F-15/F-18. CH Products calls it ambidextrous, but I would hesitate to call it truly ambidextrous due to the location of the throttle wheel on the left side of the joysticks base. This just about mandates the use of the left hand for throttle actuation. There are also two "trim" wheels incorporated in the base alongside the pitch and roll axis of the stick. They allow you to trim the "X" and "Y" axis anytime you want, including during game play. This function is surprisingly useful. I use it primarily after I have sustained battle damage and the "aircraft" will not fly normally. It is much easier to trim than holding the stick "hard over" for the long flight home!

Image

The shape of the handle is on the small side, ideal for small or young players. All the buttons are easily accessed. I really like the feel of this unit... as a matter of fact, if it had more features (buttons), I would seriously consider it over the CombatStick 568. The unit installed and functioned flawlessly as a stand-alone controller, but Control Manager software will make all the buttons programmable. It will also make it possible to combine FlightStick Pro USB with other CH Products controllers into a "virtual controller" that will be recognized by Windows as a single entity.
Not sure why the reviewer stated the Handle is small, there is a comparison shot at the bottom of this Reply.

Thrustmaster Topgun
Thrustmaster has been around as long as CH products. Thrustmaster FCS was renamed to the official, fully licensed Top Gun logo from Paramount Pictures. The shiny name plate with the Paramont logo gives a feel of authenticity in flying a naval fighter jet.

Image

USB compatible with Rockfish adapter :mrgreen:
Attached to the Rockfire USB, Mode 1 needs to be chosen for the Thrustmaster line. The Four Buttons, Hat Switch and Stick all work just fine. The Flightstick itself is a little stiff due to the large rubber boot at the base. Maybe to simulate the real thing? In flying a real jet one does not shove the stick around compared to an Arcade game.

The Control Center wrote:http://www.joy-stick.net/reviews/joysticks/topgun.htm

A few years back Thrustmaster renamed some of their controllers. The FCS (Flight Control System) now bares the official, fully licensed Top Gun logo from Paramount Pictures. If you can see past the commercialization of this stick your in for a great ride. The Top Gun is a quality, no-frills flight stick. It is molded for comfort and is very nice to use with flight sims. I am accustom to having a throttle and rudder pedals; features lacking in the Top Gun. However this stick can easily be expanded by adding the external controllers.

Interact Hammerhead FX
A game controller that looks very much like a larger version of a Playstation Dual shock. Identical analog sticks, face buttons and even has four triggers. Only thing missing is that the sticks have no R3 or L3 buttons. Some models came with a 3DFX logo; the video card that was once king on the early days of Windows DX gaming.

Image

Not USB compatible without special cable :?
I was hoping, but as expected not compatible. The crazy part is when moving the left stick caused the four buttons to flicker on the controller properties screen. The Rumble ready light even lit up teasing of the game play potential. It uses a power brick or AA batteries for the rumble motor hiding inside. A shame the controller does not have a select mode slide switch to make it universal left stick for analog and right stick for rudder and throttle. A driver is needed to make all the controller buttons integrate with the game port. Unfortunately the driver would only work if the controller is direct plugged into a game port.

Vinny Lopez wrote: http://www.ign.com/articles/2000/07/05/ ... -fx-review

The HammerHead FX, though inexplicably tied to 3dfx in some sort of nebulous marketing deal, is an InterAct pad that hopes to end console controller envy with one fell swoop by giving you two analog controllers, a digital pad, six buttons, two triggers, and biggest of all, rumble feedback. The spec and requirements list, for those of who enjoy information popped out in little black dots, is:

10 programmable buttons
Tri-Compatibility (PC Gameport, PC, or iMac USB port)
Eight-way hat switch/digital d-pad
Dual Analog Joysticks
Rumble Feedback
Requires Windows 95/98. (Windows 98 for USB version)
Requires 2 "AAA" batteries-- NOT INCLUDED

Overall, this pad is a nice, if not heavy alternative to the SideWinder series, and I'd recommend it to anyone who wants an analog, rumbly experience on their gamepad. If you enjoy space shooters and sports titles, or don't want to bring the steering wheel out of the garage every time you fire up a racing game, then this might be the perfect alternative.
Image
USB Gameport Cable
However, the Hammerhead FX does have its own Gameport USB adapter option. This is different from a "Gameport Transcoder" USB Rockfire adapter. The controller is USB ready supplemented with a wires only adapter cable. Microsoft and other manufacturers have similar non intelligent adapters for some of their Gameport controllers.

CRTGAMER wrote:Wire only Gameport to USB adapters work if "USB ready" is built into the controller.

Gravis GamePad Pro
With a similar layout to a SNES controller, the original Gravis was the best gamepad to get in the early days of PC gaming. The pro version has a very similar button layout of a non duel shock PS1 controller. It has the standard four face buttons as well as four triggers. The Dpad which can also have a small stick threaded in, emulates the PC analog stick.

Image

Due to the four button game port limitation, a driver is needed to support the eight buttons. At first I thought this would kill compatibility through the USB adapter until I looked on the bottom and spotted a small three position slide switch.

1. GRIP - Needs driver to enable and isolate each button
2. TWO PLAYER - No driver, only two buttons work
3. ONE PLAYER - No driver needed, four buttons work

The GamePad Pro comes with a gameport Y adapter built in. This allows a second Gravis or any two button joystick to work.

USB compatible with Rockfish adapter :mrgreen:
Attached to the USB adapter the Grip mode does not work. However the other two settings do! In testing the Two Player setting of the Gravis, I verified with a CH Products Mach 1 that I reviewed in the OP. Plugged in the spare Gravis GamePad Pro port, the Joystick is picked as throttle, rudder, buttons 3 and 4. Although the two controllers plugged into the USB adapter is picked up as just one game controller, the individual controls can be adjusted for each player.

Dan Adams wrote:http://www.ign.com/articles/2000/09/14/gravis-gamepad-pro-review

The pad looks and acts almost exactly like the original PlayStation controller, which if you play any console games will clue you in on the functional design. The four main buttons are nice and big and are easy to hit even if they are a little gaudy. They are spaced far enough apart that you won't be hitting more than one button unless you mean to or you have a swollen thumb. The four top buttons (two on each side) are also sized and placed nicely. The buttons also are also perfectly tuned to give just the right amount of responsiveness.

The d-pad is very responsive giving tight control and immediate response to your commands. It's a little big for my taste, mainly due to the socket in the middle for screwing in the joystick, but it doesn't really detract from gaming as I got used to it very quickly.

One other nice feature that those of you without USB ports or a second game port will like is the split plug on the cord. Plug the first controller into the back of your computer and then add a second one on top of that. It's easy and will allow for two people to play on your computer even if you are one of those poor souls with only one controller port.

Image

I really wanted all the buttons to work in the Gravis Gamepad Pro. I discovered a unique layout when setting the Gravis GamePad Pro to Single Player mode.

1. Dpad works as Analog Stick
2. Four Face Buttons each work
3. Bottom two triggers duplicate face buttons 1 and 2 with Auto Fire :!:
4. Upper two triggers work as left and right just like Dpad :!:

:shock: A very nice discovery of the Rapid Auto Fire for the two primary fire buttons! Even more surprising is the built in right and left movement utilizing the two triggers. No driver needed, this is built right in the gamepad for 100% compatibility. This is perfect for SHMUPS such as Galaxian and Space Invaders!

Any bottom shooter can benefit in this new way of trigger sideways movement control over pushing with the Dpad. Overhead Space shooters can also gain from this feature. Asteroids for example, can be played closer to the Arcade official method, the pushing of separate buttons to spin the ship.

Discovering unique features such as these makes hunting down "obsolete" controllers worthwhile! :idea:


CRTGAMER wrote:Most Flightsticks that require special drivers to overcome the gameport limitation of four potentiometer, four button and one hat switch usually will not work with a USB adapter. However some controllers such as the Gravis GamePad Pro and CH Products Gamestick get around this by incorporating auto fire, duplicating buttons or making one button act as two or even three buttons pressed at once. This is done without need of any driver. The buttons can also easily be "programmed" to key commands using a keyboard emulator such as Joy2Key or JoystickCursor Tool :idea:

References
Joystick Faq - http://www.joy-stick.net/FAQ.htm
Sim HQ - http://www.simhq.com/_technology2/technology_014a.html
Gravis Gamepad Pro and PS1 - http://gepachika.exblog.jp/5443832
Gravis Gamepad Pro Mercado - http://articulo.mercadolibre.com.mx/MLM ... ad-pro-_JM
HAMMERHEAD FX Amazon - http://www.amazon.com/HAMMERHEAD-DUAL-A ... B00006I5CY
Mod Game Stick for Real Flight - http://www.eaa.org/experimenter/article ... _howto.asp

Right Click for a larger view

CH Flightstick Pro - Thrustmaster Topgun - Interact Hammerhead FX - Gravis Gamepad Pro Stick.jpg
CH Flightstick Pro - Thrustmaster Topgun - Interact Hammerhead FX - Gravis Gamepad Pro Stick.jpg (249.79 KiB) Viewed 50224 times
Last edited by CRTGAMER on Fri Feb 17, 2017 9:38 pm, edited 2 times in total.
Image
CRT vs LCD - Hardware Mods - HDAdvance - Custom Controllers - Game Storage - Wii Gamecube and other Guides:
CRTGAMER Guides in Board Guides Index: http://www.racketboy.com/forum/viewtopic.php?p=1109425#p1109425

Image
Image
Suni
Newbie
Posts: 2
Joined: Fri Dec 11, 2015 4:20 pm

Re: Gameport Controllers in a USB Port - MS Sidewinder FF Pr

Post by Suni »

Hi!

I've been happily playing with my MS Sidewinder FF Pro joystick in Windows XP, until I now moved to Windows 10 and discovered there no longer is any Gameport support. Just now I managed to get my hands on a Rockfire RM-203 adapter, and with it I can connect my joystick and Windows sees it, but...

... it's pretty useless, as in all four modes it shows button 2 always down and button 4 flickering on/off, and has the calibration off and does not respond to any controls. :( I managed to find the Game Controller calibration wizard from Windows 10, but it doesn't help. The input I give to the physical stick seems not to come through to Windows at all.

Does anyone have ideas or experience on what could be wrong and what I could try next? Is the problem with my adapter, or my joystick, or my Windows or something else?

Regards,
Suni
User avatar
CRTGAMER
Next-Gen
Posts: 11933
Joined: Tue Jan 05, 2010 11:59 am
Location: Southern California

Gameport Controllers in a USB Port - Rockfire RM-203

Post by CRTGAMER »

Suni wrote:I've been happily playing with my MS Sidewinder FF Pro joystick in Windows XP, until I now moved to Windows 10 and discovered there no longer is any Gameport support. Just now I managed to get my hands on a Rockfire RM-203 adapter, but...

Welcome to Racketboy!

I tested the Rockfire RM-203 in Windows XP and Windows 7. The adapter acts as if a standard PC controller, no additional drivers needed. According to one verified purchase customer at Amazon, it does work for Windows 10, unsure if a special driver needed to be downloaded though.

Did you try all four modes of the Rockfire slide switch? Unplug the adapter, move the slide switch a notch and then replug back in. BE SURE THE PC 15 PIN CONTROLLER IS PLUGGED IN BEFORE PLUGGING THE ADAPTER IN THE PC. Maybe this could be the reason for the calibration issues?

If the above does not work and to make sure the adapter itself is not defective try a basic gameport PC controller (two button one Joystick). Another option is to plug the adapter into the USB port of an older Windows XP or Windows 7 PC.

Image

Based on the reviews, looks like special drivers were needed just to run your Microsoft SideWinder Force Feedback Pro in the older gameport PCs. Perhaps not fully compatible with USB adapters? Quoted from OP, I have a version of the MS digital series Flightstick and managed to get basic functions:

Microsoft Sidewinder 3D Pro
Part of the MS Sidewinder series, a classic from the Windows 95 days. This stick has digital control readouts in place of the potentiometers to prevent calibration drift. Even though the Rockfish adaptor is advertised as not compatible with digital analog controls, this stick works when set to Analog Mode 2. The four base buttons are disabled in the analog setting, but not a problem since there are Four Buttons and a Hat Switch on the stick. The stick supports all four analog controls including Flight Control, Throttle Control and with a twist of the stick; Rudder Control.

Image
Image
CRT vs LCD - Hardware Mods - HDAdvance - Custom Controllers - Game Storage - Wii Gamecube and other Guides:
CRTGAMER Guides in Board Guides Index: http://www.racketboy.com/forum/viewtopic.php?p=1109425#p1109425

Image
Image
Suni
Newbie
Posts: 2
Joined: Fri Dec 11, 2015 4:20 pm

Re: Gameport Controllers in a USB Port - Rockfire RM-203

Post by Suni »

Thanks for the swift reply!
Unfortunately, no luck. I already before tested all the modes, but I retested by unplugging the USB before changing modes and then replugging, but same result. I don't currently have the hardware to test with other gameport sticks, but I found also a similarly disappointing comment in an Amazon discussion (here: http://www.amazon.com/game-Adapter-Rockfire-RM-203-gameport/product-reviews/B004HAX7OU):
"This item might work for some joysticks, but not a single button or even the joystick itself worked - I have a MS Sidewinder Force Feedback. I wasn't even expecting the force feedback to work - was hoping to use it with Mechwarrior online - no such luck, that's $15 wasted."

Maybe it would require additional drivers, I actually have the original drivers CD still available (what, it's still under 20 years old, I bought it at 1998 or so :) ), but the setup fails to run in this windows version (not very surprising that).
gravitone
16-bit
Posts: 68
Joined: Sun Sep 16, 2007 4:49 pm
Location: Groningen, The Netherlands

Re: Gameport Controllers in a USB Port - Rockfire RM-203

Post by gravitone »

The force feedback pro and a number of other joysticks abused the analog gameport interface to make it receive and transmit digital controler data by quickly toggling the on/off state of buttons and making the driver poll the gameport many times per second to read it. A kind of morsecode if you will. On top of that microsoft pretty much hijacked the midi control protocol to control forcefeedback effects. This is the reason why the standard gameport to usb adapters wont work. They assume analog inputs and treat the incomming signals accordingly.

Luckily there are other people that share the fondness for the sidewinder 3d pro, force feedback pro, and have expended their mental and financial resources to come up with a working solution. The communication protocol has been reverse engineered and implemented into a microcontroller that will present these as a HID compatible USB controller to the host system. Force feedback is also supported. You can either program your own microcontroller or order a pre-built adapter. Check the thread listed below for reference.

http://www.descentbb.net/viewtopic.php?f=8&t=15526
User avatar
d123456
Next-Gen
Posts: 1268
Joined: Tue Jan 30, 2007 6:39 pm
Location: The Netherlands, Almere
Contact:

Re: Gameport Controllers in a USB Port - Rockfire RM-203

Post by d123456 »

What an amazing thread! I bet there is no sites that provide all this information in one place.
Trully amazing, thanks for your investigative skills
I have a Gravis GamePad. D-pad is the worst D-pad ever.
Never use it anymore, but I guess I might use it one day to mod it, extend some wires to an arcade control panel.
Optimizing PS2 games 480p (progressive) and 240p gsm hdtv
viewtopic.php?f=25&t=30389
Post Reply